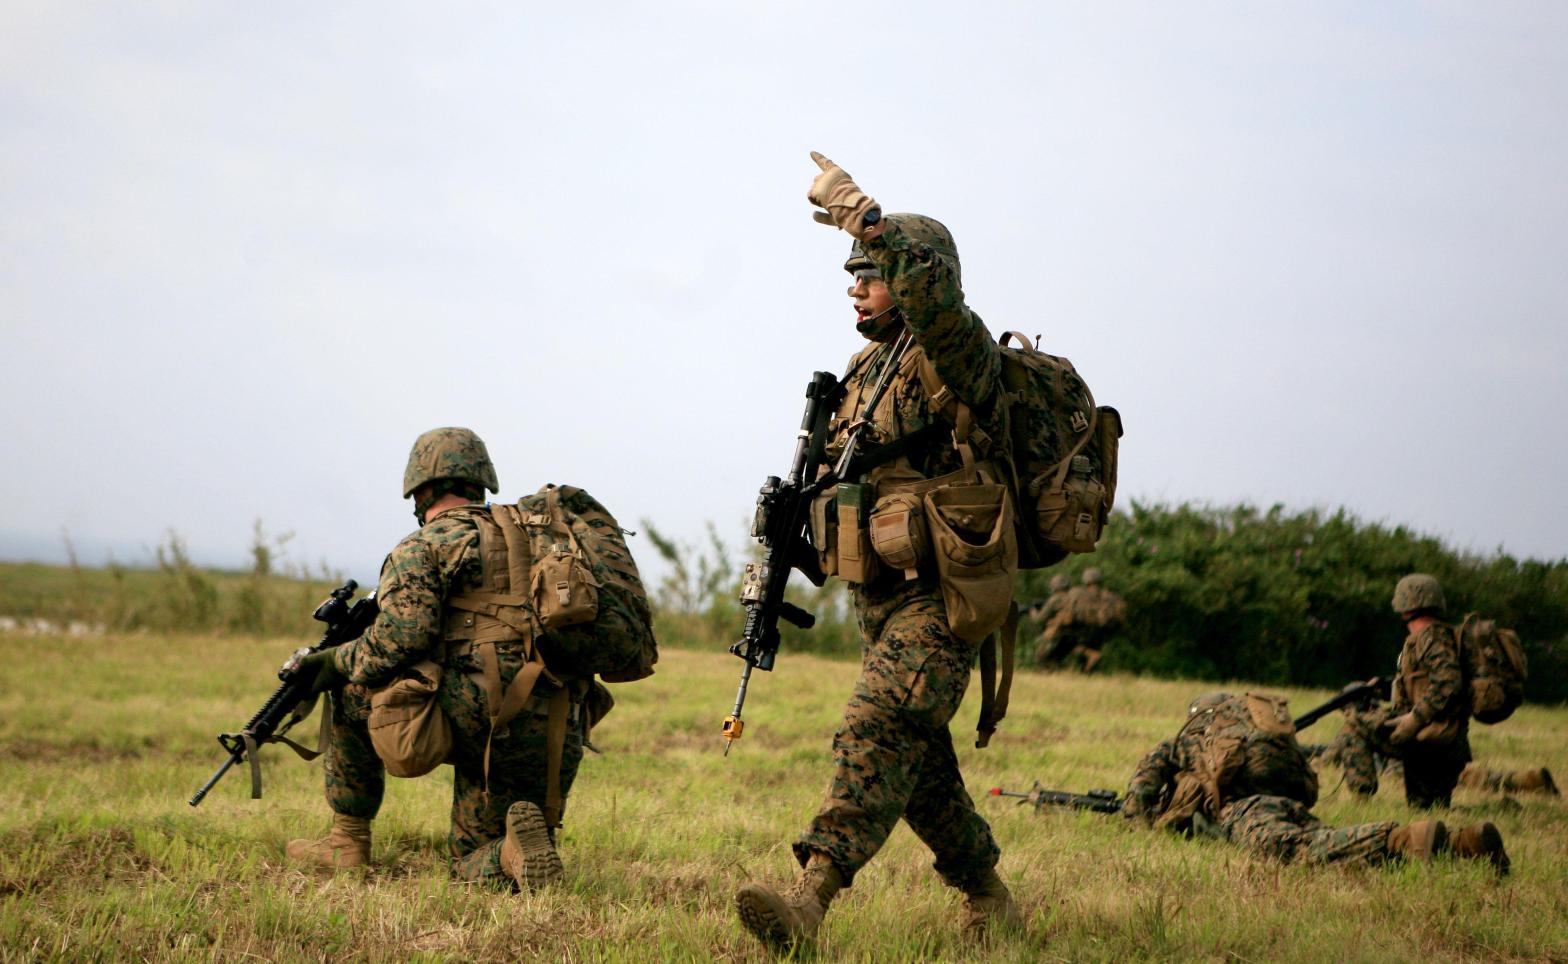
Gentlemen, it’s finally here! After over a year of refinement, scheduling conflicts, and prayer, I am pleased to announce that the long awaited Jäger Course is finally on the training schedule for May 8-13, 2023!
The Jäger Course is an immersive 5-day training event where you will survive off of only what’s in your pack, live in patrol bases, and learn how to conduct missions as unsupported light infantry. The entire week is spent outdoors simulating an extended patrol. Class starts Monday and ends Saturday morning with a warrior’s breakfast and awards ceremony.
Light infantry is supposed to be just that; light. Your pack should weigh no more than 45 pounds dry (without water) for this course while still holding everything you need for a week in the field. We tend to pack way too many items that we think are necessities but are really comfort items, making our packs weigh more than necessary. Take a hard look at your gear, find the unnecessary items, and trim the fat.
I do not intend to break anybody off during this course. That said, you will need to be prepared to hike with your rifle, kit, and pack for 2-3 miles a day. I will be monitoring students during this course for excessive fatigue, and I reserve the right to remove students from the class if I believe they are at risk of a heat-related injury. Don’t let this scare you, 2-3 miles with 45 pounds is easy, just make sure you practice beforehand to toughen up your feet a bit.
In Part I, I briefly covered how to use and zero weapon-mounted aiming lasers. Today I will discuss the tactics and techniques of night fighting, with and without lasers, in the face of an adversary who is similarly equipped.
Laser Discipline
Rule number one of wearing night vision is to not assume that you are invisible just because you’re wearing NVDs. Rule number two is to never assume that you are the only one with night vision.
We use IR lasers for aiming because they are visible through night vision. Any night vision, not just yours. It’s a different world than it was 10-20 years ago, and what was revolutionary new technology is now commonplace. Even a $100 gen-1 night vision scope will see an IR laser. This does not mean that your laser is useless, just that you must adapt your tactics.
We can minimize the inherent vulnerability of lasers by exercising laser discipline. This means only turning on your laser for the bare minimum amount of time necessary to fire a shot and turning it off immediately afterwards.
weapon up – laser on – fire – laser off- weapon down
Notice that you do not turn on the laser until your rifle is up and pointed towards the target, and turned off before lowering the weapon. Failure to do this will trace a line on the ground from you to the target and back again, revealing your location.
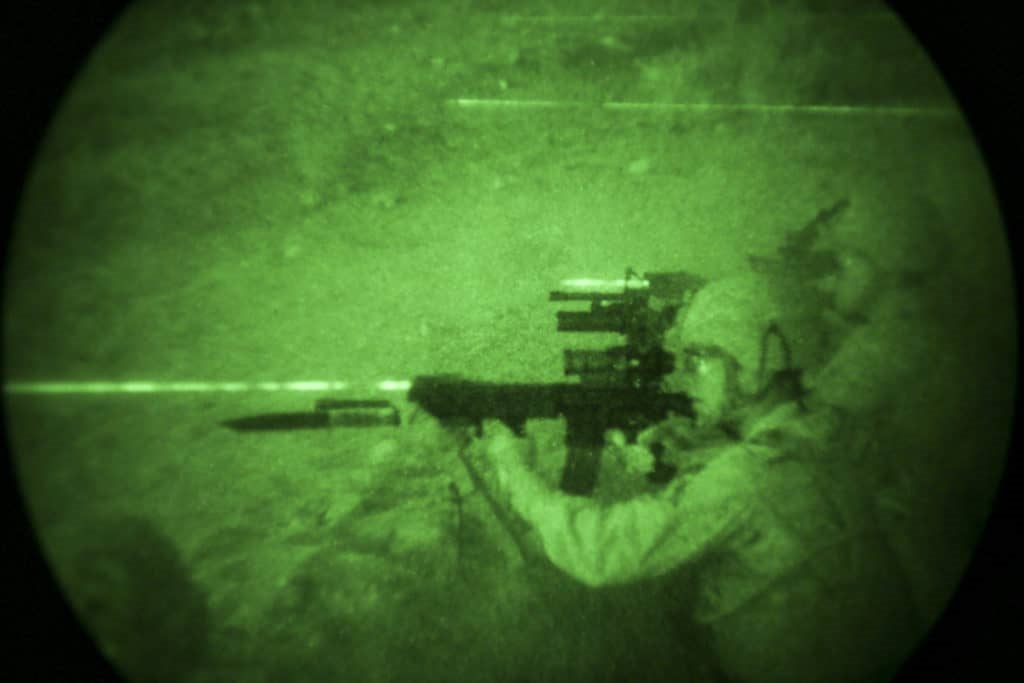
Laser discipline also means using your laser on low power for target engagement. For Class 1 civilian-legal lasers, this is not an issue since the laser is not capable of high power. However, if you have a full power (Class 3) PEQ-15, MAWL, or Perst-4, you should make sure your laser is on the lowest possible setting. This is because the high power setting will make the laser beam visible, where the low power setting only renders the aiming point “dot” visible. Observe the following examples;
A PEQ-15 on high power. Note how the full beam is visible, tracing a neat line all the way back to the shooter.
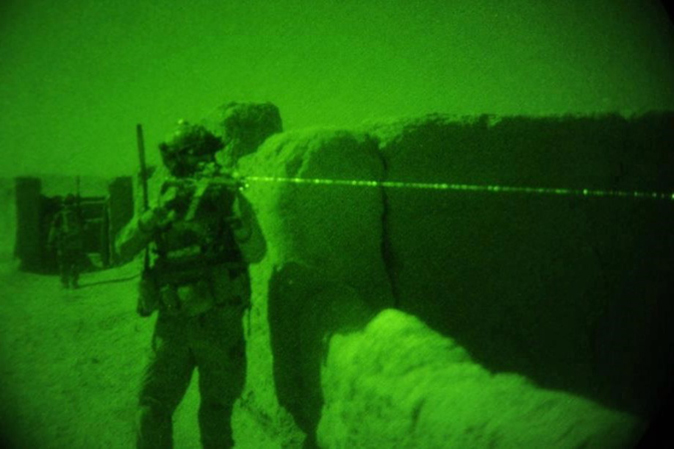
PEQ-15 on low power. The laser beam is no longer visible, although the point of origin has a slight glow. This shooter is much harder to target based on his laser beam.
This is not to say that there is no use for high-powered Class 3 lasers, just that you must be aware of the vulnerabilities inherent in their use. More on that in a bit.
Many laser units have an IR illuminator built in. This is essentially an IR flashlight that is paired with the laser to illuminate the target. I have personally never been in a situation where this was necessary, targets in dark rooms are plenty illuminated by the laser itself. Sure, you could use the illuminator to check dark areas, but that is bad practice in the face of a night vision equipped enemy.
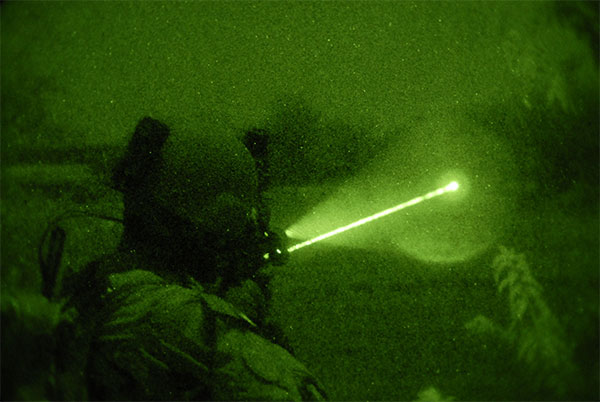
High power laser + illuminator. This shooter is broadcasting his position to anyone with an NVD, and this is bad practice on the modern battlefield.
Other Uses for Lasers
It is possible to use lasers to point things out to your teammates. However, this should be done very sparingly. Ideally, the only person to do this should be the team leader with a class 3 laser, and only in certain circumstances. A few examples of non-aiming uses for IR lasers are below:
Aiming skyward to indicate friendly positions (in dire circumstances only, this is a bad habit for non-emergency use).
Locating lost personnel (laser skyward at regular intervals until found).
These are but a few. Again, I emphasize that this sort of use should be balanced against the threat of compromising the patrol. The team leader should use his best judgment to determine whether it is worth the risk to use an aiming laser for non-aiming purposes.
Night Fighting with Lasers
By this time you should understand that lasers should be used sparingly. You cannot turn on your laser and leave it on all the time, we call this “lightsabering”. This is how you get your whole team killed.
One piece of sage advice that rings true in any sort of combat is “never be predictable.” When it comes to night fighting, this means not getting too comfortable in any one firing position. Even with good laser discipline, eventually the enemy will zero in on your muzzle flash and laser point of origin. If you stay put, firing repeatedly from the same position, you will be targeted.
The solution is simple. Move. Move in between every shot if possible, or every two shots at most. Combined with laser discipline, your night fighting cycle should be as follows;
Get into position – weapon up – laser on – fire – laser off
laser on – fire – laser off – MOVE
I once was an OPFOR roleplayer for a military training exercise. I was acting as a guerrilla sniper in an urban environment, harassing a platoon of US Marines. I used my laser for every shot, and used the above night fighting cycle. Just to make sure the platoon knew they were being sniped (firing blanks), I even set my laser so that the beam was visible. In the AAR for that exercise, the trainees said that they saw my laser but it was never visible long enough for them to find its point of origin. I always moved buildings after firing two shots, and they could never pinpoint my location to return fire or send a maneuver element after me.
Bottom line, this method works. Practice this night-fighting cycle on your own to get the muscle memory down.
Passive Aiming
Passive aiming (without a laser) is often preferred to active aiming (with a laser) because there is no beam pointing out your position. This is made possible by three methods: night vision scopes, clip-on night vision devices, and helmet-mounted night vision paired with a red dot.
Night vision scopes: Dedicated scopes for night engagement. These can vary in price from hundreds to thousands of dollars, with correlating variance in capability. These units normally do not allow daytime aiming without turning on the scope, so it’s best to use with a QD mount that holds zero (like AK side rail mounts).
Clip-on NVDs: These mount on your rifle in front of your day optic and allow you to use your day optic at night. Bear in mind that some clip-on NVDs will introduce parallax, and have a slightly different point of aim. If you use one of these, be sure to check your dope when using them. Then record it. Know your equipment.
Wearable night vision + red dot: This technique is perhaps the most cost-effective, but requires a night vision compatible dot to avoid damaging your NVD. A very effective setup I’ve seen repeatedly in class has been an LPVO/prism optic with a small dot mounted on top. This places the dot high enough to be easily viewed through helmet-mounted NVDs.
None of these techniques changes the night fighting cycle I listed above. You are still giving off muzzle flash, and you still need to move to avoid being targeted.
Other Night Fighting Considerations
Your muzzle flash is the number one thing that an enemy shooter will zero in on. You should take measures to mitigate it with a good flash hider or suppressor. Muzzle brakes have no place on fighting rifles, they enhance the flash so that you are both easier to target and temporarily blinded after each shot. Muzzle flash can also be hidden from the enemy through techniques such as loophole shooting and firing from deep inside of rooms.
Weapon-mounted flashlights have limited utility. If using a laser compromises your position, shining a visible flashlight is MUCH worse. Mind, I’m not talking about home defense or concealed carry, I’m talking about light infantry style combat. In this context, the only acceptable use for a visible weapon light is clearing structures, and even then, caution must be exercised. In Iraq, US forces clearing structures with white lights often took fire from other buildings because the enemy saw the lights through windows and knew that Americans were there.
White lights should not be mounted to weapons during rural patrolling. The risk of someone accidentally triggering their light on patrol is too great to risk it. Once you get tired you start to get lazy and stop paying attention to how you hold your weapon and accidentally hit the pressure switch. I don’t care how many safeties are on your light, the risk is still present and the consequences too high. My white light has a quick-detach mount so I can store it in my butt pack, mounting it to my carbine only when necessary.
Summary
This article covered a lot. We learned that laser discipline is critical and that movement is key to our survival. We discussed passive aiming techniques and the basics of night fighting. Finally, we discussed some general tips for night fighting.
At this point you may be wondering which is better, laser or passive aiming? I say that although passive aiming is superior, you should have both capabilities. There are just some things that a laser can do that passive aiming cannot, like get reliable hits from awkward shooting positions (i.e. prone, twisting around inside vehicles, etc.) and inflict a frustrating psychological effect on your enemy. I personally run both capabilities, with a red dot mounted above my 3x prism and a Perst-4 on the front of my rifle.
Whatever you choose, make sure you practice with it. Whether it be a laser, passive aiming, or even a weapon light, practice the night fighting cycle I mentioned above. Movement is key to making yourself harder to target. If you cannot be targeted, you cannot be hit.
Practice makes perfect, and training enables good practice. I’ll be adding more classes to the spring 2023 training schedule in the next few weeks, including the long-awaited Jäger Course. Stay tuned! Email me to sign up for a class.
Night vision devices (NVDs) are game-changing pieces of kit. The ability to see in very low light situations is invaluable, but the military discovered that it is almost impossible for troops to use their weapon sights while wearing NVDs. This is when weapon-mounted lasers came into being. We’ve come a long way since the PEQ-2 and iron sights, and we are seeing a shift in doctrine regarding how we fight in the dark. Today I will briefly discuss weapon-mounted lasers and how to use/zero them. Part II will cover tactical employment on the modern battlefield.
Intro to Weapon-Mounted Lasers
The whole point of weapon-mounted lasers is to enable aiming through NVDs. The basic principle is to shoulder a weapon, place the laser dot/beam on the target, and fire. Most laser units come with two lasers; a visible red or green laser, and an infrared (IR) laser that is only visible through NVDs. Some units also come with an IR floodlight to assist in target ID in very low light.
The visible laser is only used to zero the IR laser, and should never be used in combat. There is simply no good reason to do so, it gives away your position when you could have used another means of aiming. The best units have the visible laser “slaved” to the IR laser, meaning that zeroing one zeroes both. More on that later.
Civilian-legal lasers (Class I) are limited in power, to the point where you can only see the dot and not the beam (unless there is smoke, fog, etc.). Mil-spec aiming lasers (Class III) such as the Russian Perst models and US surplus PEQ models are also capable of high power, which is enough to see the beam of the IR laser clearly through NVDs. There are advantages and disadvantages to both, as I’ll discuss later.
Zeroing the IR Laser
There two basic types of laser zeros; converging and parallel.
Converging Zero
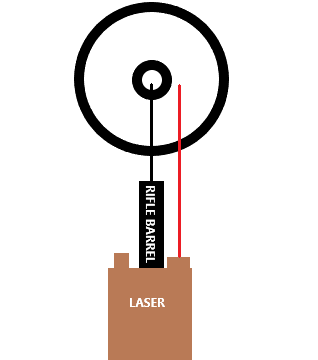
The converging zero has the laser sighted such that it intersects the bullet’s trajectory at a certain range, normally 50m or less. The downside to this is that, apart from that specific range it is zeroed for, it is very difficult to know what your hold is because the laser gets further away from the point of impact the further you get from the zero range.
Parallel Zero
The parallel zero has the laser sighted to be as close to parallel to the bullet’s trajectory as possible. What this means is that, in order to hit the center of the target, we must aim slighly off to one side with our laser. The advantage of this zero is that our hold doesn’t change horizontally with distance, enabling us to make hits from 10m to about 300m, (about as far as you can normally ID targets through night vision). This is the preferred type of zero for lasers.
My Laser Zeroing Technique
I have a very simple yet effective method of zeroing lasers that I teach to students in class. All that is required is a rifle with daytime sights (scope, red dot, iron sights) that are already zeroed. This method works for any model of laser and any caliber of rifle. Full disclosure, I didn’t invent this technique, it was passed on to me by a combat instructor some time ago whose name I have forgotten.
For units with the visible laser slaved to the IR laser
First, set up a target at 200m in low light with an illuminated center (I tape a chemlight to the middle of a target. Setting up a flashlight illuminating the target also works.) Get into a supported prone position so that your rifle is as stable as possible. Next, activate your visible laser and aim at the target through your day optic/sights. You should see your laser somewhere in your optic. What you do next is adjust the zeroing knobs on your laser until it lines up with the 200m aiming point in your sights.
For units with IR laser only, or visible laser not slaved to the IR laser
This is where it gets a bit tricky, and you need a friend with an NVD. Same as before, you get into a solid prone position and aim at the illuminated target/chemlight with the 200m aim point in your reticle. Meanwhile, your buddy kneels next to you with his NVD. Once you are set, he will look where the IR laser is and make adjustments so that it is shining onto the chemlight. When he’s done, recheck your aim point and ensure that you are still aiming at the target with the 200m point of your reticle.
Once you’ve done this, you’re finished. As long as your day optic is zeroed properly, now so is your laser. Test it out on some steel targets. On human silhouettes, you should be able to just put the laser about center mass and get a hit. Sure, it’s offset by an inch or two, but that hardly matters if you’re hitting somewhere center mass. For smaller targets (foxes, rabbits, human heads), you will need to use your offset because that inch or two counts.
The reason we do 200m is because it gets us as close to parallel as we can without shooting bullets on a cardboard target and checking it. For any weapon from 9mm PCCs to AR-15s to FALs, the bullet’s trajectory between the shooter and 200m only deviates by a few inches unless you’re using subsonic ammo. Using this technique, I have been able to get consistent hits on half-sized human silhouettes out to 250m. I might get it to work farther than that, I just haven’t tried yet.
Another reason for the 200m zero is because, at night, you can’t positively ID targets beyond about 300m anyway. Not with wearable NVDs in normal lighting conditions at least. Therefore, this zero is plenty sufficient for your night fighting needs.
Summary
Today we covered why aiming lasers exist and how to zero them. In Part II, I will discuss considerations for using lasers in a tactical environment where your opposition also has night vision, basic night fighting, and alternative night engagement techniques.
Suppressors/silencers earn a lot of public attention due to their use in Hollywood and video games. And while most people know what they are, very few people have ever shot a suppressed firearm or fully understand what they can and cannot do. I have been running suppressors on some of my rifles for the past couple years, and have learned a lot about them in the process. Today I will discuss what suppressors do, pros and cons of using them, and what to look for in a heavy-use combat suppressor.
What Suppressors Do
Sound reduction depends on the type of gun, suppressor, and bullet. Despite what Hollywood shows, most of the time it is not hearing safe. Suppressors, by themselves, reduce the sound of the “pop” of gases escaping from the muzzle by redirecting the gas inside of the can. The bullet itself, however, is still moving faster than the speed of sound, thus creating a mini “sonic boom” as it flies. The only way to get rid of that noise is to use special subsonic loads with muzzle velocities under 1,122ft/sec. Some bullets are naturally subsonic, like .45 ACP, making them ideal for suppressed firing.
There is a myth floating around that “silencers make your gun less accurate.” This is not at all true, and stems from video games which make your gun less accurate or powerful when you attach a silencer (a balancing mechanic so that not everybody uses silencers in the game). Some suppressors actually make your gun more accurate because they can increase the muzzle velocity of the round, the suppressor functioning as an extension of the barrel. You do, however, lose a lot of range when using subsonic ammunition.
Pros
Suppressors make the shooter harder to locate, and in more ways than one. As I mentioned in a previous article, “Rates of Fire for the Rifleman“, if you can’t see the guy shooting at you then you look for muzzle flash and muzzle blast (the shockwave at the muzzle kicking up dust or moving foliage while shooting). Suppressors reduce (and in many cases eliminate) both of these in addition to the sound of the shot. So if you’re on the receiving end of suppressed rifle fire, you will hear the supersonic crack of rounds flying past you, but you will have a damn hard time locating the guy shooting at you.
Suppressors make communication under fire much easier. Guns are noisy, gunfights are very noisy. When you’re trying to call out targets to your buddy, you must yell over the sound of your guns, often several times before he hears you. Anyone who has ever done live fire-and-movement drills knows what I’m talking about. Suppressors on your weapons make it much easier to hear your team leader yelling out commands and spotting enemies. This is especially true in an urban environment where you will often be shooting inside of structures or vehicles, which is deafening without suppressors.
Cons
Weight. Suppressors add weight to the front of your rifle, making it slightly more unwieldy. This means you’ll have a harder time holding your gun up for extended periods at a time. On the bright side, recoil is more controllable and you have less muzzle movement in rapid fire.
Length. Suppressors make your gun 4-8 inches longer depending on the model. This can get in the way if you’re already rocking a 16-20″ barrel. It’s not a fun time banging your weapon on doorframes and catching on brush in the woods. This is why I prefer my fighting carbines to have 10-14.5″ long barrels.
On semi-auto rifles, suppressors will blow gas back into your gun and face. This is annoying/uncomfortable to the shooter, and makes the gun very dirty. This is due to more gas blowing back into the system instead of making noise at the muzzle. Expect about twice the carbon in the action of your AR-15 when running a suppressor. This can be fixed with an adjustable gas block/piston. Another option is “flow through” suppressor models, which are designed to mitigate overgassing at the cost of less noise reduction.
When suppressors are appropriate
As with every other piece of kit, your mission will dictate whether or not a silencer is a good idea. That said, in my opinion and experience, the pros far outweigh the cons in most circumstances. Being harder to locate in a gunfight is a huge advantage, and I’m willing to carry a little extra weight if it means less bullets heading my way. The following examples are the only times I would choose not to use a suppressor.
Vehicle-borne operations. In vehicles, I need to be able to maneuver my weapon in some very confined spaces. I’m not as worried about hiding, I just need rounds on target fast.
If I am the automatic rifleman for my team. If I’m employing an automatic rifle, I want the enemy to know it and keep his head down. In his book “Recce” (excellent reading), Koos Stadler talks about his time in the South African “Recce” small teams. In the book, he says that every 2-man team had one silenced and one non-silenced weapon because when they were trying to break contact they wanted the enemy to know they were being shot at. By the way, I have a class this November where I teach how to use this kind of weapon.
When I am on guard duty. If something happens while I am standing my post and I have to engage an intruder, I want the entire camp/homestead/patrol base to wake up and be alerted by my shots. Radios may fail, but gunshots are unmistakable signals of danger.
That’s pretty much it. In every other scenario I can imagine, the pros of suppressors far outweigh the cons.
Which suppressor to buy
This ultimately depends on the purpose of the can. Ultimately, the trade-off is between weight and durability. If you plan to use it on a dedicated sniper/DMR weapon, you may want to choose a lighter suppressor. If you just want to slap it on your workhorse carbine, you should prioritize durability over weight savings. The safest way to do this is to get a suppressor that is full-auto rated.
Another consideration is the caliber of the suppressor. When it comes to rifles, you will naturally want to choose the can that is made for your caliber of rifle. If you want to use one suppressor on multiple guns, you may choose to go with a larger caliber suppressor. It is possible to shoot smaller calibers through larger diameter suppressors, you just lose a little bit of noise reduction.
Finally, consider the attachment method. There are two general categories: direct thread and quick-detach. Direct thread suppressors thread directly to the muzzle of your gun and represent the lightest option that doesn’t require extra hardware. However, repeatedly attaching and removing the suppressor will wear down your threads faster. Quick-detach suppressors require a compatible muzzle device (flash hider, brake, or compensator) to screw/lock onto. While heavier, this allows you to attach and remove the can at will, in the field, without requiring tools. If you plan to use your suppressor on multiple guns, you need some kind of QD mount.
My recommendation
The best performance for your rifle will be a suppressor that is specifically designed for that caliber and style of shooting. However, if you want the most flexibility out of a single suppressor that you can use on multiple rifles, I recommend getting a .30 cal suppressor that is full-auto rated and uses a quick-detach mounting system.
I personally own a Griffin Armament Recce-7. With compatible muzzle devices on all my rifles that shoot bullets beginning with 7.62 or .30, I can move the can from rifle to rifle at will without tools. It is full-auto rated, so I can safely use it with any of my workhorse AKs as well as my long-range precision rifles. And since it is a .30 cal suppressor, I could use it with 5.56 rifles if I so desired (because .223 is smaller than .30). The amount of flexibility that this one suppressor gives me is incredible.
Summary
Hopefully this was enough to give you an idea for just how useful suppressors can be. If you take away nothing else from this article, let it be that suppressors are force-multipliers that are well worth the investment. The fact that they make you harder to see/target while enabling you to communicate with your teammates is plenty of reason to want one on every fighting rifle you have. If you heed my recommendation, you should be able to purchase one silencer and have it work on all of your rifles, saving you money for more ammo and training.
Anyone who studies small-unit tactics has to acknowledge one thing; they require a small unit to work. It’s been said before by myself and others in the training community repeatedly that you need to network and establish a group. Implied within that statement is that someone within that group must step up in a leadership role to provide direction and guidance to the groups efforts, or else nothing is accomplished. Without leadership, a group of friends remains just a group. With leadership, you can develop a group into a team.
Groups vs. Teams
The difference between a “group” and a “team” is purpose. A group of friends who only talk about politics and share pictures of their gun collections will never accomplish anything because they don’t have a goal to work towards. A team of like-minded individuals has a mission, and everything they do contributes to that mission. A group may go shooting together, a team conducts drills to meet a standard. A group may spend hours chatting about what they would do when SHTF, a team conducts an area study and develops contingency plans.
All is not lost for the group, however. Any mere group can become a team in one critical moment. All it takes is for one man to stand up and say “Enough talking. Let’s make ourselves a force to be reckoned with and start training.” If enough of the group gets behind that one man and settles on a purpose, the group has now become a team and that man has become their Team Leader.
Responsibilities of the Team Leader
Once the Team Leader has assumed his position, he must consider his new-found responsibilities to the team. The team leader’s responsibilities can be summed up below:
Managing the team. In “garrison” (non-combat), the team leader is responsible for assigning roles and responsibilities to team members in accordance with their strengths, skill sets, and ability. In combat, he must maintain control of the team’s fire and movement. The team leader’s most potent weapon is not his rifle, it is the men under his charge. He must become skilled at wielding this weapon.
Training the team. Just as a rifleman is responsible for cleaning and maintaining his rifle, the team leader is responsible for ensuring that his “weapon” is in the highest possible state of readiness by coordinating, facilitating, and leading training events. There are two basic types of training events:
Individual Training Events; Training that teaches or reinforces individual skills.
Collective Training Events; Training that gets the team working together.
Taking care of the team members. The team leader must look out for the well-being of his people, both in and out of combat. Personal relationships with teammates are a necessity. A team leader should know everybody’s home situation, their cares, and their concerns. On patrol, the team leader should take care of his men by setting up a sleep schedule, ensuring that everyone has enough water, and being aware of anything in general that affects the welfare of his people.
The Problem
The good news is that this nation is awash with “groups” of people with their hearts in the right place. The bad news is that most will never acquire a sense of purpose until the enemy is at their doorstep. So what keeps them down? The answer is that nobody is willing to step up and assume the role of Team Leader.
There are many reasons for this. For some it’s the time commitment. For others it’s a lack of mental courage. And for many, it’s simply a lack of self-confidence. Many people, especially those with no military/LE background, don’t believe that they have what it takes to lead. Or they don’t know how or what to start training on.
One thing to understand is that you don’t need to be a tactical genius to start giving your team direction. You can be a completely green civilian with no training background and still convince your people that you all need training. If you are not capable of running the training yourself, find someone who is and coordinate getting your team to train with them. For example, I’m not a medical specialist, so I don’t lead combat first aid training for my team. Instead, I coordinate getting my people to someone who is an expert in that field so we can get the best training possible.
Bottom line, you don’t need to be tactically proficient to get a team started. You just need to get the ball rolling to make your people see that they need organization and training. Everything else will fall into place from there.
Summary
Hopefully by this point you understand the difference between a casual group of friends and a focused team with a mission. If nobody in your friend group has taken up the torch of leadership to ensure that you are actually ready to handle danger when it comes, it falls to you. Be the one to get your friends thinking and talking about organization, planning, and training. You cannot afford to wait for someone else to do it, so pick up the torch and lead on.
If you would like some guidance to help you on your leadership journey, I have a class for that. Team Leader I teaches everything you need to know about how to organize a team, plan and lead training events, and coordinate maneuver with a team of shooters. Once you finish Team Leader I, you leave with the confidence and the skills to go back to your group and give them the purpose and training they need to become a cohesive team. Nobody else offers a course like this, and my students’ reviews speak for me.
If you look at a photograph of a squad of US Marines, you will see that everyone has the same uniform, weapons, optics, and load-bearing equipment (excluding special weapons like automatic rifles). This is partly due to logistical simplicity of the military buying a single piece of kit for everyone, and partly due to effectiveness on the battlefield. If you need to use your buddy’s weapon, you can because it’s exactly like yours. If you need to strip ammo and radios off of your buddy so he can be MEDEVAC’d, you know where everything is because your gear is set up the same way.
For the Minuteman/prepared citizen, however, it is not always feasible to achieve this level of uniformity. This does not mean that the concept is discarded, just that we need to take a different approach when working with other volunteers in a team. In this article I will describe the advantages of standardization, how to approach this topic with your team, and a list of goals to strive for.
Why standardize
The first benefit of standardizing a given piece of gear is logistics. Gear breaks, gets lost, or gets used up all the time, so if you need to replace something it is much simpler to have everyone stock up on spares of the same item. This applies to consumable items like ammunition, batteries, water filters, etc.
Another benefit is the ability to use your teammates’ gear. If everyone has the same water filter and yours gets clogged, you can borrow your teammate’s filter and already know how to use it. This applies to items that have a learning curve to operate, such as weapons, optics, radios, etc.
Finally, standardizing how gear is set up allows us to retrieve something from each others’ packs/vest without hunting for it. If you left your packs at the ORP and you get told to grab your buddy’s extra water from his pack, you can retrieve his canteen from his pack without using a flashlight to hunt for it, which would give away your location.
I must note here that there is a point where standardization can go too far. I have been in many a unit where uniformity was enforced purely for uniformity’s sake, with no gain in combat effectiveness. In fact, I have seen cases where it actually detracted from our combat effectiveness, forcing everyone into a cookie-cutter standard that didn’t work well for anyone. If you seek to impose a standard on your group, it had better yield a tangible benefit that you can explain to your people. This brings us to the next topic; getting your people on board.
How to sell standardization to your group
Notice I used the word “sell.” That’s right, in an all-volunteer group of minutemen, you can’t force anyone to do anything. People tend to be resistant to change, especially when you are asking them to fund that change out of their own pocket. This means that you need to practice good leadership and get them to want to make the changes you are proposing.
First, don’t propose a ton of change all at once. You need to approach this gradually, one standard at a time. Start with something simple and cheap, like having everyone’s IFAKs in the same place on their kit. That one’s an easy sell because everyone should already have an IFAK, and the argument of “if you get shot, I need to know how to find your chest seal” is quite compelling. Once everyone agrees to that, you can slowly move on, one “great idea” at a time.
Second, you need to be willing to make changes yourself, not just demand them from others. If all you do is insist that everyone buy the same stuff you already bought, people will start to think that you’re just trying to validate your own purchases (because you are). This is how you lose your group. It helps if you are willing to show your commitment to standardization by replacing something you have with something that one of your teammates has. Lead by example.
Third, have open group discussions on the topic. Allow your people to make suggestions and have friendly debate on what to standardize and how. Don’t ever make a unilateral decision regarding gear unless it is something that risks getting you killed (like a cheap NVG with an always-on IR flood). If your people feel like they have a say in the goings-on of your group, they will stick around. The moment they lose that feeling is the moment you lose your team.
Finally, understand that you will not win every battle. Sometimes people are stubborn, or they can’t afford the fancy gadget you want them to buy. Learn to recognize what battles are not worth fighting, and move on. If you can get some people to your side but not all, that’s okay too. Over time, peer pressure has a silent way of getting the holdouts to make the changes you want without you looking like a jerk.
Realistic goals for a Minuteman/Jäger team
Ammunition and Magazines: Standardizing weapons is unrealistic; everybody loves to put their own personal flair on their weapons, and every shooter is different. However, if everyone’s guns take the same bullets, then you can use each others’ ammo stockpiles when you can no longer make a run to the gun store. Magazines are critical as well. If you conclude a gunfight on a patrol and one guy has a single mag left, the team leader needs to be able to redistribute ammo so that everyone has about the same number of rounds. This is especially true if you have an automatic rifleman in your team.
Rifleman’s kit contents: You should try to set a minimum amount of gear that everyone has on their kit to ensure that the whole team has at least the rifleman’s essentials. Don’t be too specific, but try to maintain a minimum amount of kit so that nobody shows up for a patrol without something critical like water or a tarp. Don’t try to have everybody get the exact same chest rig/plate carrier, you will lose that battle. Focus instead on the contents of everyone’s rigs.
Medical gear location: As I stated earlier, this is probably the most important thing to standardize. Your personal IFAK and tourniquets are for you, not to use on someone else. If you use your tourniquet on your buddy and then you get shot, you are screwed. Make sure everyone has their medical gear in the same place on their kit. Tourniquets (at least 2) should be reachable with both hands, and not buried in an admin pouch. Once you get everyone on the same page here, take it a step further and have everyone get the same exact IFAK with the same contents. While you’re at it, make sure everyone knows how to use everything in your IFAKS.
Radios: This is not critical, but it is beneficial. If your designated radio operator goes down, everybody in the team should be able to grab his radio and use it effectively. If you all have different radio models, you can work around this if you train with each others’ radios. However, it is much simpler if everyone uses the same device.
Other consumables: Batteries are a big one, especially radio batteries. Same as ammunition, if you run out of AAs for your NVG you can get some from your teammate. If your light, laser, etc. uses some exotic non-rechargeable battery, you’re SOL when you run out. By the way, you should carry enough extra batteries to replace all the batteries in your gear at least once. For example, if you have a PVS-14 (1x AA), a headlamp (2x AA), and a Baofeng with a battery pack (4x AA), you should have at least 7x AAs in a ziploc bag somewhere on your kit.
Clothing: I may step on some toes here, so I’ll keep it blunt. If you’re all wearing the same thing, it greatly reduces the chance of a friendly fire incident. However, it also makes it easier for the enemy to positively ID you as targets. Having a uniform technically makes you a “privileged combatant” under the Geneva Conventions if you are captured, but you would be relying on your captors giving a damn about the Geneva Conventions. Consider the threat you face wisely before deciding to throw on military fatigues.
Summary
Hopefully at this point you see the benefits of having some level of standardization in your group. I would like to caveat by saying that these are ideals, and not always possible. At the end of the day, when you step outside the wire to patrol, you take the team that you have, not the team that you want. That said, you have a responsibility now to make yourself as ready as possible for when that day comes.
If you or your friends are just getting started acquiring gear, I wrote a guide for what you should get and in what order so you can make the most of your limited funds. Another great way to figure out if your gear works well is to take it to a class. Get training now while you can still afford to travel. God only knows what will happen in the coming months.
Last week I posted an article about thermal camouflage. In that article I mentioned the use of mylar GI Casualty blankets to hide a static position. However, this is more than simply draping the blanket on top of you, there is an technique that must be applied. Today I will show you my method of rigging a mylar blanket so that it meets my requirements in the field, as listed below:
It must conceal my thermal signature from air and ground sensors, regardless of how long I’ve been underneath it.
It must be visually camouflaged from air and ground observation.
It must not cause me to overheat when spending several hours under it.
It must be easy to set up and tear down quickly (under 5 minutes).
It must also serve as a shelter from wind, rain, and cold if necessary.
The following technique is the result of my personal experimentation over the last couple of years. The finished product you see here has been tested thoroughly against handheld and airborne thermal cameras.
Visual Camouflage
Let’s start with the tarp itself. Rothco GI Casualty Blankets (and similar products) are green on one side and reflective on the other. As the name implies, they are meant to keep casualties warm during MEDEVAC. They are made of mylar and plastic, with metal grommets in the corners.
The green side, while not silver, is still reflective. It is also a solid color, which is troublesome. It does us little good being completely hidden from thermals when a drone pilot can easily see a large green rectangle. So we must visually camouflage the tarp.
I bought some mossy oak camouflage netting from Wal-Mart for about $20. Then I laid it out on top of the tarp and cut it so that the dimensions matched, saving the extra material for later. To attach it to the tarp, I simply used zip ties to affix it to the grommets in the corners.
This single layer of mesh was better than solid green and even got rid of the sheen from the plastic material. However, I wanted to create more of a 3D effect. So I took the extra material from earlier, cut it into strips, and zip tied that in random splotches on the existing mesh. I made sure to bunch it up as I went to get as much of a 3D “bushy” effect as possible.
However, the solid green tarp was still very distinct through the single layer of mesh. To fix this, I hit the tarp with some splotches of tan spray paint underneath the netting. I chose not to spray paint the whole thing due to some people saying that paint caused the material to flake. I have yet to experience this and it may be possible to paint the entire tarp. However, this result turned out to be so effective that I see no reason to change it.
Setup
In order for the tarp to work, it must be suspended at least 12″ above me. Any closer and it will collect my body heat, allowing my thermal signature to shine through. Additionally, I want to use this tarp as a shelter so I can carry less weight. To accomplish this, I used the same knots as I do with the Royal Marine Rig. But this time instead of an A-frame, I modified it so that it suspends from two trees at opposite corners with the remaining two corners held down with stakes/sticks in the ground.
This modified A-frame allows me to lie down in the center and stash my pack on one side of me, completely covered. I always make the tarp as low as possible while allowing me to lie underneath with 12″ of airgap. There is plenty of air circulation which not only keeps me from overheating in summer, it ensures that the tarp does not absorb my body heat and remains the same temperature as the surrounding environment (i.e. invisible to thermals). I am also protected from rain. If I need protection from wind, I can lower one side by moving the stake.
In winter, I need more protection from the cold. To accomplish this I simply string up a piece of paracord between two trees and drape this over top in a traditional A-frame. This reduces air circulation but traps in more heat.
Position Improvement
In the picture above, you will notice that there are crisp straight edges around the outside of the tarp. Since nothing naturally occurs with perfectly straight edges, we must attempt to blur them out.
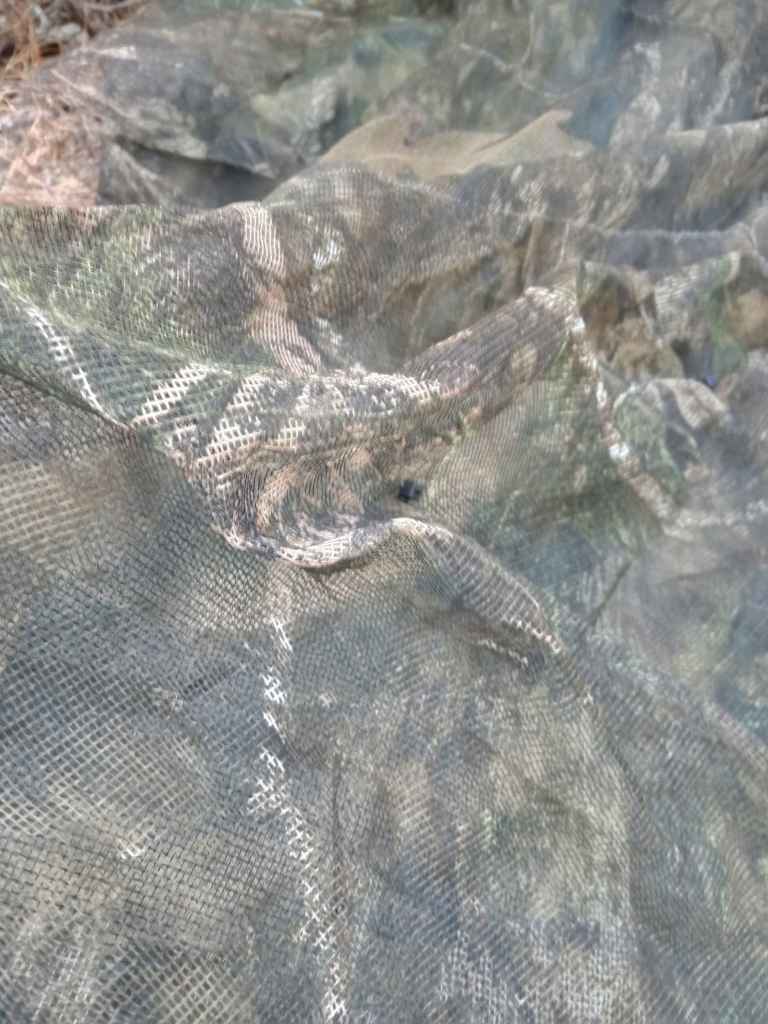
In Summer there is a lot more green on the ground here, so this isn’t as much of an issue. But now that we’re entering fall, I need to go to more effort to blur the green edge against the brown forest floor. One way that we can do this is by adding more netting to the edges so that it drapes over the side. We can also add natural vegetation as shown below.
You can see how even just a little bit of vegetation makes the near side more indistinct than the far side.
Summary
This technique is the most effective means of thermal camouflage I’ve encountered without buying a $400 blanket. When used with the knots from the Royal Marine Rig, I can set up this shelter in 2 minutes and pack it away in 30 seconds. As I stated earlier, I have reached this point after years of testing and modifying this design. It has proven to be effective at making me completely invisible to thermal optics, including testing with military drones.
A word of caution here. These mylar tarps are not incredibly sturdy and can tear if you yank them around. That said, they’re still rugged enough for field use, and small tears can be fixed in the field with duct tape and zip ties. I recommend you buy at least 2 of them for when one inevitably rips. When that happens, it’s a simple matter of cutting the zip ties on the old one to move the camo mesh to the new tarp, and then re-tying a few knots.
This whole project costs about $50, making it an extremely cost-effective way to hide from multi-thousand dollar thermal cameras. I dub this technique “The Jäger Rig”, and it is a permanent part of my kit on a patrol. Anytime I am at an extended halt, observation post, or overnight position, I set up overhead thermal camouflage. The modern battlefield is changing, and almost anybody can get their hands on some form of thermal optic if they really want to.
This is by no means the only way to do this. Badlands Rifleman has another method that works for him. I encourage you to get out and experiment to find other ways to set up thermal camouflage. If you find a better way to do it than mine, share it in the comments or, better yet, bring it to a class so I can help you test it!
The term “combined arms” conjures up images of tanks advancing with aircraft screaming overhead and infantry charging in front. While this is one modern, conventional form of a combined arms technique, it is far from the only one. And just because the modern Minuteman has limited types of arms available does not mean that he cannot still adopt a combined arms approach to combat. All that is required is a little creativity, knowledge, and the proper training.
“Combined arms is the synchronized and simultaneous application of arms to achieve an effect greater than if each arm was used separately or sequentially.”
In this sense, the term “arms” means any form of weapon, combat vehicle, or unit. On a large scale your “arms” could be an infantry regiment and a fighter squadron. On a small scale, it could be a machine gun and a grenade launcher. You get the idea.
The way that combined arms works is by employing each “arm” in such a way that if the enemy seeks to protect themselves from one arm they become vulnerable to the other. This creates a devastating effect on the enemy, who finds themselves with few good options. The following are some conventional examples of combined arms in practice:
Tanks advancing with infantry support in front. Enemy machine gun emplacements which would target the infantry are destroyed by heavy shells from the tank, and enemy anti-tank soldiers must expose themselves to the infantry to fire their weapons.
A defensive position with machine guns, riflemen, and grenade launchers. Enemy attacking along avenues of approach are cut down by the machine guns. If they attempt to flank the machine gun positions, they take accurate rifle fire from the foxholes surrounding the gun. And if the enemy tries to hide in a ditch where bullets can’t reach them, the grenadier can lob high explosive projectiles into it.
Guerrilla/light infantry use of combined arms
The concept of combined arms is not exclusive to conventional militaries. Scaled down to the small-unit level, irregular forces throughout history have found ways to employ what arms they had in a well-rounded approach to combat.
In the first Chechen war in the 1990s, Chechen rebels often employed 3-4 man teams with whatever weapons they had available. Whenever possible, each team had 1 sniper, 1 machine gunner, and 1 RPG gunner. The sniper was normally the team leader, and positioned his team such that they could protect him after he got off his sniper shot on an enemy officer/tank crewman/radio operator. The machine gunner would fire at the rapid rate to suppress enemy infantry, and the RPG gunner was there to engage any Russian armor that attempted to maneuver on them. The goal was not a protracted firefight, it was to hit and run. This combined arms approach made these independent, loosely controlled “hunter killer” teams very effective.
In the 18th-19th Centuries, German and Austrian Jägers fought with 3 sections (called glieds) of troops. The first two glieds had muskets, while the third glied had the experienced marksmen armed with rifles. The riflemen were deployed to inflict casualties in the enemy ranks, while the musketmen held their fire until charged. The musketmen were there to protect the riflemen from close-in fighting, as rifles were slower to reload and could not have bayonets affixed. An enemy who attempted to get down to cover was picked off by the sharpshooters. An enemy who charged was met with (relatively) rapid-firing muskets and bayonets.
Options for the Modern Minuteman
At this point you may be thinking that this doesn’t matter to us as private citizens because all we have is rifles. This is not true, however. There are many different options for “arms” available to us without any special permits or tax stamps. All that is required is a little creativity and different methods of employing our people and their weapons. The following are some different weapons-related roles that we can adopt with what’s currently available to us.
Designated marksmen: The designated marksman is assigned the role of engaging enemy command and control personnel. This includes enemy leaders and radio operators. If possible, this man is equipped with an accurized rifle and/or quality ammo capable of better accuracy than the rest of the squad.
Automatic riflemen: The autorifleman lays down a base of fire, rapidly suppressing the enemy through his ability to fire accurate bursts. Despite the title, this weapon does not need to be fully automatic to fill this role. I wrote an article here detailing what an autorifle does and how to set up a rifle for this role.
Anti-Materiel Rifle (AMR) gunners: An AMR is a .50 BMG rifle designed to target enemy equipment (materiel) as opposed to personnel. I believe that this is a critical tool to have because, at present, it is the only reliable means we have of fighting armored vehicles and hardened fortifications. .50 BMG rifles are big and heavy, and best used in a dedicated 2-man team of shooter and spotter. I wrote one article on the uses of AMRs here and another on tactics and employment here.
Electronic Warfare specialist: This role is fairly new, but quickly becoming the norm. With both Russia and Ukraine pushing handheld EW weapons to the tactical level and the USMC trying to re-write the structure of a rifle squad to include one EW specialist per squad, it is clear that this sort of role is here to stay. And yes, this counts as “arms” because the military classifies EW effects as “fires” the same as mortar rounds and artillery barrages. The EW specialist is responsible for jamming enemy communications, jamming drones, and monitoring hostile comms. I must note here that it is currently illegal in the USA to actively jam transmissions of ANY kind.
Drone pilot: While commercial drones are most often used for surveillance, the fact that they are being used by both sides in the Ukraine war right now to drop bomblets or grenades on each other earns them a spot on this list. With this common off the shelf technology, anybody can provide their own air support.
The Combined Arms Squad
So you may be wondering right now how to incorporate these different “arms” into a squad. And the answer is that it depends on the threat that you are facing. I would, however, recommend that every 3-4 man fire team be equipped with an automatic rifle. In the absence of belt-fed weapons, having one guy with a heavy barrel and extended mags who can lay down some hate and discontent can be a real lifesaver.
Everything else is mission-dependent. I would love to lay out a model squad with one of each of the specialists listed above, but the truth is that as a civilian you will almost never have that many people working together at once. You will also not need every form of “arms” on every mission, so it’s best to save weight. The best way that you, the modern Minuteman, can use a combined arms approach is to assess the threat you are facing. Determine what the enemy capabilities are, and plan your loadout accordingly.
TheCombined Arms Squad in Practice
Picture a Chinese “Red Dawn” scenario. A group of Minutemen fighting as guerrillas decide to ambush a Chinese supply convoy in the enemy’s rear area. The squad leader sets into a “T” shaped ambush at a bend in the road, deploying his squad in a line formation perpendicular to the approaching convoy. Meanwhile, the security team positioned on the next hilltop stands by with a drone operator, an EW specialist, and two riflemen for security.
The EW specialist sets up his directional yagi antenna facing the approach avenue of the convoy. Past experience has shown him that the enemy would routinely call up a certain intersection as a checkpoint over the radio when convoys passed through it. Lazy planning on their part, and he was happy to exploit it. He didn’t know much mandarin, but by now he could recognize the name of the checkpoint.
Upon hearing the checkpoint call over the radio, the EW specialist notifies the security team leader. The drone pilot, who had been waiting for this trigger, launches his aircraft and flies it towards the oncoming convoy. Simultaneously, the security team leader notifies the squad leader that the enemy is approaching.
In a few minutes, the drone pilot has eyes on the convoy. He confirms the number and type of vehicles and backs off to keep his distance. Meanwhile the EW specialist pulls out his compass, shoots an azimuth to the enemy HQ, aims his directional yagi antenna that way, and waits.
As the convoy comes into view, the squad waits patiently for the lead vehicle to get to within 200m of the ambush. As the lead vehicle, an armored car with a turret, passes a rock on the side of the road, the AMR gunner with his .50 BMG rifle initiates the ambush with a single shot into the driver. It’s an easy shot from head-on. The armor-piercing round easily slices through the “bulletproof windshield”, smashes the steering column, and rips the driver of the lead vehicle in half. The lead vehicle swerves to the edge of the road into a tree, bringing it to an abrupt halt and causing the rest of the convoy to slam on the brakes.
Instantly, a dozen things begin happening at once. The designated marksman with his AR-10 picks off the turret gunner before he can recover from the crash, silencing his DShK heavy machine gun for good. The squad’s two automatic riflemen begin raking fire up and down the sides of the convoy, deterring any dismounts from bounding into the treeline where they would have cover. The riflemen armed with carbines begin placing aimed, accurate fire into the second vehicle’s unarmored cab, and picking off any dismounts as they scramble to get out of their vehicles.
Upon hearing the unmistakable sound of the .50 cal firing, the EW specialist taps the screen of his tablet. His directional yagi antenna, aimed at the enemy HQ, begins jamming the convoy control frequency by blasting “The Star Spangled Banner” into the ears of the enemy radio operator. This active jamming of the receiver ensured that they wouldn’t hear any call for help from the ambushed convoy, and due to the directional antenna, the convoy wouldn’t know that their HQ was being jammed.
Realizing the predicament they are in, the other armored car in the rear of the convoy tries to maneuver around the trapped trucks to provide some covering fire on the automatic rifles. As soon as he drives into view of the ambushers, he catches a round of .50 BMG API to the face, deleting his head. As the vehicle grinds to a halt, the designated marksman places another well-aimed shot into the blue helmet of the turret gunner, silencing him.
As the action starts to wind down, the drone maneuvers closer to watch for clusters of enemy in defilade. He spots a fire team hiding behind the hulk of an armored car, and carefully drops a captured Chinese grenade into the middle of the group. After checking for other survivors, the drone returns to its LZ for recovery. Once the squad leader has determined that the enemy is no longer offering resistance, he sends his maneuver element to sweep through the kill zone and eliminate any last holdouts.
Summary
In the example above, every time the enemy attempted to respond to one threat, he exposed himself to another. Staying on the road meant getting shredded by the autorifles. Pushing into the treeline meant getting picked off by riflemen. Hiding in defilade exposed them to air attack from the drone. And maneuvering an armored vehicle into position exposed it to the AMR gunner. This is the heart of combined arms. Giving the enemy no good options to work with by using different weapon systems together in one beautiful, deadly harmony.
If you would like to learn how to use some of these weapons more effectively, my Support Weapons Class will teach you how to employ autorifles and .50 BMG rifles effectively. Whether you own one of these weapons or not, learning how to employ them in a tactical context is valuable knowledge for anyone who might find themselves working with other Minutemen in the future. The next Support Weapons Class is November 19-20, email me or fill out my contact form to register.
In February of this year I wrote an article about the history of Jägers and light infantry. In that article I advocated that American patriots become students of light infantry tactics and operating methods. However, over the last several months it has come to my attention that there are several misconceptions floating around about what light infantry is, what role they play, and what roles they don’t. This article seeks to clear up some of the confusion and clarify exactly how and when light infantry tactics should be applied.
The US Military claims to have several formations of “light infantry.” The claimed distinction is that these units are not “mechanized infantry” (that is, infantry that operates out of armored fighting vehicles), and are therefore “light.” However, the absence of vehicles alone is not enough to make a true light infantry unit. The tactics, training, and even mission set of these units are often very similar if not the same as their mechanized brethren, which technically makes them line infantry. Lind writes;
“…the essential difference between [line and light infantry] remains. It is not easily observed because it is an intangible factor: the mentality of the light infantrymen.”
“…the correct meaning for the term “light” is not the American notion of weight, but the European concept of agility and operational versatility.”
Lind goes on to say that light infantry does not rely on supporting arms or overwhelming firepower. Stealth, mobility, and adaptability are the hallmarks of true light infantry. Their operations are characterized by deep penetration into enemy rear areas, operating (at least for a time) mostly independent of any logistical trains. True light infantry will resupply off the land whenever possible to stretch their packed rations and water.
By these criteria, the only true light infantry units in the US Military today are US Army’s 75th Ranger Regiment, 10th Mountain Division, and USMC Force Reconnaissance Companies. However, the Commandant of the Marine Corps is taking steps towards converting entire Marine regiments into true light infantry (in the form of “Marine Littoral Regiments”) to prepare for fighting a numerically superior Chinese force.
The role of light infantry
Let’s take a look at how light infantry has been used throughout history.
The first light infantry units were probably the Greek Hoplites, who in ancient times would harass an enemy’s flanks and rear while the line infantry went to work on the main enemy formations.
In the Seven Years War, the American Revolution, and Napoleonic Wars, light infantry and Jägers were used in addition to regular infantry to skirmish with enemy outposts and draw resources away from the main fight.
The intent for the new Marine Littoral Regiments is to conduct shaping and supporting operations enabling a successful naval campaign in the Pacific.
Noticing a trend? The role of light infantry is to conduct aggressive harassing and shaping operations in support of a main effort conducted elsewhere by conventional forces.
The bottom line is that the conventional, military use of light infantry is to shape the battlefield such that the main effort can do their job better. In order for Jägers to conduct missions behind enemy lines, someone must be in a foxhole holding those lines in the first place.
Relevance in a WROL scenario
Now that we know what light infantry is and that they exist to support a main effort, we can begin to translate this to the paradigm of an armed prepared citizen. If you are at your homestead/farm/bug-out location, the defense of that location (more specifically, the defense of your family) is your main effort. You must have a “conventional force” of defenders dedicated to accomplishing that mission. Once you have that in place, you can begin to use your own “light infantry” to leave your perimeter and conduct operations that support your mission of defending your loved ones. Here are some examples of supporting missions that your “Jägers” could conduct:
After setting up defensive positions you notice a hill that overlooks your location. You regularly send a security patrol to the hill to ensure nobody is observing your defenses from there.
You send out a patrol to make contact with the folks holed up in the trailer park down the road so you can collaborate on area defense (note how this operation is non-combative in nature, but still supports your mission).
After receiving intelligence on a gang that is using a farmhouse as a base for raiding local homes, you send a scout team to establish an observation post to confirm the information so you can ambush the raiders.
You get the idea. Sitting static in a defense is not a smart way to accomplish your mission. You need to be proactive in conducting reconnaissance of your area to engage bad actors before they get within rifle range of your family. In so doing, you are conducting shaping and supporting operations that support the main effort of defense.
Summary
Today we looked at what light infantry actually is and how it is used in a conventional sense. Then we took the concept of light forces supporting a main effort and applied it to a WROL scenario. It is important to note that although we can draw certain parallels between professional light infantry and our “light infantry,” we must remain aware of the differences. All military doctrine is written within the paradigm of “acceptable” numbers of casualties, so use discretion when applying it. I strongly recommend Joe Dolio’s Tactical Wisdom book series for an excellent guide that balances proven military techniques with the reality of operating as an unsupported group of civilians.
That said, simply reading about tactics is not enough to master them. You need to get training in person with your people so you can practice working as a team. If you would like to know how to run your own training events, I have a class for that. My Team Leader Class series gives you all the tools you need to run your own training, plan missions, and lead a group of riflemen in a tactical environment. The window is closing to register for Team Leader I on October 1-2, so email me to reserve your spot!
Warfare, be it foreign or domestic, is changing. The modern battlefield is saturated with sensors of all types from drones to night vision to electronic warfare. As this technology becomes more and more available/affordable to civilians, even irregular warfare is evolving. In order to survive the ever-changing nature of war, we must adapt along with it.
Particularly impactful is the common availability of thermal optics. Thermal optics, which read heat signatures, are incredibly potent tools. Although somewhat cost-prohibitive, they are no longer as unobtainable as they once were and can be had for under $2000 in some cases. It is safe to assume that any large-scale civil conflict will see at least some use of thermal optics on both sides, so we must be prepared for this reality.
In order to learn how to deal with a thermal-equipped enemy, we must first understand the technology we are dealing with.
What thermal sensors can do
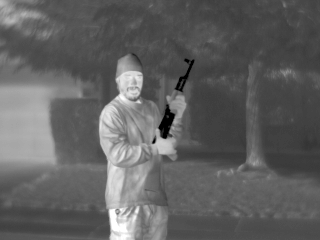
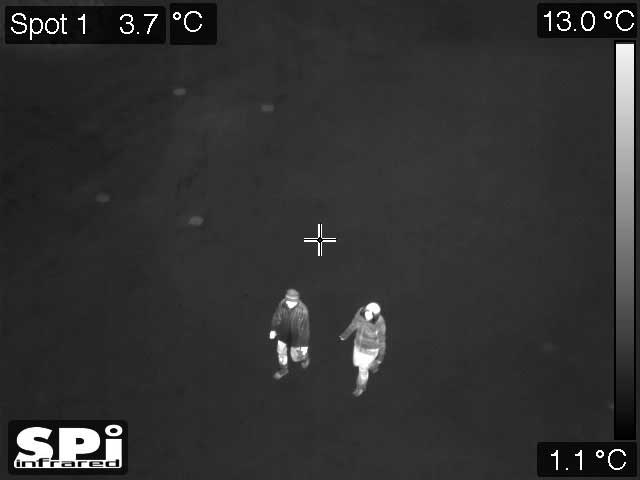
Thermal optics read differences in temperature within a given field of view and convert that information into a visible color image with different colors representing different levels of heat. The most common palette is “White Hot,” which shows hotter surfaces as white with everything else in a scale of grey to black.
Notice how the person’s skin and clothes are white (hot) and everything else is greyscale. The black (cold) rifle clearly has not been fired recently or it would be brighter.
This ability to read purely heat energy allows thermal optics to see things that the naked eye or night vision optics would miss. Thermal optics can:
-See through smoke/fog -Detect clothes that have absorbed body heat (most clothing) -Identify vehicles that have been driven recently -In some circumstances such as snow, see recent footprints -Detect moving people very easily -Work both day and night
One more point I should add here is that it is fairly simple to hide from someone on the ground equipped with thermals. Hiding from airborne thermals in small drones and aircraft, however, is a bit trickier because you are forced to think in 3 dimensions for your camouflage.
What thermal sensors cannot do
Thermal optics are not the “eye of Sauron” as some have put it. They have limitations just like any other piece of equipment. Some limitations include:
-They cannot see through glass. -They cannot see through solid objects such as leaves and branches. -Battery life is incredibly short, making constant observation very difficult without a large power source. -Most handheld/drone mounted units are limited to 200-300m detection range for man-sized heat signatures. There are exceptions, but this is true for the majority of sub-$4k thermal optics on the civilian market. State or state-backed actors have access to more powerful units with greater detection ranges, especially when mounted on vehicles. -A human must observe the image and determine what he is seeing. Humans are fallible, and human nature can be exploited.
How to hide from thermalon the move
At the time of this writing, there is no thermal-defeating uniform or poncho that you can buy. The one company that makes a wearable poncho that effectively masks thermal signature does not sell to civilians.
That said, there are still some effective low-tech ways to conceal yourself from a thermal-equipped enemy. It is important to remember that people are not the only things that generate heat. Rocks, moist ground, and roads retain heat from sunlight for several hours after dark. Recently operated vehicles, certain buildings, and wild animals also read as “hot” to thermal sensors. Also remember that behind the thermal optic there is a human trying to find you. You don’t need to completely block your heat signature,you just need to make yourself indistinguishable from any other random heat signature in the area to fool that human behind the sensor.
Thermal optics cannot see through leaves and branches. So planning a patrol to take you under dense tree cover whenever possible is a good idea to evade airborne sensors. Areas of dense brush accomplish the same thing against ground sensors. If the foliage is thick you could be completely hidden. If it’s not, it may still mask your shape enough to obscure you from an enemy observer. Natural vegetation and jute on a ghillie suit/ ghillie blanket/ cobra hood also does not absorb body heat, and will remain the same temperature as your environment. Applying enough of it in the right places makes your signature as a human unrecognizable, both to visible and thermal optics. So veg up.
The biggest giveaway of a human through thermals is our shape. It is very easy to PID a human that is standing or walking through thermals, even from a distance. However, doing something as simple as crouching or bending over to make your shape more ambiguous can do a lot when you’re being viewed from a distance.
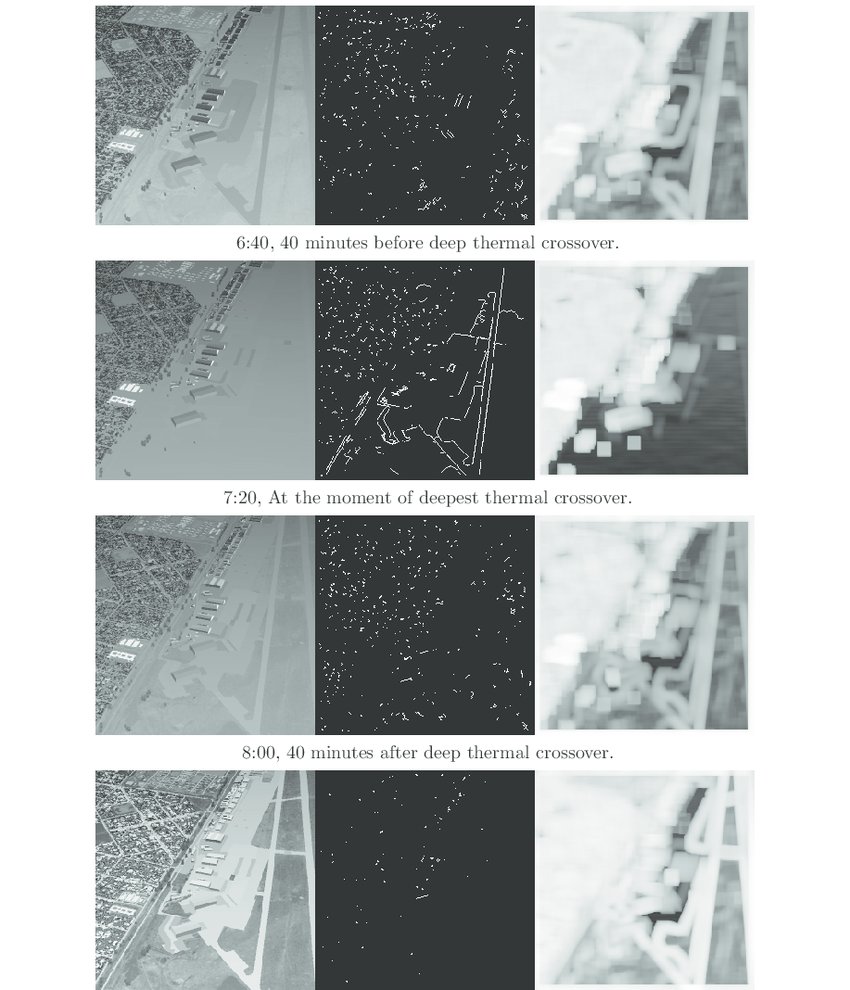
There are certain times in the day when thermal observation is more difficult. One such time is during a phenomenon called “thermal crossover.” Thermal crossover is when the temperature of the terrain drastically shifts twice a day around sunrise and sunset. The average temperature of human skin is 91 degrees Fahrenheit, so if the temperature is higher than that during the day there will come a time when the terrain is about the same temperature as your skin. This makes it much more difficult to detect you, so you should plan your movement during this time if at all possible. Thermal crossover normally lasts roughly 30 minutes before and after sunrise and sunset, depending on your environment. You can estimate the actual time by watching for when the temperature gets close to 91 degrees.
The images on the left are viewed through a thermal imager. Note how thermal crossover “grays out” everything as the temperatures become uniform.
Thermal crossover may not work in cooler climates/seasons for obvious reasons. All is not lost, however. In cooler climates we tend to wear more layers of clothing. The more layers you wear, the colder your heat signature is because less heat is escaping your body.
Note how the heavy jacket on the left reads cold. If this man was wearing more layers on his legs and had a hood on over his hat, he would have even less of a thermal signature.
Some forests also tend to retain heat for hours into the night due to the insulating effect of the canopy. This means that in a forest, apart from thermal crossover, the best time to make movement is the early hours of the night while the ground still reads hot. How long this lasts depends on your environment, but I’ve seen it last until 0300 in some cases. Go out into your environment with your own thermals to get an idea of how long heat is retained.
Hiding from thermals while stationary
Hiding from thermals while stationary is significantly easier. However, there are still some precautions that you should take. If you are paying attention to events in Ukraine right now, you likely have seen a ton of drone footage of artillery strikes or air strikes on static positions. Another common trend is both sides dropping munitions on each other from the drones themselves. This is what happens when a static position (foxhole, LP/OP, patrol base, etc.) is not camouflaged from the air. The Ukrainians seem to be especially bad at this, making large and obvious trench lines that are impossible to miss from above.
The moral of the story is this. On the modern battlefield, to be detected is to be targeted, and to be targeted is to be killed. This applies to potential civil conflict as well. During some force-on-force events, I’ve seen drone operators drop water balloons on each other for a fun game of hide-and-seek. If you think that a civil conflict won’t see different sides dropping IEDs on each other, think again. Cartels are already doing this to each other on our Southern border. Any static position, no matter how temporary, must be camouflaged from the air, and that includes thermal.
First, hiding under tree canopy is preferable. You should also set up overhead concealment. If you use a tarp by itself, eventually that tarp will absorb some of your body heat and you will show through as a human-sized, human-shaped heat signature. It’s even worse if you drape the tarp directly on top of you, which does nothing at all after a minute or two.
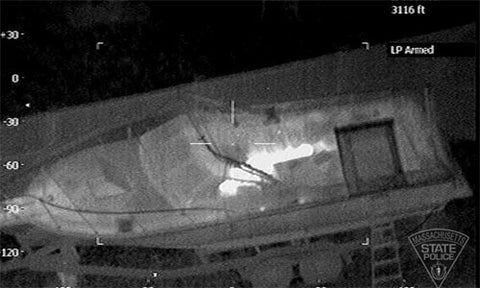
The Boston Bomber hid in this boat during his manhunt. Note how even though there is a tarp over him, you can clearly make out a human-shaped heat signature.
The solution is to use a mylar space blanket or tarp. The reflective qualities of the mylar will not absorb your heat as long as there is at least a 12″ air gap between it and your body. This is important. Simply draping a mylar tarp on your body will transfer your body heat directly to it and it will do nothing to hide you, so you must find a way to suspend it over you.
GI casualty blankets off Amazon are pretty good for this. They have one reflective side and one green side. They even have grommets in them so you can suspend them between two trees/poles above you as with a tarp for a shelter. However, even the green side is still a bit reflective, and the grommets are somewhat weak. Badlands Rifleman attaches his to the underside of a USMC surplus tarp which is camouflaged. If you do that, all you must do is set up a lean-to, a-frame, or Royal Marine Rig with the tarp over your position, and you are completely masked from overhead thermal observation. I have a slightly different solution, which I will demonstrate in a future article.
I can personally attest that these GI Casualty blankets work incredibly well. When I was active duty, I had the opportunity to test one suspended 12″ over me as I lay in the prone. I was under that tarp all night, and in the morning one of our military-grade drones flew over me looking down with its thermal camera. I was completely invisible to it. I stuck out my leg so the pilot knew he was looking at the right spot, and only the exposed leg was visible through the sensor.
For more permanent positions, overhead cover made of logs, sandbags, and earth also blocks thermal imagers. In an urban environment, close the glass windows so thermal optics can’t see into your building.
Summary
Warfare is constantly changing. We must keep up with new developments if we expect to have a chance of surviving any future conflict. Thermal sensors, while potent, can still be defeated with a little bit of fieldcraft. Be aware of the threat and start training now. If you have your own thermals, go outside and experiment with them. Get an idea for what in your local area retains heat and could mask your thermal signature. Grab a buddy and try hiding from each other. If you don’t have thermals, come to a class and I’ll be happy to help you learn what works and what doesn’t. Registration for Team Leader I on October 1-2 ends this Saturday, so hurry up and shoot me an email to reserve your spot!