
Last week I posted an article about thermal camouflage. In that article I mentioned the use of mylar GI Casualty blankets to hide a static position. However, this is more than simply draping the blanket on top of you, there is an technique that must be applied. Today I will show you my method of rigging a mylar blanket so that it meets my requirements in the field, as listed below:
- It must conceal my thermal signature from air and ground sensors, regardless of how long I’ve been underneath it.
- It must be visually camouflaged from air and ground observation.
- It must not cause me to overheat when spending several hours under it.
- It must be easy to set up and tear down quickly (under 5 minutes).
- It must also serve as a shelter from wind, rain, and cold if necessary.
The following technique is the result of my personal experimentation over the last couple of years. The finished product you see here has been tested thoroughly against handheld and airborne thermal cameras.
Visual Camouflage
Let’s start with the tarp itself. Rothco GI Casualty Blankets (and similar products) are green on one side and reflective on the other. As the name implies, they are meant to keep casualties warm during MEDEVAC. They are made of mylar and plastic, with metal grommets in the corners.

The green side, while not silver, is still reflective. It is also a solid color, which is troublesome. It does us little good being completely hidden from thermals when a drone pilot can easily see a large green rectangle. So we must visually camouflage the tarp.
I bought some mossy oak camouflage netting from Wal-Mart for about $20. Then I laid it out on top of the tarp and cut it so that the dimensions matched, saving the extra material for later. To attach it to the tarp, I simply used zip ties to affix it to the grommets in the corners.

This single layer of mesh was better than solid green and even got rid of the sheen from the plastic material. However, I wanted to create more of a 3D effect. So I took the extra material from earlier, cut it into strips, and zip tied that in random splotches on the existing mesh. I made sure to bunch it up as I went to get as much of a 3D “bushy” effect as possible.
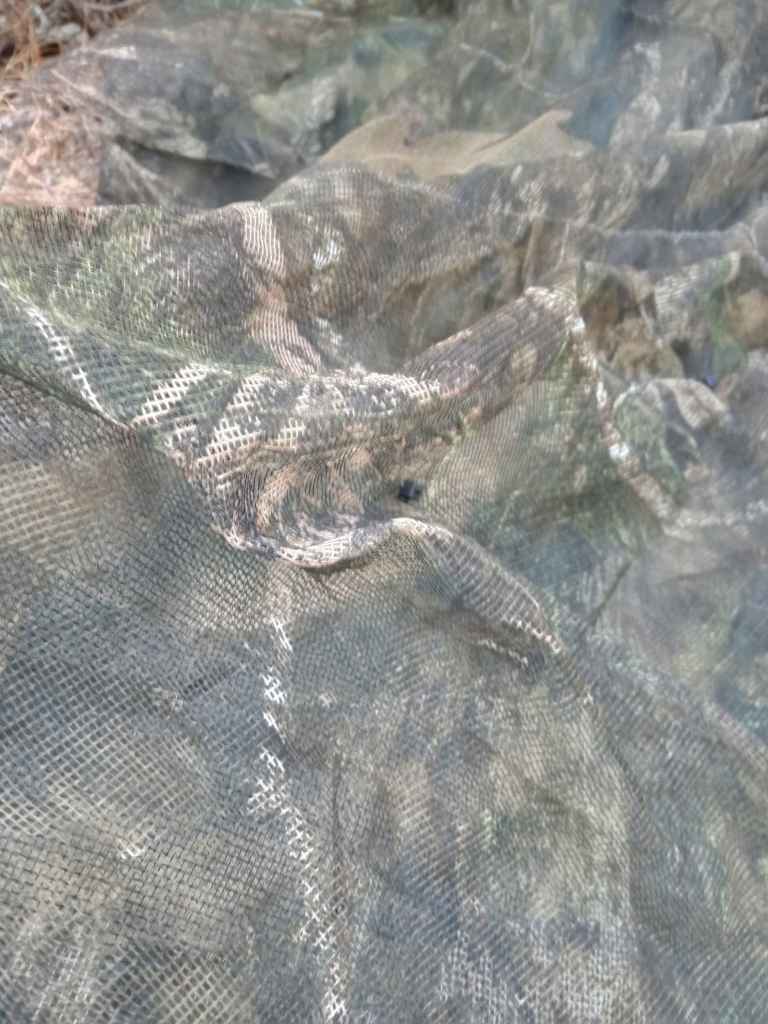
However, the solid green tarp was still very distinct through the single layer of mesh. To fix this, I hit the tarp with some splotches of tan spray paint underneath the netting. I chose not to spray paint the whole thing due to some people saying that paint caused the material to flake. I have yet to experience this and it may be possible to paint the entire tarp. However, this result turned out to be so effective that I see no reason to change it.


Setup
In order for the tarp to work, it must be suspended at least 12″ above me. Any closer and it will collect my body heat, allowing my thermal signature to shine through. Additionally, I want to use this tarp as a shelter so I can carry less weight. To accomplish this, I used the same knots as I do with the Royal Marine Rig. But this time instead of an A-frame, I modified it so that it suspends from two trees at opposite corners with the remaining two corners held down with stakes/sticks in the ground.


This modified A-frame allows me to lie down in the center and stash my pack on one side of me, completely covered. I always make the tarp as low as possible while allowing me to lie underneath with 12″ of airgap. There is plenty of air circulation which not only keeps me from overheating in summer, it ensures that the tarp does not absorb my body heat and remains the same temperature as the surrounding environment (i.e. invisible to thermals). I am also protected from rain. If I need protection from wind, I can lower one side by moving the stake.
In winter, I need more protection from the cold. To accomplish this I simply string up a piece of paracord between two trees and drape this over top in a traditional A-frame. This reduces air circulation but traps in more heat.
Position Improvement
In the picture above, you will notice that there are crisp straight edges around the outside of the tarp. Since nothing naturally occurs with perfectly straight edges, we must attempt to blur them out.
In Summer there is a lot more green on the ground here, so this isn’t as much of an issue. But now that we’re entering fall, I need to go to more effort to blur the green edge against the brown forest floor. One way that we can do this is by adding more netting to the edges so that it drapes over the side. We can also add natural vegetation as shown below.

Summary
This technique is the most effective means of thermal camouflage I’ve encountered without buying a $400 blanket. When used with the knots from the Royal Marine Rig, I can set up this shelter in 2 minutes and pack it away in 30 seconds. As I stated earlier, I have reached this point after years of testing and modifying this design. It has proven to be effective at making me completely invisible to thermal optics, including testing with military drones.
A word of caution here. These mylar tarps are not incredibly sturdy and can tear if you yank them around. That said, they’re still rugged enough for field use, and small tears can be fixed in the field with duct tape and zip ties. I recommend you buy at least 2 of them for when one inevitably rips. When that happens, it’s a simple matter of cutting the zip ties on the old one to move the camo mesh to the new tarp, and then re-tying a few knots.
This whole project costs about $50, making it an extremely cost-effective way to hide from multi-thousand dollar thermal cameras. I dub this technique “The Jäger Rig”, and it is a permanent part of my kit on a patrol. Anytime I am at an extended halt, observation post, or overnight position, I set up overhead thermal camouflage. The modern battlefield is changing, and almost anybody can get their hands on some form of thermal optic if they really want to.
This is by no means the only way to do this. Badlands Rifleman has another method that works for him. I encourage you to get out and experiment to find other ways to set up thermal camouflage. If you find a better way to do it than mine, share it in the comments or, better yet, bring it to a class so I can help you test it!
Semper Discens.

Reblogged this on The Tactical Hermit.
LikeLike
Dave Canterbury has a video on reinforcing these tarps so they last longer. https://www.youtube.com/watch?v=TB_L4V8dRac&t=1s Works good, can use different colors to break up shapes.
LikeLike
Persistent aerial surveillance systems equipped with multispectral and hyperspectral imaging systems are not uncommon since GWOT. They are a cast iron MotherF’er to hide from, at least in open or semi open terrain like the arid regions of the world. Find you some surplus SAAB UlCANNS USGI military surplus camo netting to replace the chicom glowie Walmart camo mesh. It obscures you from multiple spectra of light (UV, visible, near infrared, medium wave infrared, and long wave infrared. It is also billed as being able to camouflage you from GMTI airborne Synthetic Aperture Radar and ground based surveillance radar systems, as long as you do not move. Don’t be symmetrically shaped or smooth surfaced or else the computer software of these systems will flag you as a possible target of interest.
It’s easily distinguished from the older style USGI camo netting by it’s much finer black mesh backing and distinctive larger flatter pieces of colored scrim attached to the mesh netting.
LikeLike