
Night vision devices (NVDs) are game-changing pieces of kit. The ability to see in very low light situations is invaluable, but the military discovered that it is almost impossible for troops to use their weapon sights while wearing NVDs. This is when weapon-mounted lasers came into being. We’ve come a long way since the PEQ-2 and iron sights, and we are seeing a shift in doctrine regarding how we fight in the dark. Today I will briefly discuss weapon-mounted lasers and how to use/zero them. Part II will cover tactical employment on the modern battlefield.
Intro to Weapon-Mounted Lasers
The whole point of weapon-mounted lasers is to enable aiming through NVDs. The basic principle is to shoulder a weapon, place the laser dot/beam on the target, and fire. Most laser units come with two lasers; a visible red or green laser, and an infrared (IR) laser that is only visible through NVDs. Some units also come with an IR floodlight to assist in target ID in very low light.
The visible laser is only used to zero the IR laser, and should never be used in combat. There is simply no good reason to do so, it gives away your position when you could have used another means of aiming. The best units have the visible laser “slaved” to the IR laser, meaning that zeroing one zeroes both. More on that later.
Civilian-legal lasers (Class I) are limited in power, to the point where you can only see the dot and not the beam (unless there is smoke, fog, etc.). Mil-spec aiming lasers (Class III) such as the Russian Perst models and US surplus PEQ models are also capable of high power, which is enough to see the beam of the IR laser clearly through NVDs. There are advantages and disadvantages to both, as I’ll discuss later.
Zeroing the IR Laser
There two basic types of laser zeros; converging and parallel.

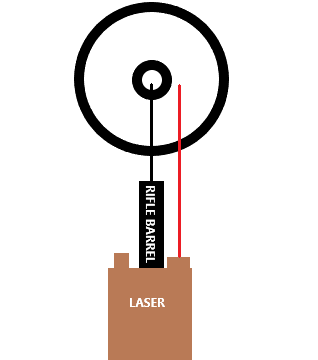
The converging zero has the laser sighted such that it intersects the bullet’s trajectory at a certain range, normally 50m or less. The downside to this is that, apart from that specific range it is zeroed for, it is very difficult to know what your hold is because the laser gets further away from the point of impact the further you get from the zero range.
The parallel zero has the laser sighted to be as close to parallel to the bullet’s trajectory as possible. What this means is that, in order to hit the center of the target, we must aim slighly off to one side with our laser. The advantage of this zero is that our hold doesn’t change horizontally with distance, enabling us to make hits from 10m to about 300m, (about as far as you can normally ID targets through night vision). This is the preferred type of zero for lasers.
My Laser Zeroing Technique
I have a very simple yet effective method of zeroing lasers that I teach to students in class. All that is required is a rifle with daytime sights (scope, red dot, iron sights) that are already zeroed. This method works for any model of laser and any caliber of rifle. Full disclosure, I didn’t invent this technique, it was passed on to me by a combat instructor some time ago whose name I have forgotten.
For units with the visible laser slaved to the IR laser
First, set up a target at 200m in low light with an illuminated center (I tape a chemlight to the middle of a target. Setting up a flashlight illuminating the target also works.) Get into a supported prone position so that your rifle is as stable as possible. Next, activate your visible laser and aim at the target through your day optic/sights. You should see your laser somewhere in your optic. What you do next is adjust the zeroing knobs on your laser until it lines up with the 200m aiming point in your sights.
For units with IR laser only, or visible laser not slaved to the IR laser
This is where it gets a bit tricky, and you need a friend with an NVD. Same as before, you get into a solid prone position and aim at the illuminated target/chemlight with the 200m aim point in your reticle. Meanwhile, your buddy kneels next to you with his NVD. Once you are set, he will look where the IR laser is and make adjustments so that it is shining onto the chemlight. When he’s done, recheck your aim point and ensure that you are still aiming at the target with the 200m point of your reticle.
Once you’ve done this, you’re finished. As long as your day optic is zeroed properly, now so is your laser. Test it out on some steel targets. On human silhouettes, you should be able to just put the laser about center mass and get a hit. Sure, it’s offset by an inch or two, but that hardly matters if you’re hitting somewhere center mass. For smaller targets (foxes, rabbits, human heads), you will need to use your offset because that inch or two counts.
The reason we do 200m is because it gets us as close to parallel as we can without shooting bullets on a cardboard target and checking it. For any weapon from 9mm PCCs to AR-15s to FALs, the bullet’s trajectory between the shooter and 200m only deviates by a few inches unless you’re using subsonic ammo. Using this technique, I have been able to get consistent hits on half-sized human silhouettes out to 250m. I might get it to work farther than that, I just haven’t tried yet.
Another reason for the 200m zero is because, at night, you can’t positively ID targets beyond about 300m anyway. Not with wearable NVDs in normal lighting conditions at least. Therefore, this zero is plenty sufficient for your night fighting needs.
Summary
Today we covered why aiming lasers exist and how to zero them. In Part II, I will discuss considerations for using lasers in a tactical environment where your opposition also has night vision, basic night fighting, and alternative night engagement techniques.

Reblogged this on The Tactical Hermit.
LikeLike
Thank you sir for this article
LikeLike
Thanks! I’m glad it was helpful.
LikeLike
Well done, thank you.
LikeLike