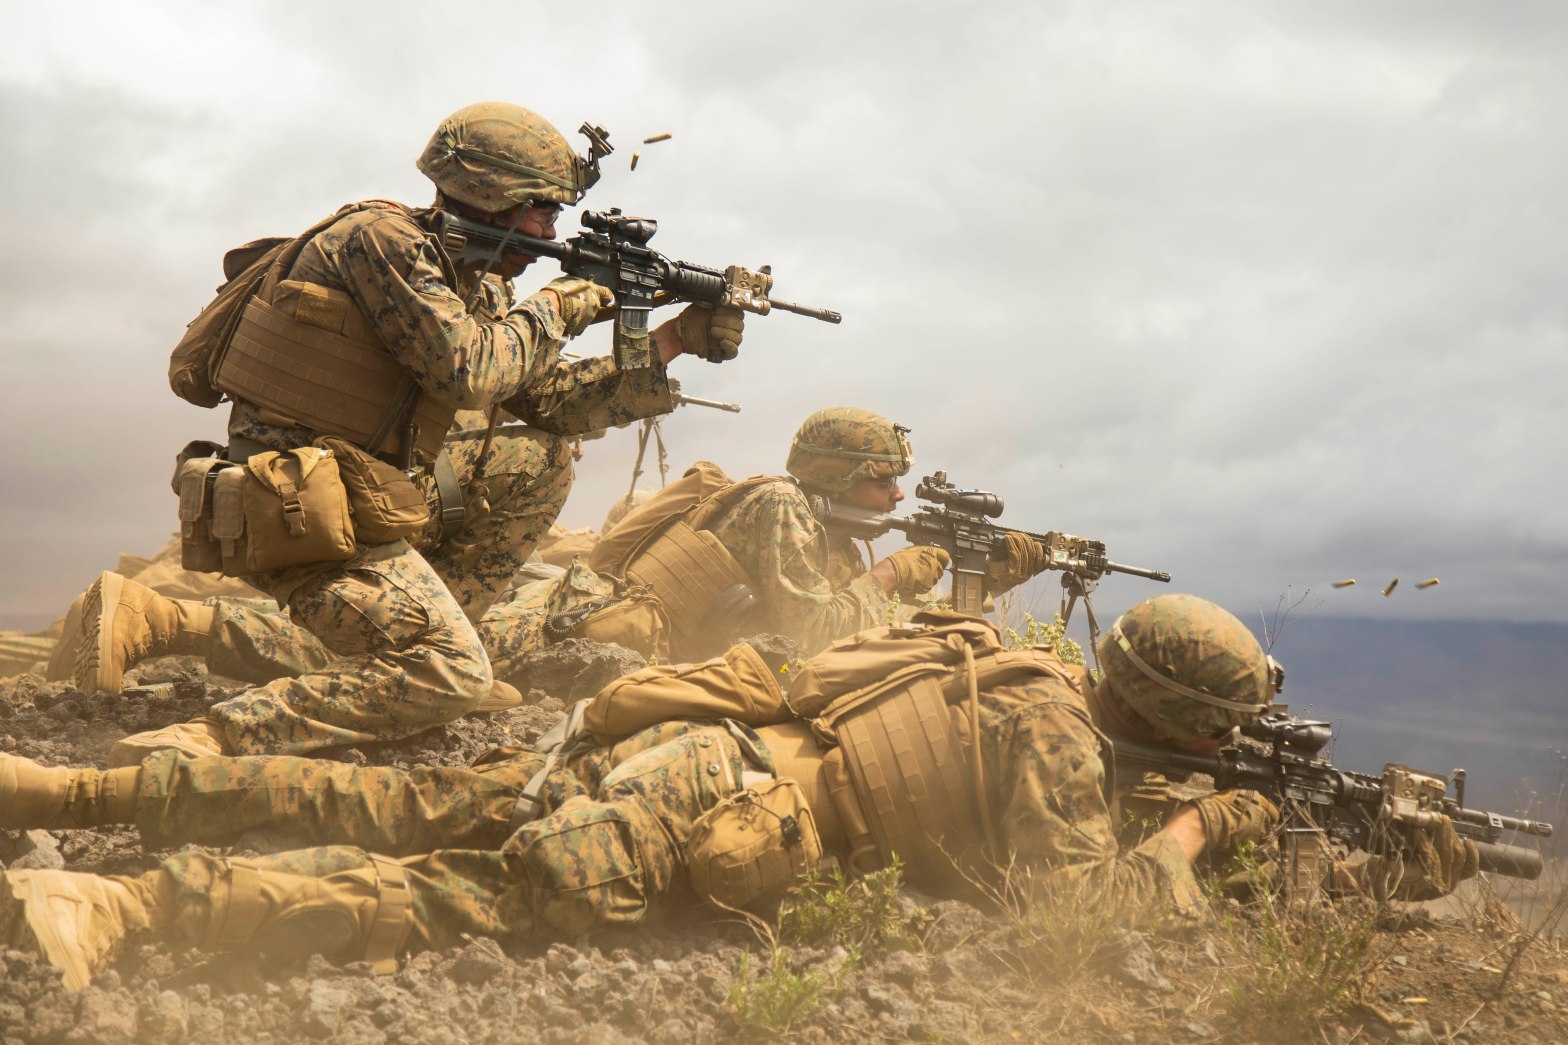
This past weekend my MAG had the opportunity to cross-train with another MAG in the mountains of Kentucky. We arranged a mutually beneficial exchange of training where they taught us how they train to fight from and around soft-skin civilian vehicles, and we taught them some radio skills. It was an OUTSTANDING weekend of training and fellowship with like-minded Christian men, and we left having learned a lot from each other. This AAR will list the type of training that we conducted and summarize the lessons learned.
Day 1: Vehicle Training
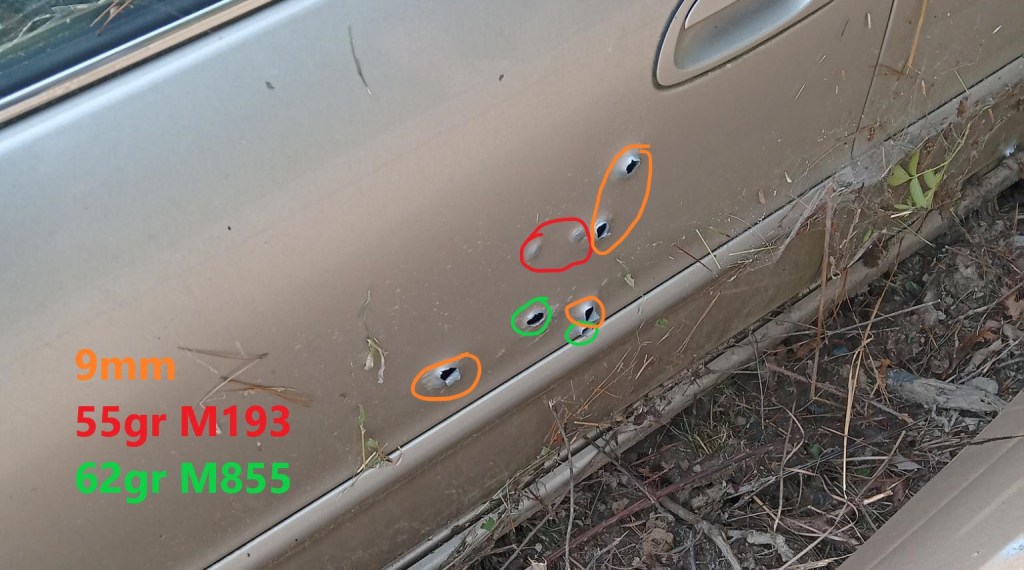
After the safety brief, we received a short class on what bullets do to different parts of cars. The instructor proceeded to shoot a car with different calibers in different places to show us what bullets ACTUALLY do to vehicles. Some key observations:
124gr 9mm: punched through both doors, deflected off of the pillars and trunk area
55gr 5.56 from a 16″ AR-15 actually failed to exit the vehicle, penetrating one door and stopping in the second. 62gr M855 green tips, however, punched through easily. Both were deflected by the pillars.
7.62×39 doesn’t give a shit about anything in the car except the engine block and the axles. My crew uses AKs primarily, and this validated our choice quite a bit. .308 performed the same.
Next we practiced shooting positions on the outside of some cars using the few parts of the car that actually stopped or deflected bullets as cover. Some of these positions were completely new to us, and were a bit challenging to master. What was particularly interesting was maximizing cover by shooting my rifle sideways when firing over the hood. I admit that I accidently put a few rounds into the hood of the junk car I was shooting over before I got the technique down.
We did this with live rounds on junk cars, but you can practice these techniques using airsoft guns and your personal vehicle. If you screw up and hit your car, worst case scenario you have to wipe off a white mark from your windshield or hood.
We then practiced shooting through the windshield of a vehicle from the inside. This was a very eye-opening experience, as I knew this was possible but had never tried it before.
LOTS of glass bits fly when doing this. Eyepro is a MUST for mounted operations. We also zipped up the collars on our combat shirts to keep glass from going down our necks. My team will be adding shemaghs to our gear SOP to protect our necks in the future.
I was very surprised to see that the windshield was still very much usable after this drill. It turns out that when you shoot through (mostly) the same hole, the rest of the windshield remains intact and fit for driving.
After lunch, we practiced “react to contact” drills from mounted in the vehicles. The key to these drills was to exit the vehicle quickly, on the side opposite the contact, and peel outwards away from the vehicle to better cover. We practiced this from all directions (front, rear, left and right sides). After a few dry runs we did it with live rounds, and I gotta say that I was impressed with how well we did.
I did these drills with a my full Minuteman kit (plate carrier, war belt, and helmet). It added an extra challenge getting in and out of the cars, but I got used to it. It wasn’t as much of a hindrance as I thought it might be.
The day closed out with a situational exercise, with us as a 4-man vehicle team in a convoy. I was the vehicle commander (and thus Team Leader) for this exercise. The scenario was that we were the 2nd vehicle in a 2-vic convoy, and we had to catch up to the lead vehicle which had rounded a curve and temporarily went out of sight. We rounded the curve, and saw that the lead vehicle was stopped. Suddenly, the lead vehicle exploded in a cloud of dust and shattered glass. “SHIT!” I yelled, “CONTACT RIGHT!” We bailed out on the left side of our vehicle and started engaging targets.
Our objective was to recover a “VIP” (white IPSC target) from near the lead vehicle 50m to our front. After quickly assessing the situation and evaluating the terrain, I initiated a peel left using a shallow ditch as cover. My team peeled with me, continuing to engage targets as we went. Once we reached the lead vehicle, I advanced with Boltboy and covered him while he recovered the VIP. We then peeled back to our vehicle, and upon discovering that it was still drivable, I threw a smoke grenade and ordered my team to mount up. Once back in our car, we drove away while still engaging the brown cardboard enemies (whom we learned later were all very dead), shooting from our open windows.
YEET
The whole situational exercise took less than 3 minutes, and went amazingly smooth for us having not rehearsed it. It was very violent and very fast, some of the most fun I’ve had on a live fire exercise.
Blanks are great for Force-on-Force training, but live fire exercises build confidence and trust among teammates. It greatly helped that everyone involved had a high level of weapons proficiency, and we didn’t have a single incidence of anyone getting flagged by a muzzle.
Those who pooh-pooh competition shooting underestimate the training value that they provide in basic weapons handling. Boltboy and I both have extensive experience in 2-gun and run-and-gun matches, and we can credit at least some of our muscle memory for muzzle discipline to these events. These habits translated well to live fire and maneuver exercises.
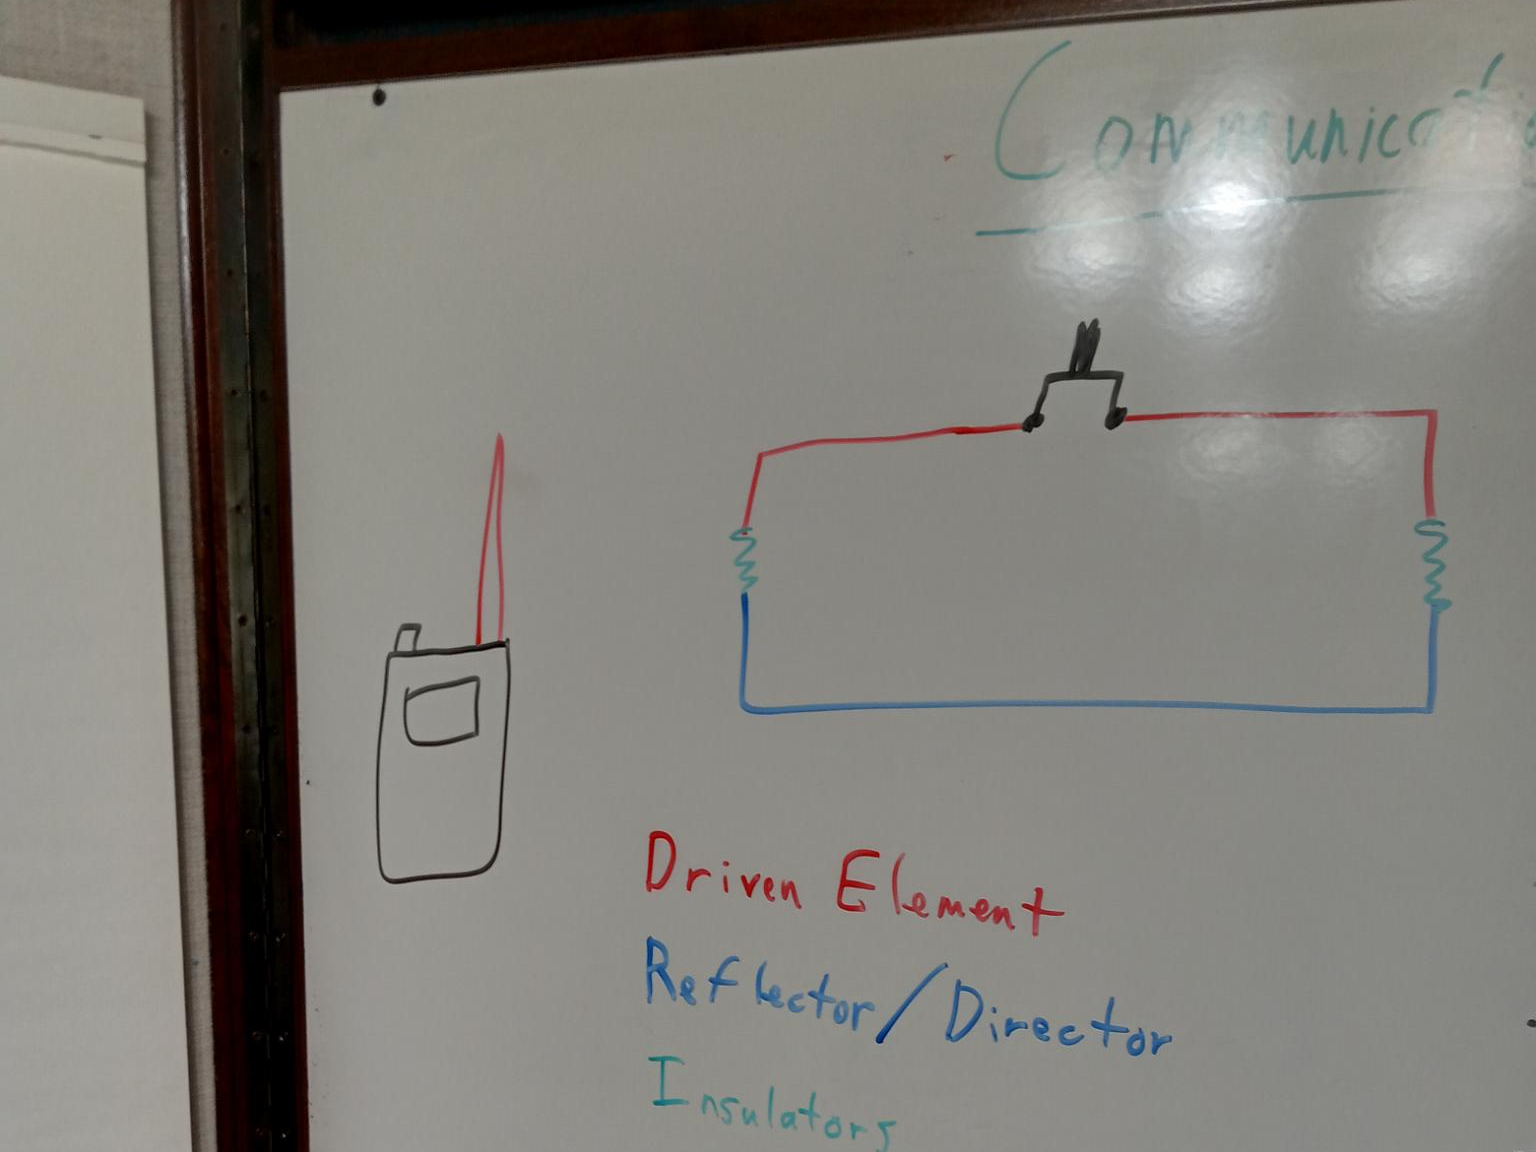
Day 2: Radio Training
The next day I taught a class on radio communications. We covered the following topics:
Basic radio etiquette and lingo
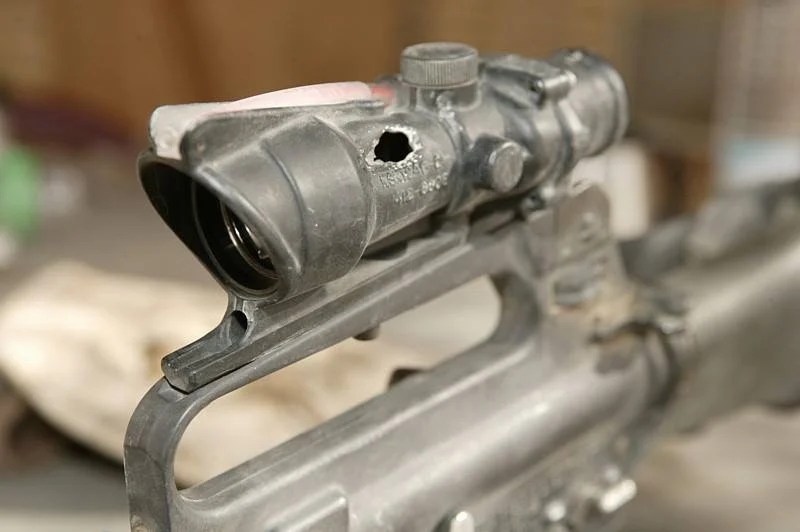
The UV-9R PRO, my recommendation for a radio to wear on your kit. Affiliate link: https://amzn.to/3wZM42H
Sending and receiving common report formats (POSREP, SALUTE, SALTA, SITREP, 9-line CASEVAC, and ZMIST)
Introduction to communications planning
Building a directional MOXON antenna for UHF
By the end of the day, I had students talking on their radios at vastly improved ranges with directional antennas that they built themselves. Everyone was stoked! That evening we went to a steakhouse, and the entire evening was spent with discussion on how to set up communications between everyones’ houses, where repeaters might be needed, how they would be employed, etc.
The next day, Sunday, we attended church together before parting ways. We worshipped the Lord together with our families and thanked God for a productive and safe weekend of training and fellowship.
Summary
This weekend was an outstanding success for both MAGs. We all learned a lot from each other, and a closer bond was built between our groups. If you know of like-minded MAGs, militias, or other groups of patriots in your area, I strongly encourage you to consider scheduling joint training events. It builds your network, improves everyone’s skills, and is an overall great way to spend a weekend. Find something that your guys are good at and offer to teach it.
And as a reminder, if you have a group and don’t know where to start with your own internal training, I can come to you to train your people in your local area. Team Leader I is a good place to start for a foundation of organizing and training a new group, or I can teach custom classes if your team is ready for the next level.
It is with great pleasure to announce that I have FINALLY finished the TACSOP videos for the Can Cannon Grenadier concept. Thank you for your patience, this has been several months in the making.
Topics covered:
Capabilities and limitations
Manual of arms & condition codes
Loading & firing procedures for the M7 and M9 smoke projectiles
Loadout recommendations
Tactics
Battle drills with demonstrations
I wanted to present this material in as professional and thorough a manner as possible. It ended up being over 20 minutes of content, so I had to split it up into two videos. They are linked below.
Ensure that you are in compliance with all state and federal laws before attempting to replicate anything you see in these videos.
I have also uploaded these same videos on Rumble, for those of you who prefer not to use YouTube.
More video content like this to come, hopefully faster now that I’m (sorta) getting the hang of making videos. If you have any suggestions for future content, let me know!
Two years ago I discovered hawg-ops.com. It’s a very potent open-source map tool and I wrote an introductory article on it back in August 2022. Since then I’ve been fiddling around with it and have discovered a few more features that I will share with you today.
Adding Unit Icons
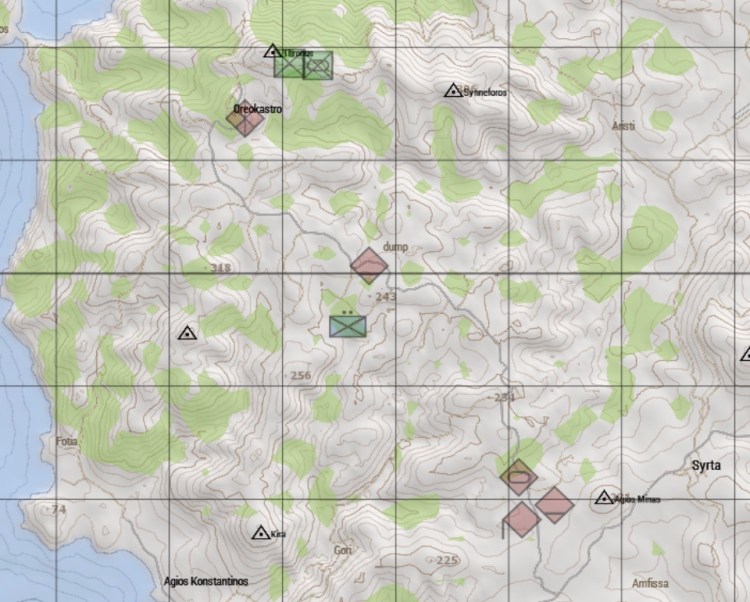
The site has the ability for you to add unit markers for friendly, neutral, and hostile forces to the map using standard NATO map symbols. For those unfamiliar with this symbology, detailed description of these symbols can be found at this link.
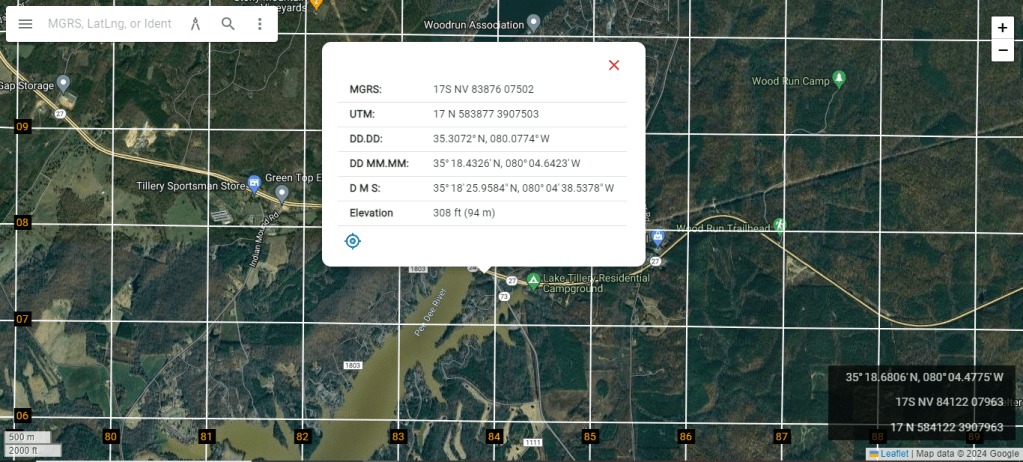
To add a marker, click on the location where it will be placed. A bubble appears with detailed coordinates in MGRS, UTM, LAT/LONG, and elevation data.
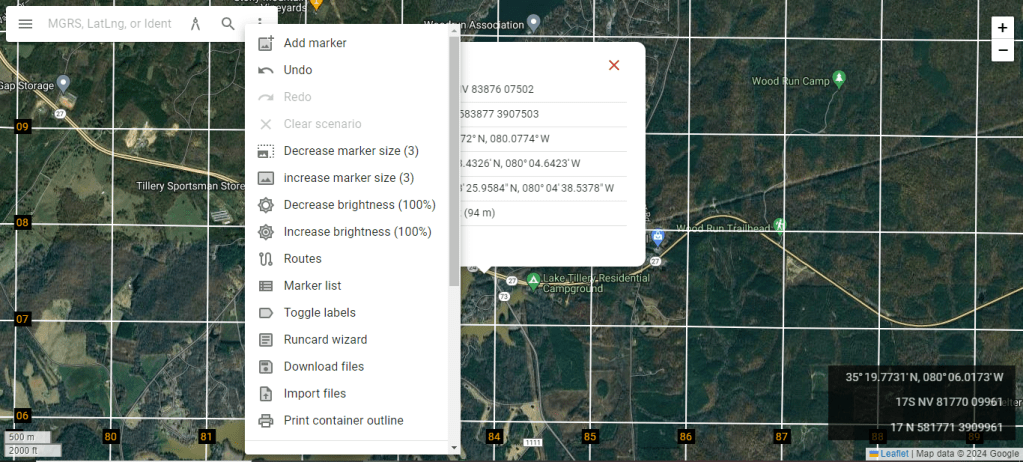
Next click the three dots next to the search bar and select “Add marker”
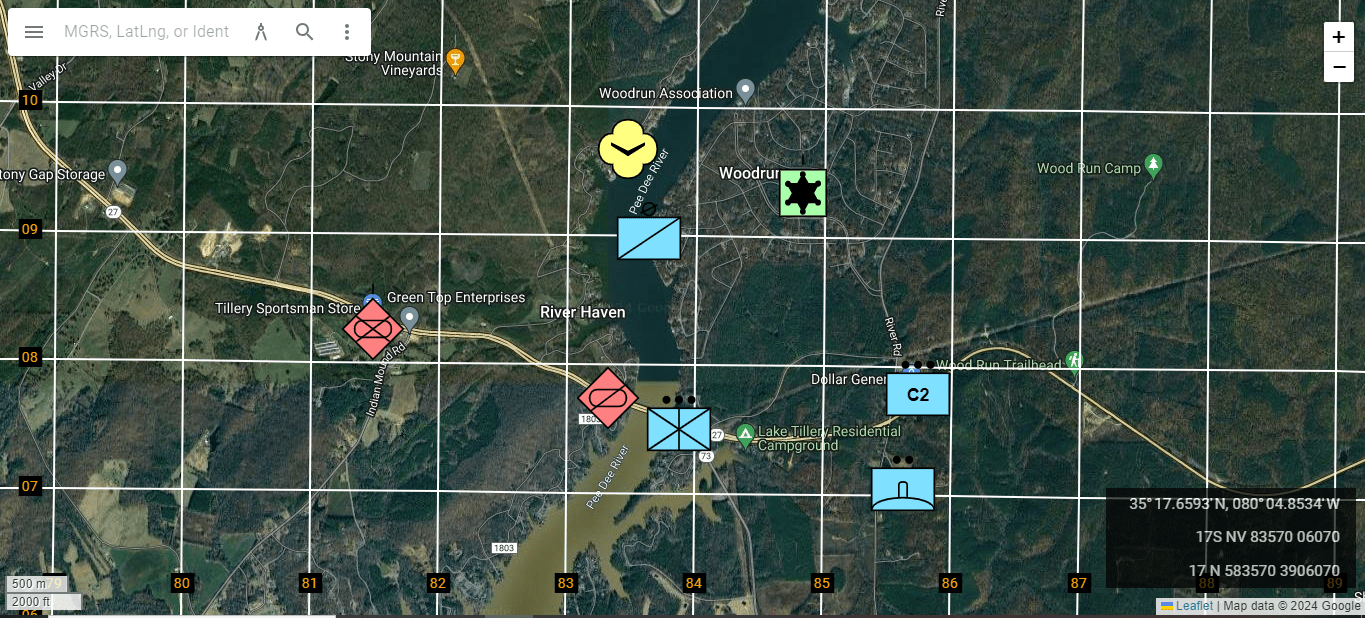
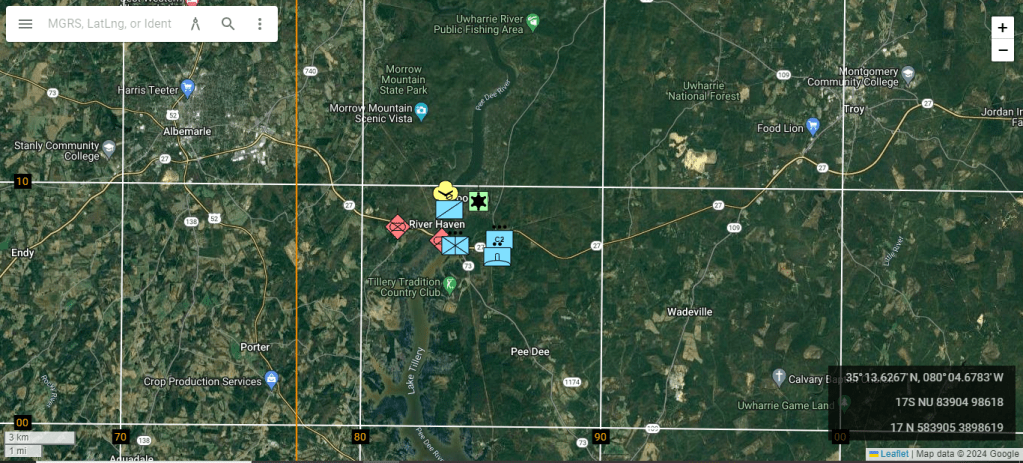
From here you get a pop-up with a series of drop-down menus that make it very easy to create the marker that you want. You can make it a simple or as complicated as you want. When you are done selecting the affiliation, echelon (size), and composition to get the symbol you desire, it will appear on the map when you click on the desired symbol. In the example below, I have placed a marker for a friendly platoon of motorized infantry guarding the bridge.
You can then repeat this process for hostile, neutral, or other units. This is an excellent tool for Intelligence Preparation of the Battlespace (IPB), as you can create a very easy-to-understand picture of the forces present in your area. Simply screenshot any maps you make and print them off to hand out to your people.
Let’s say you want to zoom out for a bigger picture. the symbols remain the same size as you do, so they can get a bit cluttered. Fortunately, you can adjust the marker size easily. Click on the three dots by the search bar and select “Decrease Marker Size” until the map is no longer cluttered.
Making Usable Tactical Maps
It is possible to use this site to create and print maps that can greatly aid us in specific operations. Unfortunately, it is not yet possible to directly print maps off of the website in a scale that can be used with common map protractors (1:24,000, 1:25,000, etc.), and I have not yet found a work-around by fiddling with printer settings.
That said, hawg-ops is still VERY potent when used to supplement a legitimate topographical map purchased from mytopo.com. The biggest asset that hawg-ops provides is grid lines overlaid upon satellite imagery. Sat imagery can see things of tactical importance that we would otherwise miss on a topo map. Treelines, buildings, small water features, cover and concealment, etc. The grid lines allow us to quickly line up what we see on both maps.
Additionally, with hawg-ops, you can zoom in to create maps of a MUCH smaller scale than you could ever find elsewhere. The following steps are how I would make a tactical map sheet if I was a squad leader in this sample AO.
Note that this is to SUPPLEMENT, not replace, my 1:24,000 scale topographical map.
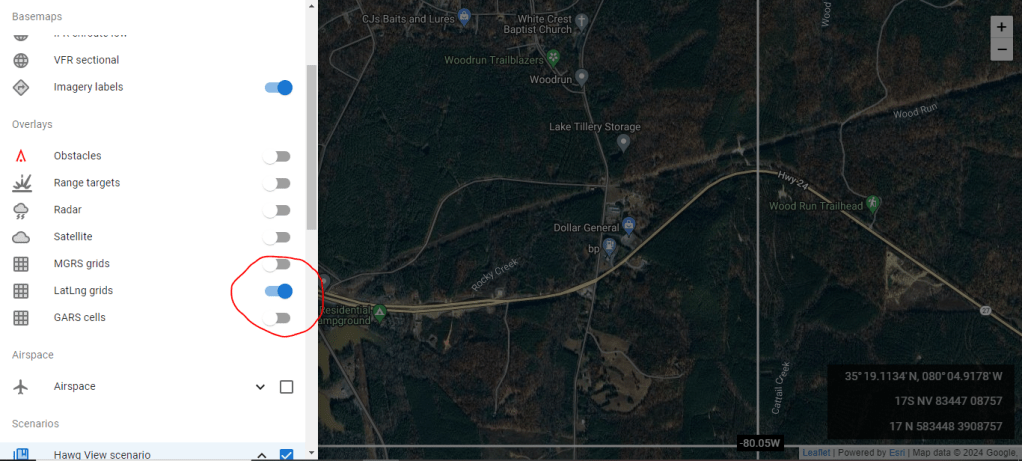
First, we get rid of all unit markers. Those are fine for powerpoint slides or intelligence briefs, but they get in the way of actual navigation. Clear markers by either refreshing the page or selecting “Clear scenario” from the drop-down menu.
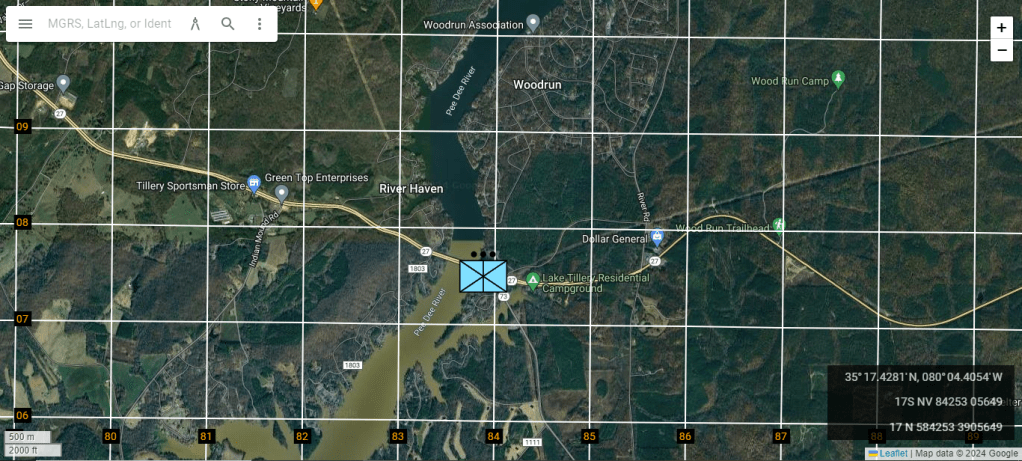
Next, I want to center the map on my AO and include key terrain around my position/objective. The bridge is my objective, but I want to include the opposite bank and the town to my North. I don’t anticipate going to the opposite bank, so I don’t need too much detail of the West side of the river.
Next, I need to ensure that my grid lines match the grid system on my topographical map. If my topo map uses lat/long (gross), I need to access the drop-down menu in the top left and select the appropriate button.
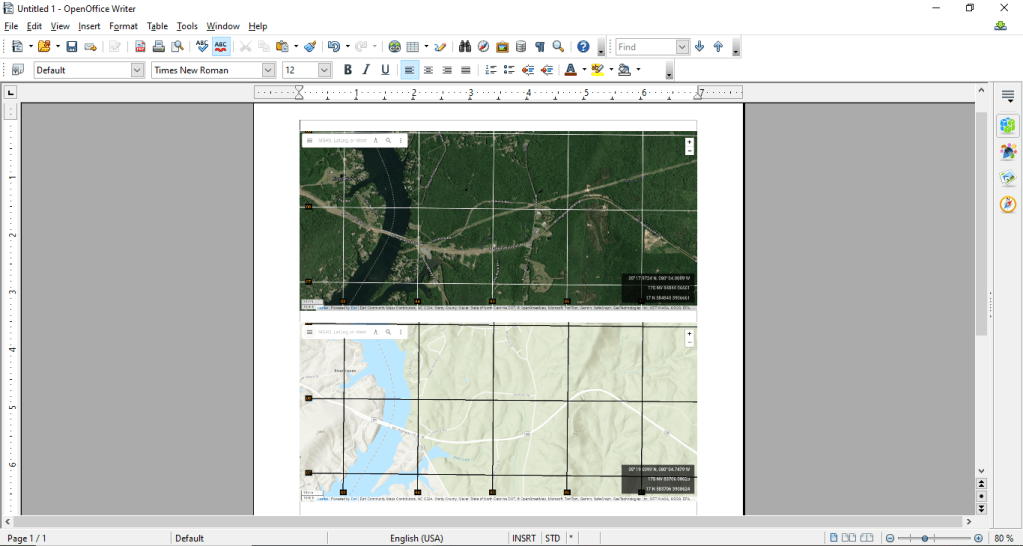
Next, I’m going to open a text document (MS Word, OpenOffice, etc.). I will immediately screenshot the map using the snipping tool and copy it into the document.
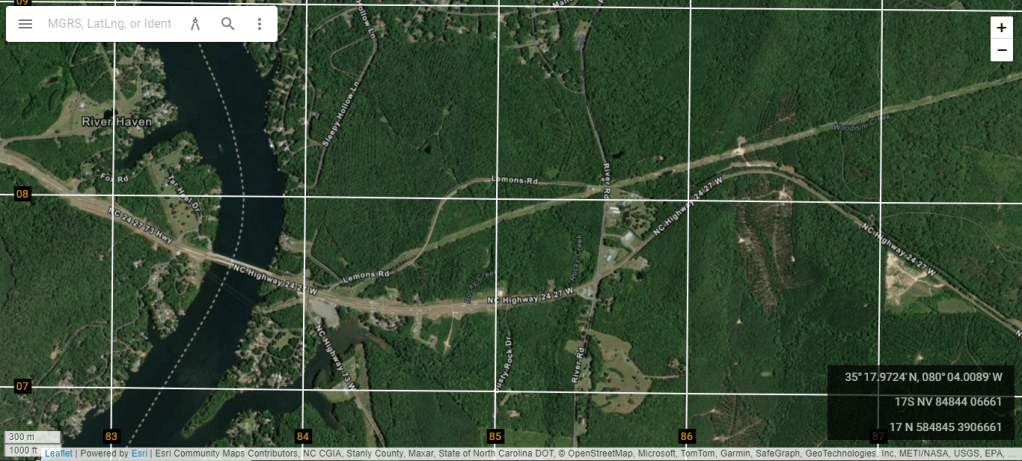
Now, back to hawg-ops. You have access to several different base maps in the drop down menu. The only ones useful for our purposes are Google Hybrid (default), ESRI Imagery, and ESRI Topographic. Switching to ESRI Imagery gets us a slightly different view than Google Hybrid. This imagery is taken with a different satellite, often during a different time of year, so you get a different view of the foliage and a slightly better understanding for how the area might look on the ground.
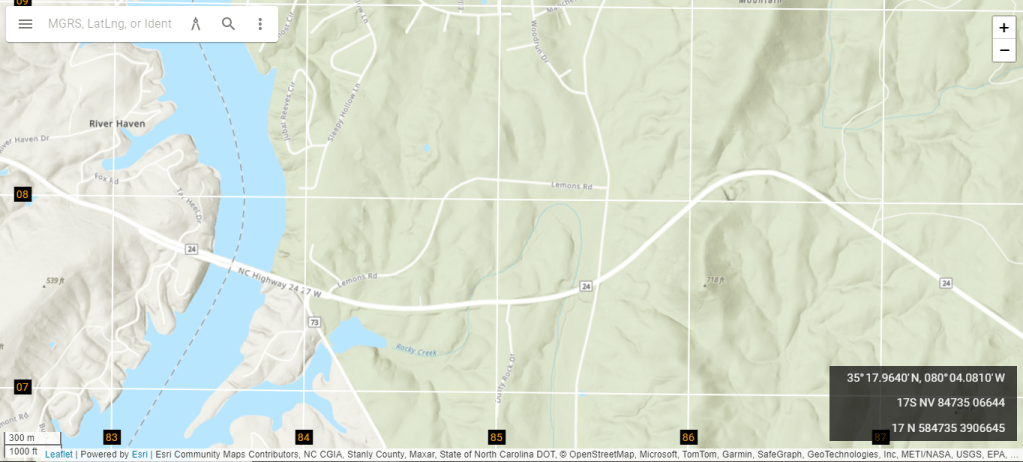
Switching to ESRI Topographic trades the imagery for a topographic 3D-ish view of the same area. It doesn’t show contour lines, but uses shading and elevation marks to show the terrain.
Take screenshots of the same area viewed under each base map and copy/paste them into your word document. It should look something like this.
We now have 3 different views of the same area side-by-side. What I most often do is compare the Google Hybrid with the ESRI imagery and choose whichever one gives me a better understanding of the area, and then delete the other one. You could keep both if you want, but I prefer to have only one satellite image next to the topo image.
You may notice that the grid lines are hard to see in ESRI topographic. They’re white regardless of what base map you select. What I like to do is open the ESRI topographic image with Paint 3D and draw black grid lines over the white so that I can see them more easily.
And there you have it. Print off your tactical map sheet and laminate it. If desired, you can add marginal data underneath about the AO, or you can just cut off the extra white paper before laminating to make it more compact.
Hawg-ops.com is an excellent free map tool. It was designed by “Porkins”, a military pilot, to make mission planning easier for himself and his fellow pilots. He is out of the military now, but still updates the website from time to time. He gets no money from it and manages the site as a hobby, so updates are slow in coming. However, what he has created is still extremely useful and you would be wise to take advantage of its features as I have shown here.
There is likely much more to this website that I haven’t discovered yet, so I may yet write a Part 3 if I discover more features useful to the modern American rifleman.
In the meantime, if you haven’t already, check out the articles I wrote on battle tracking and setting up a map board. It would be wise to begin buying/making maps of your area now while you still can. Access to the internet is never guaranteed, especially not when you’re likely to need maps.
I am pleased to announce that the open enrollment classes for this spring are finally up on the training schedule and registration is now open. This includes the first Team Leader II class, which is being graciously hosted in the mountains of Western NC by a good friend of mine.
While Team Leader I is an introduction to organizing, training, and leading a small team of shooters, Team Leader II is a deep dive on mission planning and tactics, and includes several force-on-force scenarios where you get to practice leading a team of riflemen in a dynamic environment that forces you to make decisions under stress. Each scenario will be reviewed in depth to allow you to learn from the mistakes and successes of yourself and your fellow students.
April 13-14Team Leader I (Maysville, North Carolina) $300
May 14-15Team Leader I (Lenoir, North Carolina) $300 May 16-18Team Leader II (Lenoir, North Carolina) $500 Bundle both classes together for $100 off!
It is recommended, butNOTrequired, that you take Team Leader I prior to Team Leader II.
Contact me via email (vonsteubentraining@protonmail.com) or my contact page to register for a class.
My schedule is still wide open for custom training events throughout the rest of 2024. Check out my Custom Training Page if you would like me to come to you and train your group!
When we hear the word “camouflage,” we think of a sniper wearing a ghillie suit or our favorite camo patterns. In reality, there is far more to the topic of camouflage than simply visual concealment. The modern battlefield is saturated with sensors of all types, and it is important to be cognizant of how vulnerable you are to each one. Today I am going to discuss these vulnerabilities in the context of their respective domains.
I must note that you will NEVER have completely zero signature across all domains. That may be your goal, but it is not a realistic one. The good news is that this is not necessary. All that is required is that we take steps to reduce our signature in each of these respective domains as appropriate for the context that we find ourselves in. That is why we call it “Signature Management” (SIGMAN) and not “signature removal”: we are simply managing our signature as appropriate for the threat we face.
I cannot hope to comprehensively cover ANY of the domains of SIGMAN in this article. Each topic deserves its’ own article, if not an entire field manual. My goal today is to simply increase your awareness of your signature so that you can take steps to mitigate your vulnerabilities.
Visual
The visual domain is the most obvious one. Our eyes provide 85% of our sensory input, so this is the most obvious avenue of approach. Traditional camouflage techniques apply to the visual spectrum to make yourself (and your equipment/vehicles) harder to visually detect. This is one of the easiest parts of your signature to manage because we all have the ability to evaluate our own visual signature to see how well we are blending in.
Much has been written on this topic by men with more expertise and experience than myself, and I encourage you to do your own study. For now, I will leave you with the following points.
The battlefield is 3-dimensional. Be aware of your visual signature from above as well as on the ground.
Use a ghillie blanket to camouflage individuals, positions, or equipment when halted.
Natural vegetation is always better camouflage than artificial materials. Camo patterns on clothing and equipment are simply a starting point.
Your visual signature is greatly increased when moving. Movement catches the eye. Care should be taken during route planning to use cover and concealment.
Vehicle movement along dusty roads should be slow enough not to raise large dust clouds when speed is not a priority.
Use buddies to evaluate the effectiveness of each others’ visual camouflage.
When traveling with multiple vehicles in a convoy, travel single file when going off-road. A single set of tire tracks in a field may look normal, but several converging or parallel tracks do not. Especially when viewed from above with SUAS.
Sound
Audible noise can be a dead giveaway. Vehicle engines, loud talking, or even unnecessary movement can generate enough noise to betray a unit’s position. And depending on the tactical situation, sound alone may be enough for an opposing force to positively identify (PID) you as a hostile target.
Noise discipline should be strictly enforced by team leaders in the field to keep troops from talking too loudly, rattling equipment, etc.
Before a patrol, team leaders should check that their troops’ equipment does not rattle or creak as they walk. Apply tape to loose buckles, sling swivels, etc. to muffle the sound.
Vehicle engines should not idle at the halt. Avoid using running vehicles to charge batteries on electrical equipment. Solar panels are preferred for this because they do not make any noise.
Smell
Our sense of smell is underappreciated because we haven’t needed to use it for survival in a long time. However, once our survival starts to depend on it, we rediscover our sense of smell in a way we didn’t know we could. The last century of warfare is replete with stories of troops smelling the enemy before getting attacked.
There are more obvious smells that could give away a patrol, patrol base, or observation post. Use these best practices to mitigate this:
No smoking in the field. Tobacco smoke has a very distinctive smell that can carry quite a ways, and is a dead giveaway in the woods.
When refueling vehicles, have absorbent pads in a drip pan on the ground below to catch any spills. Ensure all jerry cans are properly sealed.
Refrain from cooking food outside of “safe” areas. Heating water is normally okay if using a smokeless heat source, but actual cooking creates too much aroma.
No cooking bacon on your silencers in the field, lol.
Do not build wood fires unless absolutely necessary for survival.
NIR
Near-infrared (NIR) refers to the portion of the light spectrum that is invisible to our naked eyes but visible through the aid of Night Observation Devices (NODs, aka NVGs). This is an oversimplified definition, but it is sufficient for our purposes. When I refer to NIR signature I am talking about vulnerabilities related to the opposition’s use of NODs.
NODs work by amplifying the ambient light within an area and can also perceive NIR light. This means that ANY light sources are greatly amplified, especially light that also generates heat because heat produces IR and NIR light. The cherry on a lit cigarette, for example, looks like a floodlight through NODs.
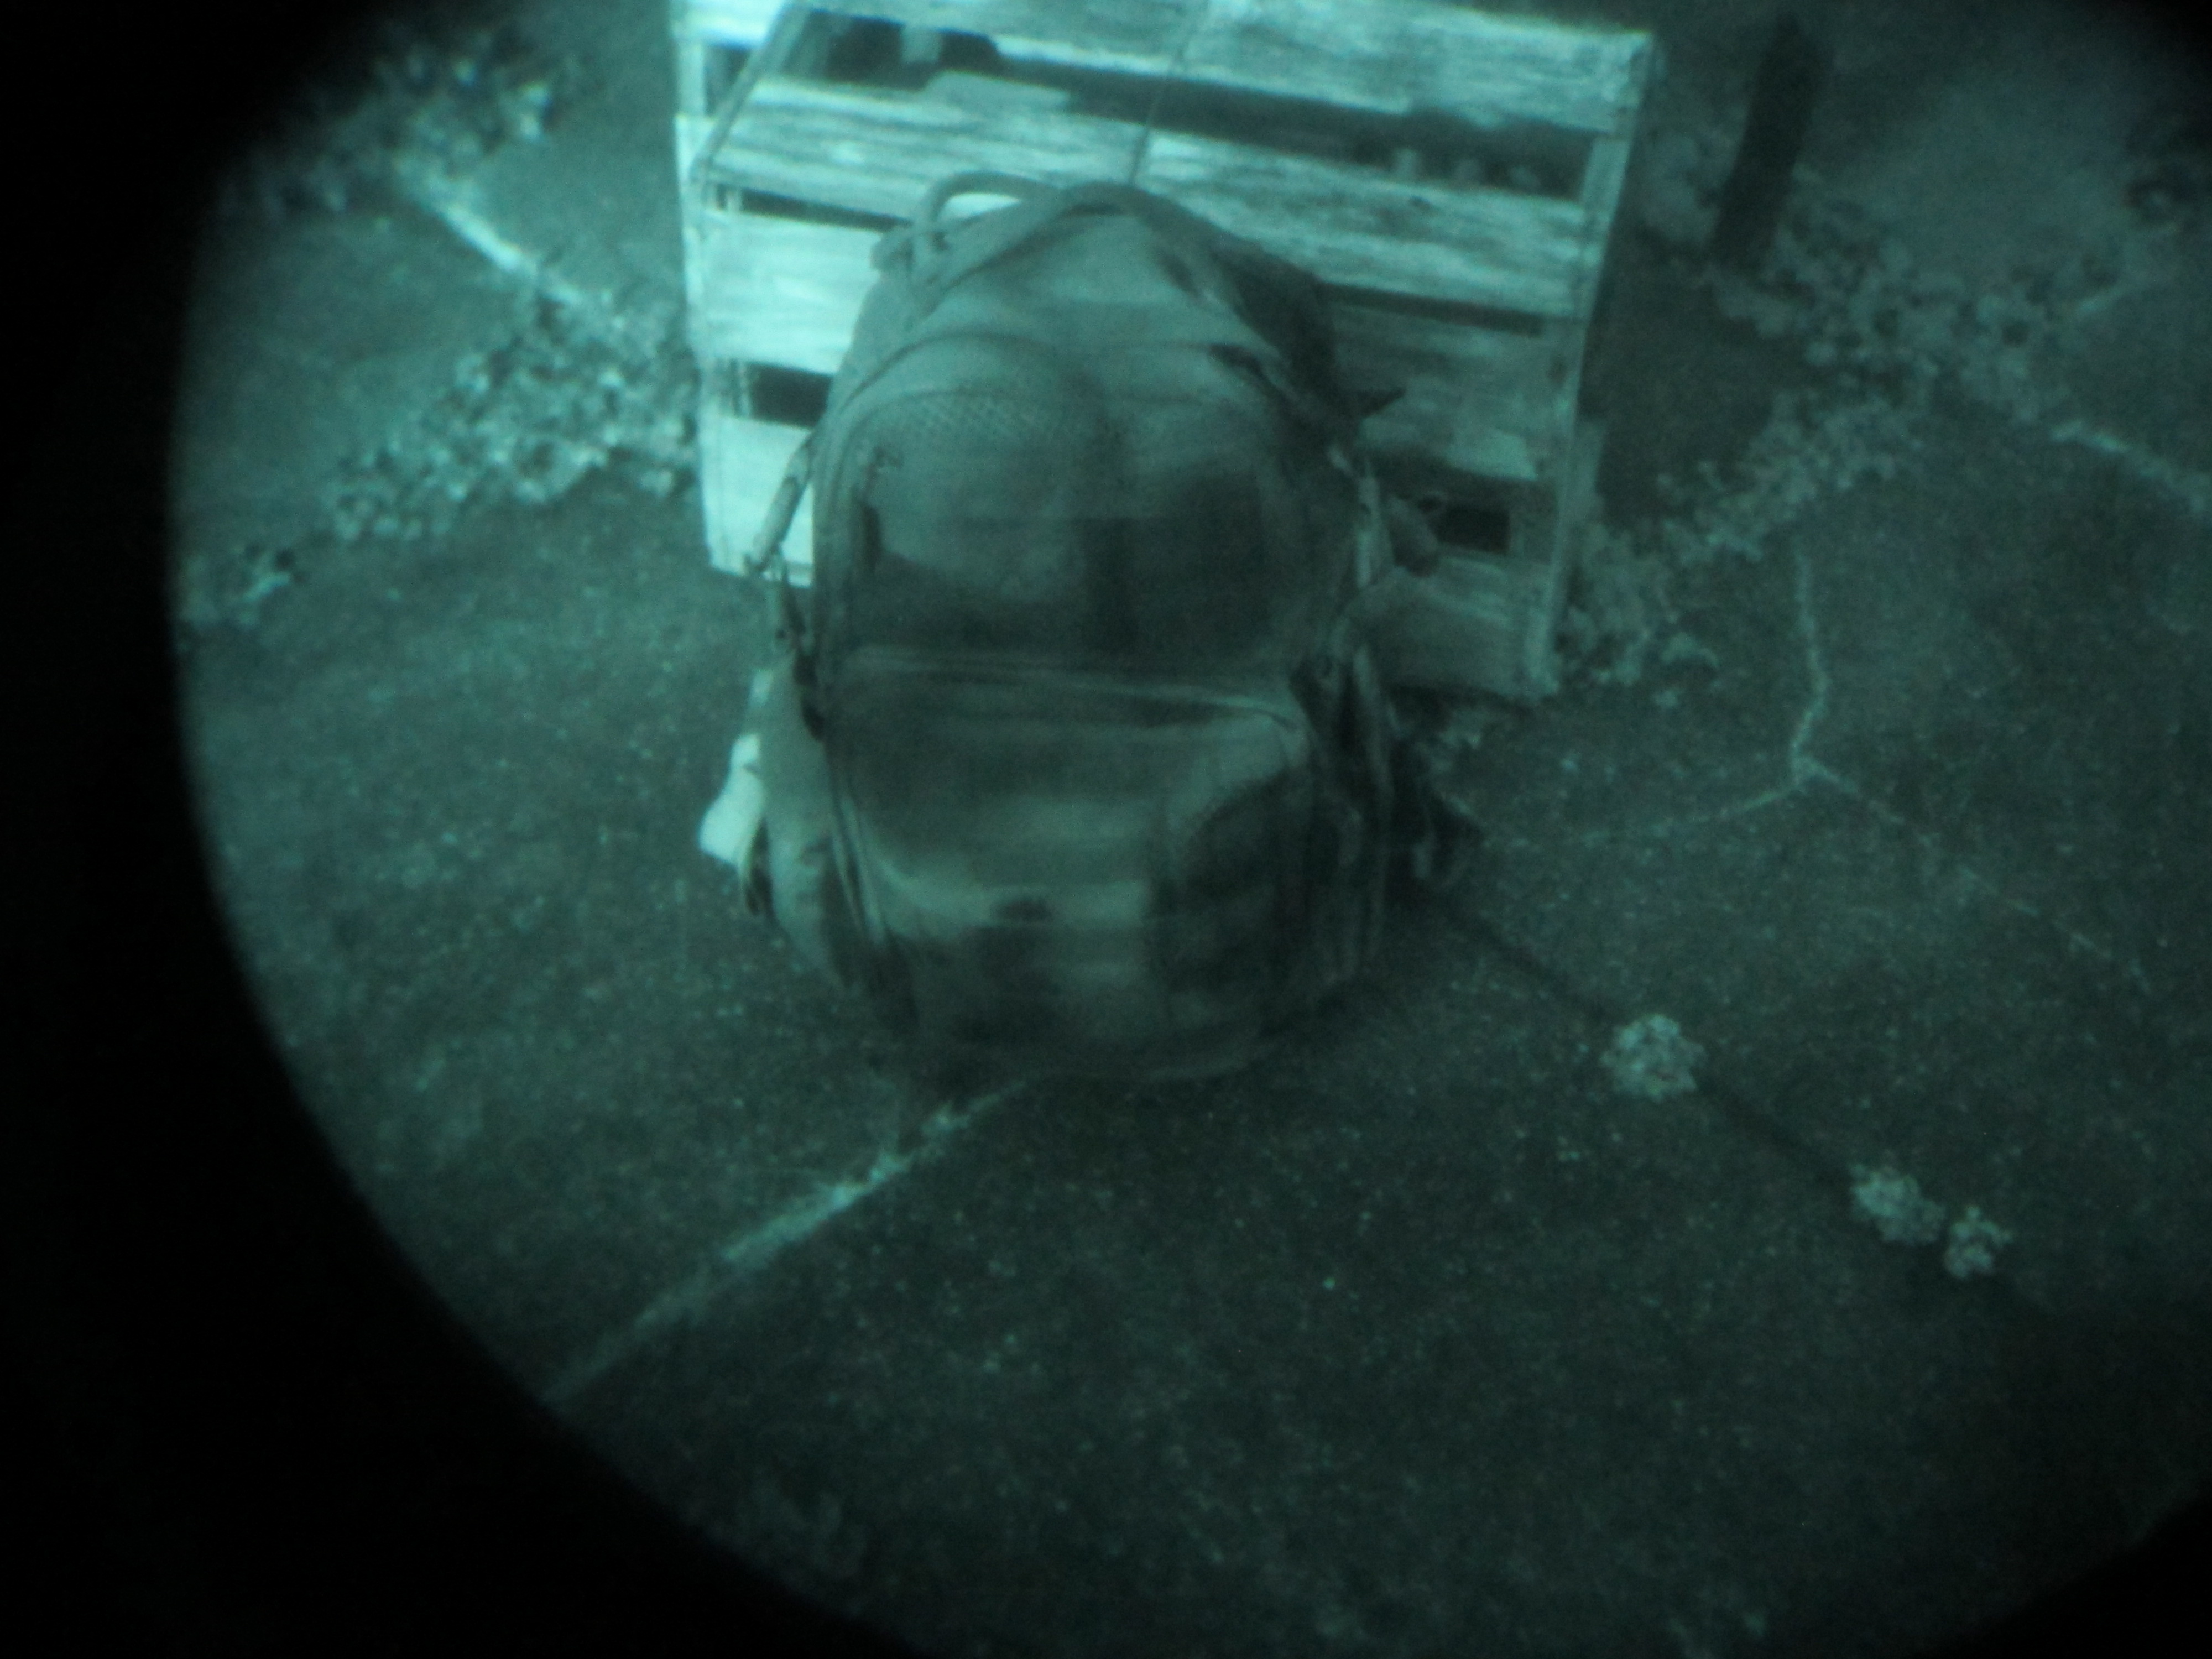
Additionally, equipment/clothing that looks visually camouflaged may actually appear as a bright white blob through NODs if the dyes are not “NIR compliant” (having passed the military’s standards for not reflecting NIR light). If you haven’t already, check your uniforms, vest/pc, and backpacks for NIR compliance by looking at them through NODs. If it is compliant, you will still see the printed camouflage pattern. Non-NIR compliant gear with MOLLE webbing looks like a white blob with horizontal black stripes.
This is a Multicam backpack. But the dyes aren’t NIR compliant, so it doesn’t matter at night.
The following are best practices to mitigate your NIR signature:
The use of cooking fires or camp stoves should be limited to daylight hours when NODs are not in use.
Smoking should be nonexistent in the field, especially at night.
Check gear for NIR compliance by looking at it through NODs. All military surplus uniforms and equipment will be NIR compliant.
Using flat camouflage spray paint colors on noncompliant items fixes them. I do this to my noncompliant backpacks to make them absorb NIR light.
Thermal
Thermal sensors are optics that read the infrared spectrum to determine the temperature of objects at distance, and translate that information into an image showing color-coded temperature differences.
Thermal sensors can be mounted on vehicles or weapons, handheld, or on drones and aircraft. The vulnerability in the thermal spectrum is significant, but not insurmountable. See my article on this topic: The Minuteman’s Guide to Thermal Camouflage
Train with thermal optics often in order to build familiarity with their capabilities and limitations.
Use careful route planning to take advantage of cover and concealment, as well as times of day when thermals are less effective.
When bivouacked, halted, or in any static position, use a Jäger Rig to make yourself invisible to airborne thermal sensors.
When camouflaging vehicles, use cardboard boxes, tree branches, etc. to suspend camouflage net at least 8-12″ above the vehicle. This creates an air gap so that the camouflage does not absorb the heat of the vehicle, and does a better job of hiding its thermal signature.
Electronic
Electronic warfare (EW) is perhaps the most misunderstood domain of SIGMAN, and also one of the most easily exploited. Anything that transmits a signal of any kind contributes to a unit’s electronic footprint. Cell phones, radios, drones, even Bluetooth devices. I once saw a team get located in their observation post (OP) by their Peltor ComTac VI headsets which used Bluetooth to talk to each other. Sometimes, being “high speed” is a vulnerability.
Radios are great assets if you use them properly. Just be mindful of your EW footprint and don’t transmit unnecessarily. Affiliate link: https://amzn.to/3StTYJq
This is not to say that every transmission will get you killed, far from it. It’s a matter of balancing your electronic footprint so that it doesn’t draw too much attention. Bluetooth signals in the middle of a forest might raise some eyebrows, but those same signals in an urban area with thousands of innocuous Bluetooth devices per square mile will probably be ignored.
Use passive listening devices like frequency counters and spectrum analyzers to find the “noise floor,” the EW baseline of what transmissions are normal in your area. Then manage your EW footprint by blending in to the noise floor. For example, I live on the coast where there are a lot of maritime frequency transmissions. Hypothetically, I may be able to blend in to the noise floor by using marine radio channels, or frequencies that are slightly off but within the same band. You get the idea.
A large part of EW SIGMAN is knowing the capabilities of your adversary. A state or state-backed actor will have access to airborne EW platforms, which are extremely dangerous. Irregular threats like gangs and cartels still have access to basic off-the-shelf jammers, but their range is limited and they might not have the knowledge of how to use their equipment for passive intelligence gathering. Other irregular threats may have enhanced Radio Direction Finding (RDF) capabilities. There is an entire sport within the Ham radio community called “foxhunting” where amateurs use RDF to locate a hidden transmitter.
This is merely scratching the surface of EW. Once you start to go down this rabbit hole, you will find that there is no end to the possibilities if you are willing to put in the time to study it. For now, I’ll just leave you with these best practices.
Determine the noise floor and attempt to blend into it.
Do not carry devices that constantly transmit (cell phones, smart watches, etc.) or are easily geolocated. I have successfully hunted patrols in force-on-force exercises because one goober thought he could get away with bringing his cell phone. Seriously, LEAVE THE PHONES AT HOME.
Screenshot of Snap Maps where somebody snuck their cell phone on a force-on-force exercise, leading to my team (roleplaying the bad guys) finding their patrol base.
Keep radio transmissions short, sweet, and to the point. Think about what you’re going to say before you key out to eliminate the “uhhhs” and pauses as you think of what to say while transmitting. Write down tactical reports before you send them. Push to talk, don’t push to think.
For radios, use the lowest power level possible while still reaching the distant station. Using high power to talk to someone 100yds away is like shouting to talk to someone next to you. Yeah, they’ll hear you, but so will everyone else in the building.
When possible, use directional antennas and terrain masking to further conceal radio signals.
Send reports of a routine or non-urgent nature using a data burst transmission (AndFlmsg, TACCHAT, etc.) to cut down on transmission time.
Send radio transmissions from a site that is at least 200m or 1 terrain feature from your patrol base, OP, etc. This includes piloting SUAS.
Spoor
Spoor is sign that is left behind by a patrol which enables it to be tracked. Footprints, broken twigs, tire tracks, etc. It is a signature that is left behind after the patrol has left, which separates it from the other SIGMAN domains. Spoor is not commonly included in publications on SIGMAN, but I believe that it is relevant to mention here.
A patrol that leaves a significant amount of spoor enables the adversary to collect information on what the patrol was doing. If multiple patrols do this, a clever adversary will be able to determine patterns on how you operate and use this against you.
In a hypothetical grid-down scenario, your neighborhood sets into a defensive posture to keep out looters,and sends out regular security patrols. But your inexperienced neighbors follow the same route every time they go out, which wears a path in the grass. This pattern is easily recognizable and exploited. Before long someone will evade your patrol and slip into your perimeter since they know their route. If they’re more aggressive, your patrol could be easily ambushed or the route booby-trapped.
Another example is that you send a reconnaissance patrol to check on a nearby subdivision that was burning earlier. Your patrol wasn’t as sneaky as they thought they were being, and left behind some food trash in their OP. Desperate, hungry scavengers watch your guys leave, find the trash in the OP and realize that you have a good supply of freeze-dried food. Your patrol gets followed back to your neighborhood, and now the scavengers know where to raid to get food.
Pack out your trash. The enemy can use it to find out what you have, how many are in your patrol, how (un)disciplined you are, and more.
The bottom line is don’t leave any unnecessary sign that reveals information about your patrol.
Carry out all trash that you carry in on a patrol. Have a plan to manage your personal trash. Team Leaders should enforce “trash discipline” by inspecting patrol bases and OPs before evacuating them when time permits. NEVER bury trash.
Do not take the same route out as you took in, an ambush may be waiting for you. Always take a different route back.
The last man in a patrol should, when possible, cover up any sign that the patrol leaves. Use pine boughs to sweep snow over footprints, cammie paint to dull the bright end of a snapped branch, etc.
When refueling vehicles, have absorbent pads in a drip pan on the ground below to catch any spills.
Avoid soft ground (mud, sand).
Bury all feces in catholes or a slit latrine. If you are really dedicated and want to leave NO trace, carry out your excrement in WAG bags. We also used empty MRE bags with duct tape, but that’s not a great solution if you can get actual WAG bags.
If you must dig for catholes or fire pits, pile your dirt onto a tarp/poncho so that you can get ALL the dirt back into the hole.
Summary
We just covered a lot of information about the different domains of SIGMAN. Hopefully you are able to incorporate some of these best practices into your team standard operating procedures (SOPs) to make yourselves harder to detect. Remember, to be detected is to be targeted, and to be targeted is to be killed.
In closing, I want to remind you that you will never achieve zero signature. In fact, some of the best practices for one domain of SIGMAN actually increase your signatures in other areas. And that’s okay. What matters is that you are managing your signature appropriately with respect to your environment, your threat, and your mission. If you can remain flexible in this way and can adapt rather than remaining fixed into one cookie cutter SOP, you will come out on top more often than not. In all forms of conflict, from chess to strategic deterrence, he who adapts quickest dominates.
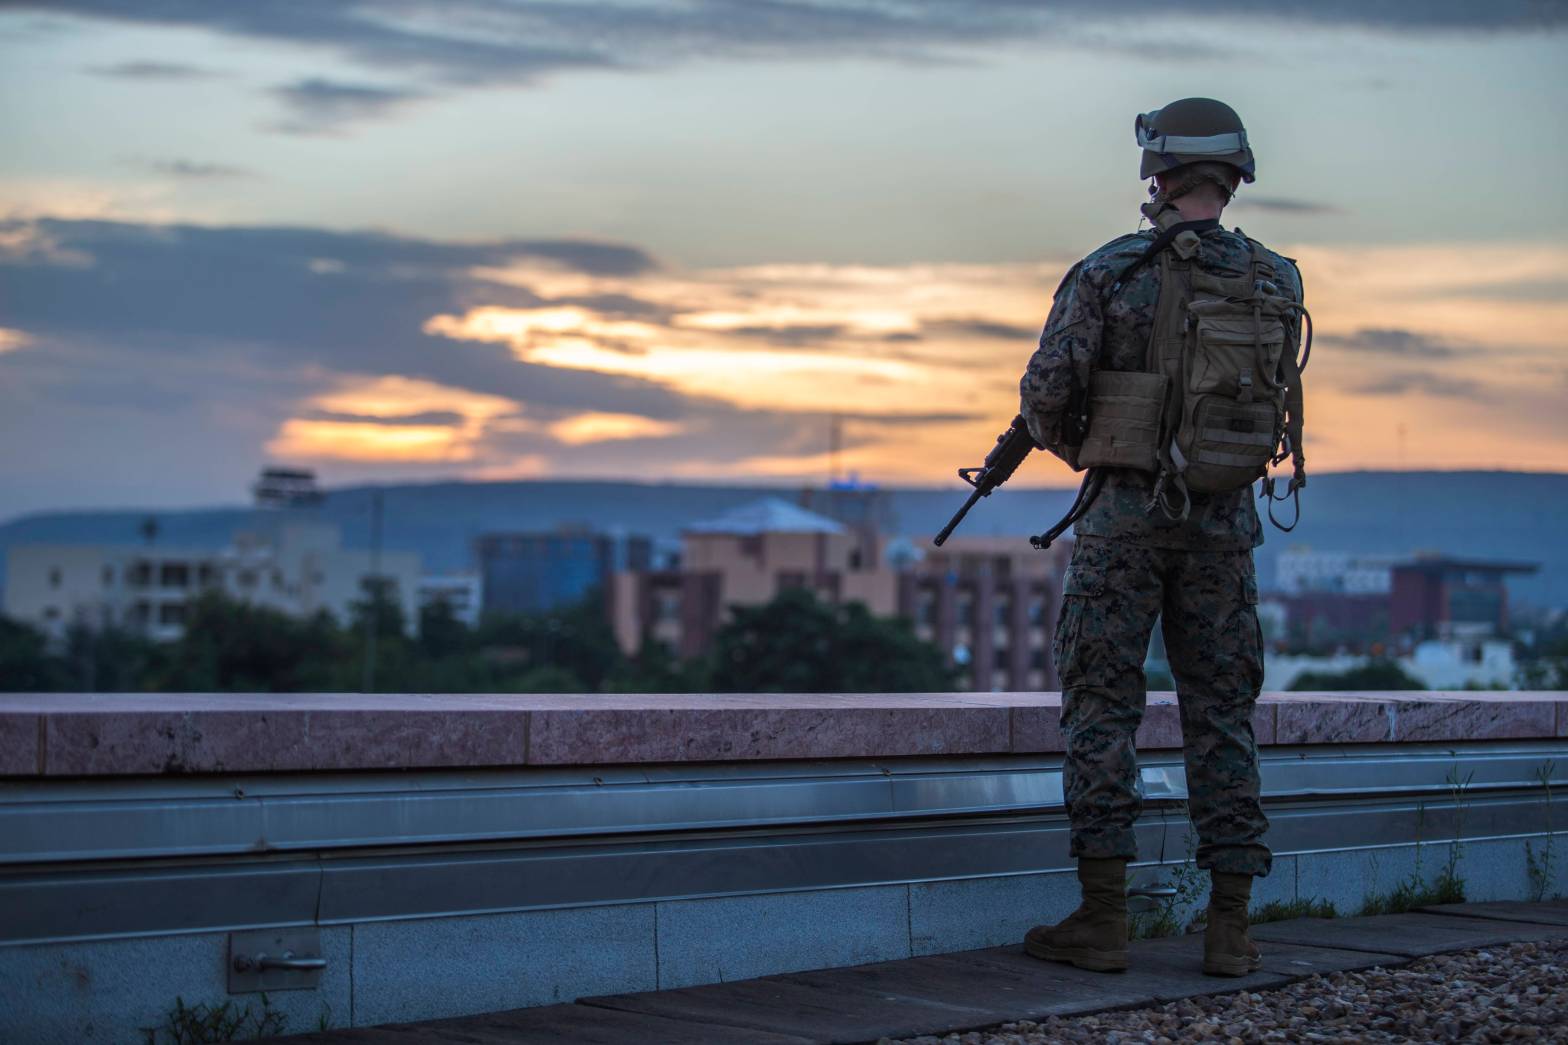
This past weekend I had the privilege of spending a few days in the mountains of Western NC training with some friends. There was a combination of force-on-force exercises, radio practice, TCCC training, and the fieldcraft involved with just dealing with the elements of being in the mountains in winter.
I came away from this event with several AAR points for myself, my gear, my training, and just in general. I will share these lessons learned below, so you can learn from my mistakes and successes.
Improvised snow camouflage for my rifle using white electrical tape and a cut-up white laundry bag. Unfortunately it rained the day before the exercise, so all the snow was gone.
Fieldcraft
Temperatures ranged from 20 degrees Fahrenheit at night to low 50s during the day. This meant that a balance had to be struck with my warming layers. Being inactive at night and active during the day leads to quite the variation of body temperature, so I had the opportunity to experiment with a couple of different things.
At one point I hiked up a mountain at a steep incline gaining 600ft of elevation over less than half of a mile. I did so wearing a heavy field jacket over my combat uniform. Halfway up the hill I had to stop and shed my coat, cramming it into my assault pack. Shedding layers as you become active is natural, but my nice warm coat was very bulky and heavy in my pack. I didn’t like the inefficient use of valuable space and weight.
Lesson learned: lighter warming layers that can be worn underneath the field uniform were far more space and weight efficient while keeping me just as warm as my coat did. I used my old USMC “wooly pully” 100% wool sweater for this, and it was worth its weight in GOLD. A goretex shell or similar would have been nice to reduce windchill.
I didn’t have a cold weather sleeping bag, so I improvised by putting my lightweight Snugpack Jungle Bag inside of a mylar emergency sleeping bag. This was only effective the first night when the temperature reached about 35 degrees Fahrenheit, but was insufficient once temperatures dipped into the low 20s the following night. I had to use several hand and body warmers to keep myself from freezing, but at least I never caved and went back to my truck.
Lesson learned: Invest in a quality cold weather sleeping bag. Surviving the night is not enough, sleeping through the night is necessary to be well rested.
Equipment
It rained the day before the event, melting all the snow that had covered the landscape. Sadly, I didn’t get to use my over-whites, so I opted for MARPAT desert camouflage fatigues. The desert MARPAT worked incredibly well blending into all the dead leaves on the ground.
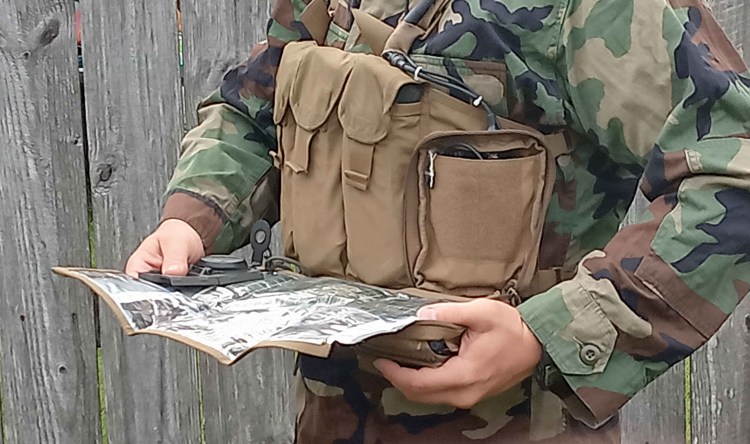
I carried my assault pack (SOG Ninja) with my Can Cannon strapped to the side of it in an experimental grenadier loadout, in addition to my belt kit and chest rig. This setup worked well, and the can cannon was easy to deploy from this position.
I used a surplus SAW ammo pouch on my assault pack to hold 66mm DPS rounds for the can cannon. It comfortably held 5 rounds ready to go, in addition to the three I had on my gear.
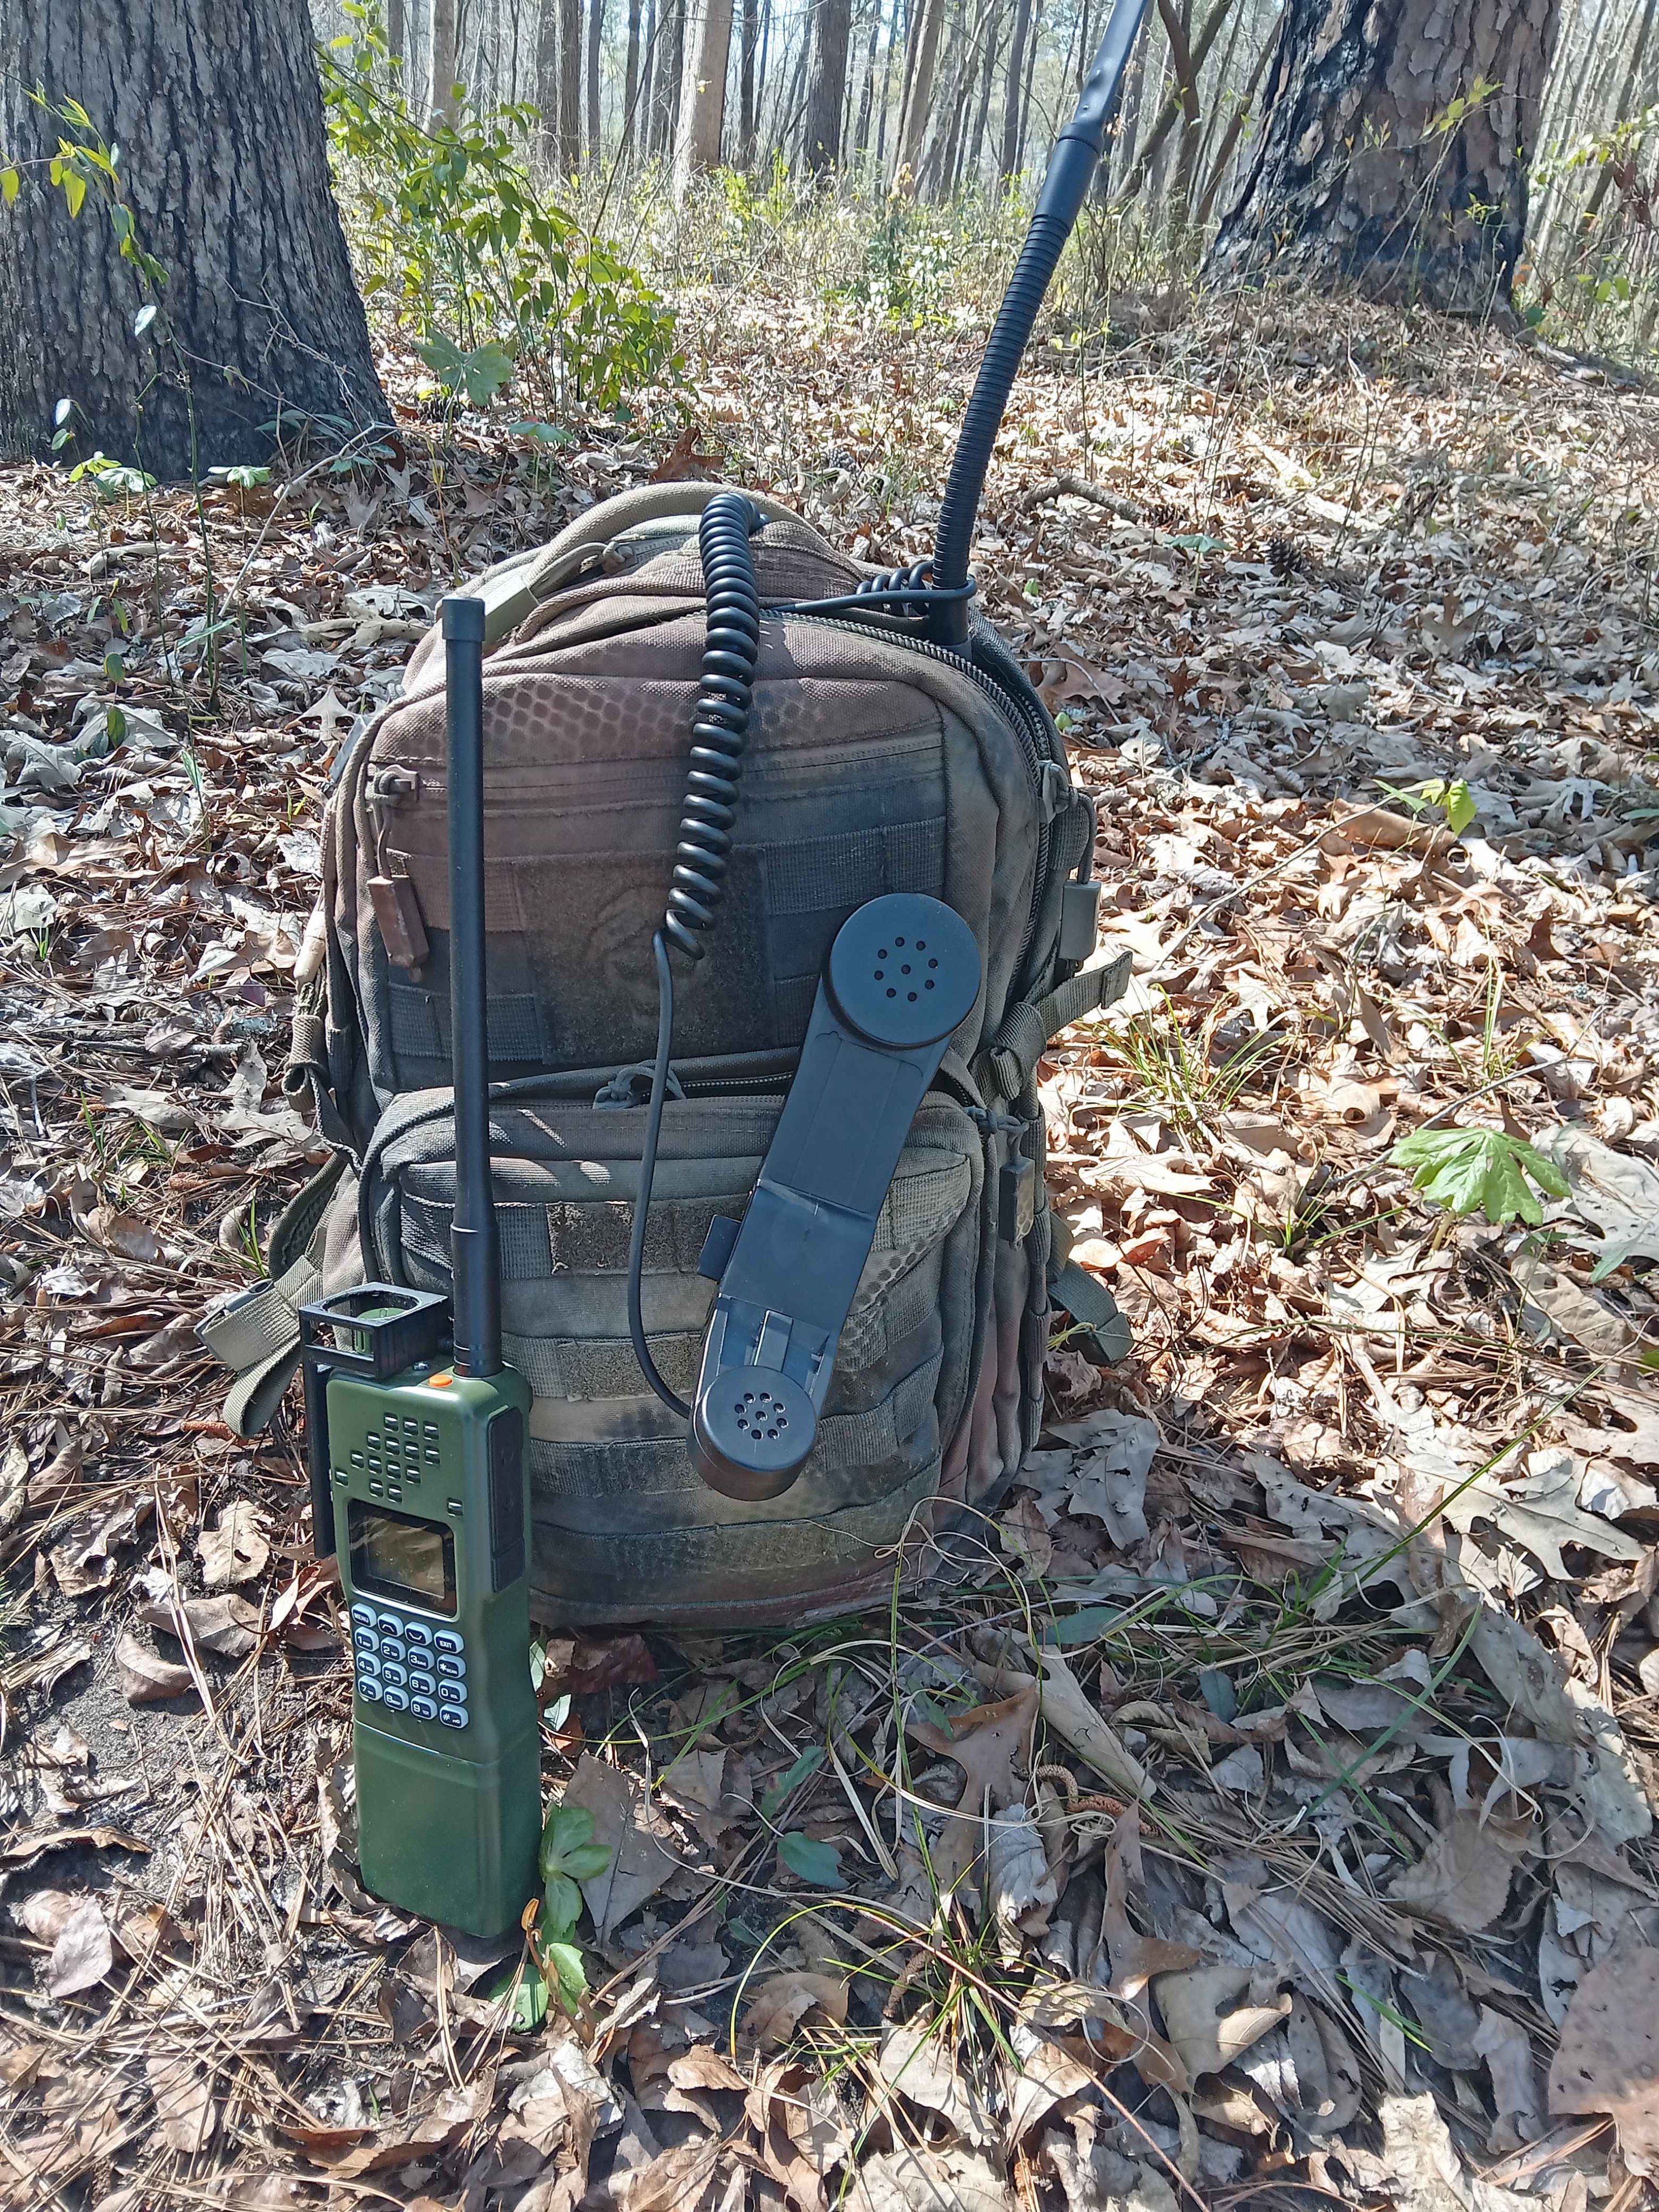
I tried to use my AR-152 radio with a PTT and headset, but this setup did not work as intended. I was unable to transmit anything but static using the headset/PTT, and had to remove it to use the external speaker/mic on the radio.
Lesson learned: Not all PTTs are made alike. All radio checks before a patrol must be done with ALL radio accessories attached, especially handsets/headsets. If I hadn’t been thorough on my equipment checks, I would have stepped on a patrol unable to hear or transmit.
The radio itself, however, was an absolute TANK. 2 days turned on in sub-freezing temperatures and it didn’t even lose 1/4 of its charge. Affiliate link: https://amzn.to/47FUZCC
At one point I had to take off my assault pack to low crawl underneath some low pine boughs. Dragging it along with one hand with my rifle in my other hand was not ideal.
Lesson learned: A drag strap with a large carabiner would have been very useful to attach to my belt and pull the pack behind me while keeping one hand free to crawl more silently. I will be adding one to my assault pack in the near future.
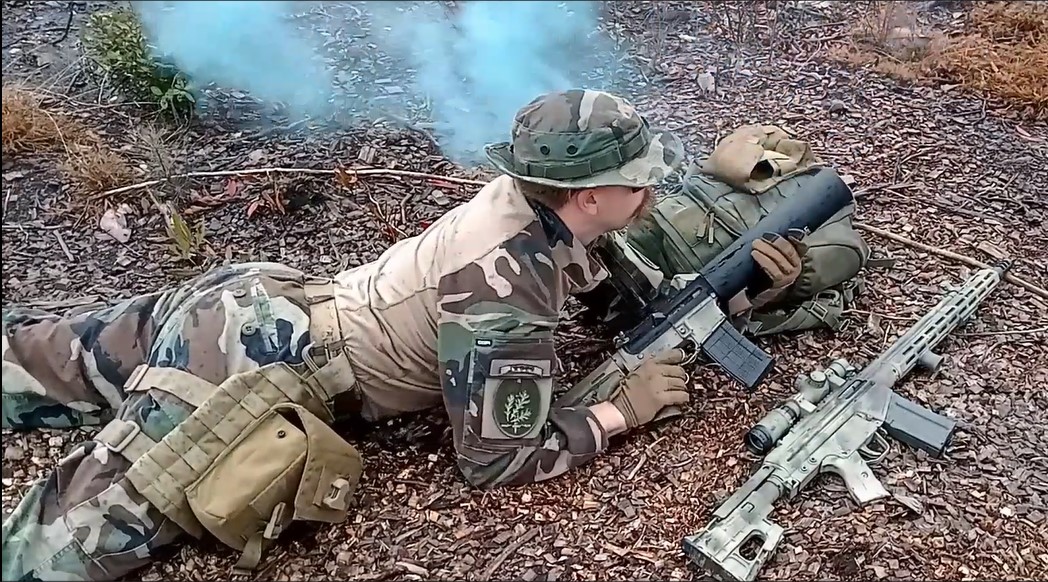
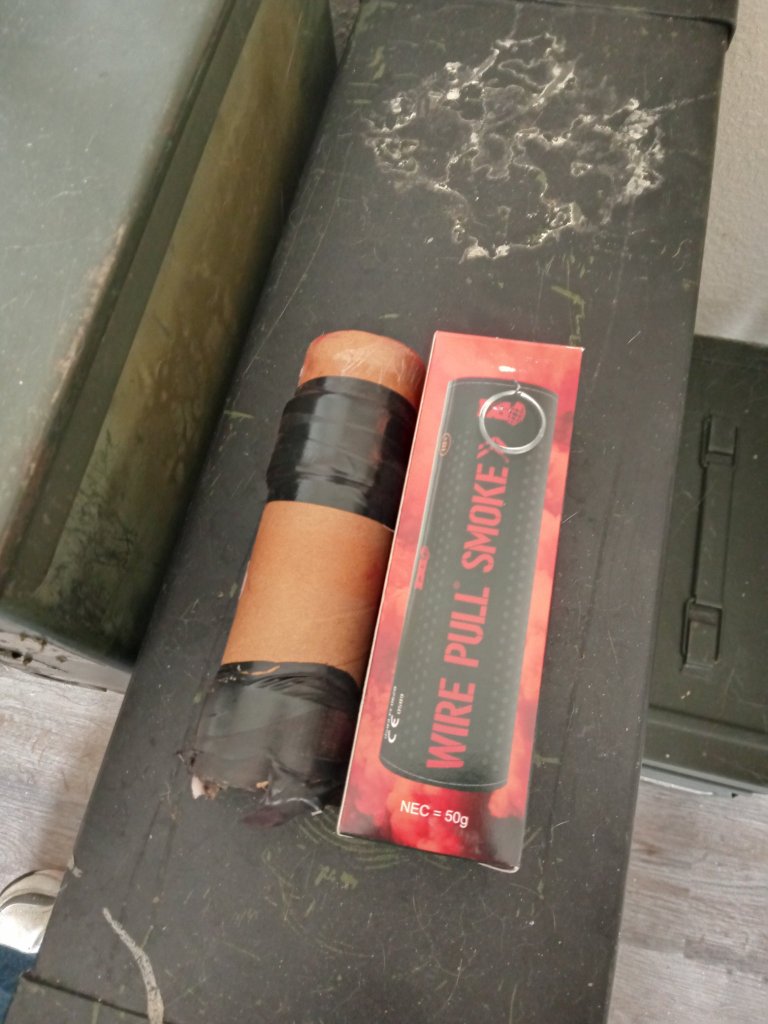
I experimented with Enola Gaye WP-40 smoke grenades. These are smaller than the EG-18s which I use for screening, but they cost half as much and I wanted to see if they had any real-world usefulness. During a raid, I handed one to the Team Leader of our maneuver element to mark his position to our support element. It worked great for that purpose, with 90 seconds of red smoke thick enough to see from several hundred yards away.
Lesson learned: For the size, weight, and cost, these are handy little tools that make a fine addition to any team leader’s analog signals kit (alongside chemlights, flares, and a whistle). 2 of them fit into a magazine pouch nicely, or 1 inside of a flashbang grenade pouch.
Enola Gaye WP-40 (this one is slightly modified… grenadier article coming soon!)
Tactics
The Can Cannon proved to be very useful with the DPS rounds. This topic deserves it’s own article/video, so I won’t try to go into depth here. Suffice to say, the Minuteman/Jäger Grenadier is here to stay.
Toob
I led a 3-man ambush on a 5-man patrol. The ambush plan went well until I tried to execute a withdrawal from the ambush site. Due to a miscommunication on my part and a lack of time to conduct rehearsals, I got “shot” while attempting to move.
Lesson (re)learned: Rehearsals are critical. Every part of an ambush must be rehearsed: setting into position, initiating the ambush, exploitation, withdrawal, and any contingencies. Failure to rehearse leads to greater risk.
Personal
I underestimated my physical fitness. Hiking up steep mountain slopes took more out of me than I’d like to admit, and running around with my assault pack and grenadier’s loadout made me more winded than I expected to be.
Lesson learned: I need to include more inclines into my run/ruck routes and just get out to PT more often. Combat is cardio.
Summary
You can read all you want, buy all the gear you want, and watch all the cool videos on how to do things. But nothing substitutes actually going outside and getting a little bit uncomfortable to test yourself, your gear, and your team.
Go for a hike. Take your gear camping. Attend a training class. Get comfortable being uncomfortable.
Stuff breaks. No matter how expensive an item is or how many torture tests it passes, everything will wear out and break eventually if it is actually used. Or human error gets the best of us and we just lose things. When this happens in the military, Uncle Sam just reaches into his your pockets and replaces said expensive item. But what about you? Can you afford to replace your equipment if it breaks?
I’ve written in the past about gear snobs and their obsession with purchasing only the latest and greatest equipment available. There’s nothing wrong with expensive equipment, I have some nice things myself. But what happens when that gear gets damaged or lost? Can you afford to replace it? If it breaks in a WROL scenario, you probably won’t be able to buy replacements, so do you have an extra on hand right now? ”Buy once, cry once” is misleading; everything breaks.
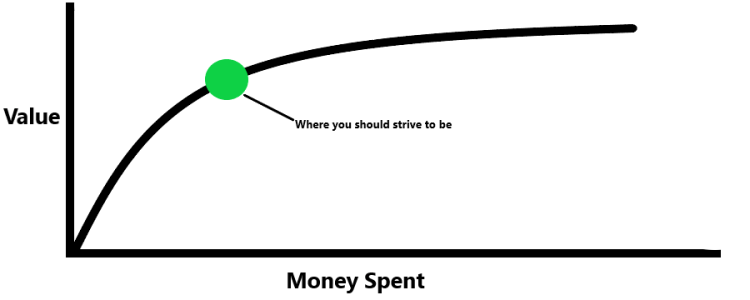
Performance vs. Price: the Eternal Quest for Balance
All equipment should be considered consumable, and you should plan to replace or fix everything at some point. If you have to save for months to get a $160 combat uniform when a $40 set of military surplus utilities would have met your needs, it will hit you much harder when you tear up your knees low crawling through dirt, gravel, and brush. For some people who know they can’t replace/fix their $80 combat pants, this fact even prevents them from training in them.
That said, the opposite extreme is detrimental as well. It would be folly to look at this issue and decide to only buy the cheapest gear available so that you can more easily replace it when it breaks. It does you little good to buy crap gear for the sole purpose of being able to replace it with more crap. There is a balance to be had here. A balance that is different for everyone depending on their means.
This goes back to the principle of diminishing returns from my previous article on this topic. There is always more value in the more expensive gear, but at some point the value gained is no longer worth the increase in price. At a minimum, make sure that your gear satisfies your operational requirements. Just don’t spend too much extra on useless features.
The Principle of Diminishing Returns
Fixing Gear
It is extremely beneficial if you have the resources and the skills to repair your damaged equipment and get more life out of it. This is a temporary measure, but greatly helps extend the operational life of your gear. I always carry a “fix-it kit” in my assault pack consisting of 100ft of paracord wrapped around a pack of large zip ties, plus a roll of duct tape. These three items have saved me countless times in the field when something rips, tears, or falls apart. I once zip-tied a fellow Marine’s boot back onto his foot when his bootlace got shredded. Not ideal, but it got him through the rest of the patrol.
Pro tip: Don’t throw away your torn camouflage clothing. You can cut it up and use it to patch your other camo clothing when it tears. Patches over holes hold up much better than simply stitching the hole shut.
Sewing is an invaluable skill to have.
How to Run Spares
I don’t have an issue with expensive gear. Far from it, I have a few nice things myself. What I have an issue with is refusing to train with a piece of gear because one considers it “irreplaceable”. If a piece of kit is so expensive that you are afraid to train with it, you cannot actually afford it.
In an ideal world, you would have duplicates of every item in your kit. This is possible for some cheaper items (cammie paint, flashlights, canteens, etc.), but becomes unrealistic for the more pricey items.
Spare items don’t need to be exact copies, they just need to accomplish the same purpose. One thing that everybody does is upgrade parts of their gear, and certain items get swapped out with better/newer ones from time to time. Rather than ditching, selling, or giving away the old gear, consider holding onto it as a backup (unless the gear being replaced is actually garbage). For example, I have an expensive field uniform that I regularly train with. My replacement plan is milsurp camouflage fatigues that I’ve been using for years and that I know work just fine, albeit slightly less comfortable.
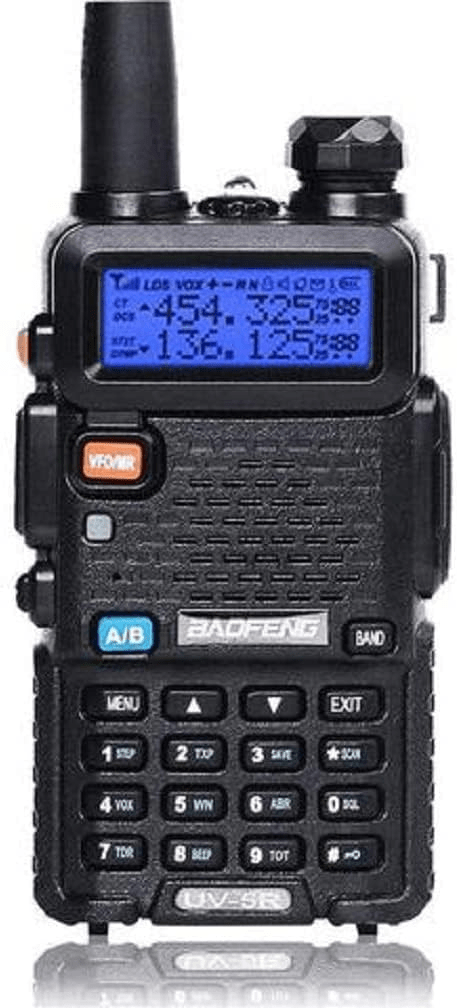
It never hurts to have a couple of cheap handheld radios handy as spares or to hand out to the less prepared. Affiliate link: https://amzn.to/3TK5NML
We can also plan to replace certain items with skills if necessary. For example, GPS receivers are potent land navigation tools. If my GPS (or the network) goes down, I also have the ability to land nav the old school way with a compass. Another example of running spare “skills” instead of gear is backup iron sights on a rifle. If you’re running a red dot with cowitnessed or flip-up iron sights, your replacement plan for your optic is the ability to hit targets with the irons.
Using “backup skills” instead of “backup gear” certainly seems like a cheaper option. The only catch is that you actually need to have the skills. If you’ve never attempted land navigation with a compass and your GPS goes down, you’re screwed. If your backup iron sights aren’t zeroed and you don’t know your holds, you might as well not have them. Don’t be lazy, train with your gear. All of it.
Summary
There is nothing wrong with having nice things. Just ensure that you have a backup plan for when things eventually fail you. Don’t let a piece of equipment be a single point of failure for you. Use spare equipment, skills, or a combination of both to enable you to continue your mission.
If you’re getting started assembling a kit or want to look into affordable equipment to run as backups, check out my Rifleman on a Budget Page. I have personally tested everything on that list and verified that it holds up under field conditions without breaking the bank.
Anyone who has ever done any sort of small-unit tactics training can remember “covering” a buddy while they move. This is good to learn, but there can be a bit of misunderstanding as to what actually constitutes “covering fire” or “suppression”. Just because you are putting rounds downrange does not necessarily mean that you have “covering fire,” and assessing the effects of fires is a very important skill for any rifleman, but especially team leaders.
Defining Some Terms
Before I explain how this is done, it is first necessary for me to define some terminology to avoid confusion going forward.
Fire: The act of putting rounds or ordnance downrange in order to create a desired effect. Can be pluralized (e.g. “fires”) when referring to the actions of a unit firing several weapons at once.
Effective fire: Fire that is accurate enough and heavy enough to have an effect on the element being fired upon (forcing them to take cover, stop/slow movement, or take casualties).
Suppression: The result of effective fires on an element that prevents them from moving, shooting back, or otherwise doing their jobs for fear of getting hit/killed.
Okay, now that we’ve squared away the jargon, let’s discuss the effects of fires.
Effective vs. Ineffective Fire
Effects are everything on the battlefield. It matters not so much how many bullets you shoot at the enemy or of what caliber they be, so much as it matters what effect those bullets have on the enemy. Did you inflict casualties? Did you suppress their movement? Did you disrupt their plans in any way? What effects did you desire, and did you create that effect? If the answer is yes, then nothing else actually matters.
We use effectiveness to gauge the severity of incoming fire. The phrases below are some of the ways to communicate the severity of incoming fires:
Effective fire: rounds are impacting close enough or heavy enough to have an effect on our actions (e.g. force us to take cover, inflict casualties, etc.)
Sporadic but effective fire: the volume of incoming fire is light, but still accurate enough to have an effect (think well-aimed sniper fire)
Sporadic and ineffective fire: rounds are occasionally impacting in our general vicinity, but are inaccurate enough that we are able to accept the risk and power through to continue mission.
The receiving end of effective fire
Many factors play into how effective fires are, but the biggest one is training. A green, inexperienced unit will be more easily suppressed by a few potshots than a group of seasoned veterans who understand better what incoming fire actually poses a risk to them. What would be considered effective fires on the first unit may be dismissed as sporadic and ineffective by the second. This only works so far, though. No amount of training can make you bulletproof.
On the other side of the coin, the level of training of the firing unit also has a direct impact on how effective their fires are. A properly trained team with a good team leader will be able to communicate where their targets are to ensure that their rounds impact as close to the enemy as possible, which greatly improves the effectiveness of their fires. An untrained or poorly trained squad may simply call “CONTACT LEFT” and leave it at that, with everybody firing into the general “left” side with no further fire commands. See my article “Rates of Fire for the Rifleman” for more on how this is done.
Assessing the Effects of Fires
In small-unit tactics drills, one element suppresses the enemy while the other element moves, protected by the firing element. As the golden rule of fire and movement goes:
“Movement without suppression is suicide.Suppression without movement is a waste of ammunition”
Suppression isn’t just fire, it is effective fire with the desired effect of keeping the enemy’s head down enough that he is not placing effective fires on you. Before any movement is initiated, the firing element should first assess the effects of their fires before telling the maneuvering element that they are safe to move.
There are a few ways to assess the effects of your fires. First, determine if the enemy is still placing effective fires on you. If so, movement is suicide, and you need to increase your rate of fire to gain fire superiority and achieve suppression. Once the enemy fire ceases or at least becomes “sporadic and ineffective”, then you know that suppression has been achieved and the maneuver element can now move. In urban areas, you may even have visual cues where you actually see the enemy duck behind cover. If engaged at night, a reduction in the number of observed muzzle flashes may be an indicator of effective suppression.
However you do it, it is vital that you assess the effects of your suppression before initiating movement. Failing to include this step in small-unit tactical training is training to run headlong into accurate, well-aimed rifle fire. Take your time, get fire superiority, then move. There are, of course, certain exceptions to this principle, and some drills (such as reaction to a near ambush) must be executed swiftly regardless of fire superiority. These are acts of desperation, however, and should not be the default response to all contact.
The same applies when employing smoke screens, which is another type of “fires”. Assess first whether the smoke is actually doing what you need it to do before relying on it for concealment. Remember, when it comes to smoke grenades, one is never enough.
Got comms? A reliable handheld radio is indispensable for a team leader. Affiliate Link: https://amzn.to/41V5Bwl
Summary
Understanding the effects of fires is important for the aspiring tactician. Assessing the effects of fires should be a part of battle drills, which is why I teach it in my classes. If you’re the firing element, it is your responsibility to assess the effects of your own fires before telling your buddy(s) in the maneuver element that they are good to move. Ensure that your team knows how to do this and train accordingly.
Boltboy and I demonstrate how to modify EG-18 smoke grenades such that they can be launched from a can cannon. We call them 66mm DPS (Dual-Purpose Smoke) rounds, since they can be launched for hasty target reference points or thrown/launched for screening movement.
We are NOT building explosives, we are simply putting a pre-made pyrotechnic into a shell that can be launched. The techniques shown in this video were all done in a safe and legal manner. Ensure that you comply with all state and federal laws before attempting to recreate anything from this video.
At this point in our experimentation, I have concluded that the can cannon (66mm soda can launcher using 5.56 blanks) has a place in the Minuteman or Jäger squad. Launching smoke grenades is just scratching the surface of what is possible, you could hypothetically launch any payload using a can as wadding in this fashion, so long as the weight does not exceed 450 grams or so. As we continue our experimentation, I am developing TACSOPs (tactical standard operating procedures) for its use, which I will publish once I am happy with it.
We are also experimenting with other options for the grenadier. Strobe light projectiles could be used for nighttime marking. A golf ball launcher muzzle device would be more compact and lightweight if we can design projectiles that fit it. The .308 can cannon would have potentially much greater range (300m compared to 100m with the 5.56 cannon) if we can design projectiles that won’t disintegrate under the increased pressure.
This smaller smoke grenade shows promise as a purely marking round. Testing is currently underway.
I apologize for the lull in posting lately. Getting out of the military is a long and complex process, especially when combined with buying/moving into a new house and job hunting. But I’ve resolved most of that and expect to pick back up after the holidays. If you want to see more video content, let me know in the comments.
Part I of this series laid out the pros and cons of armor and provided context on when it should be used. Part II was a guide on what to look for when purchasing armor. Today, in part III, I will demonstrate proper fit and wear of a plate carrier and provide some tips on how to set yours up.
Fitment
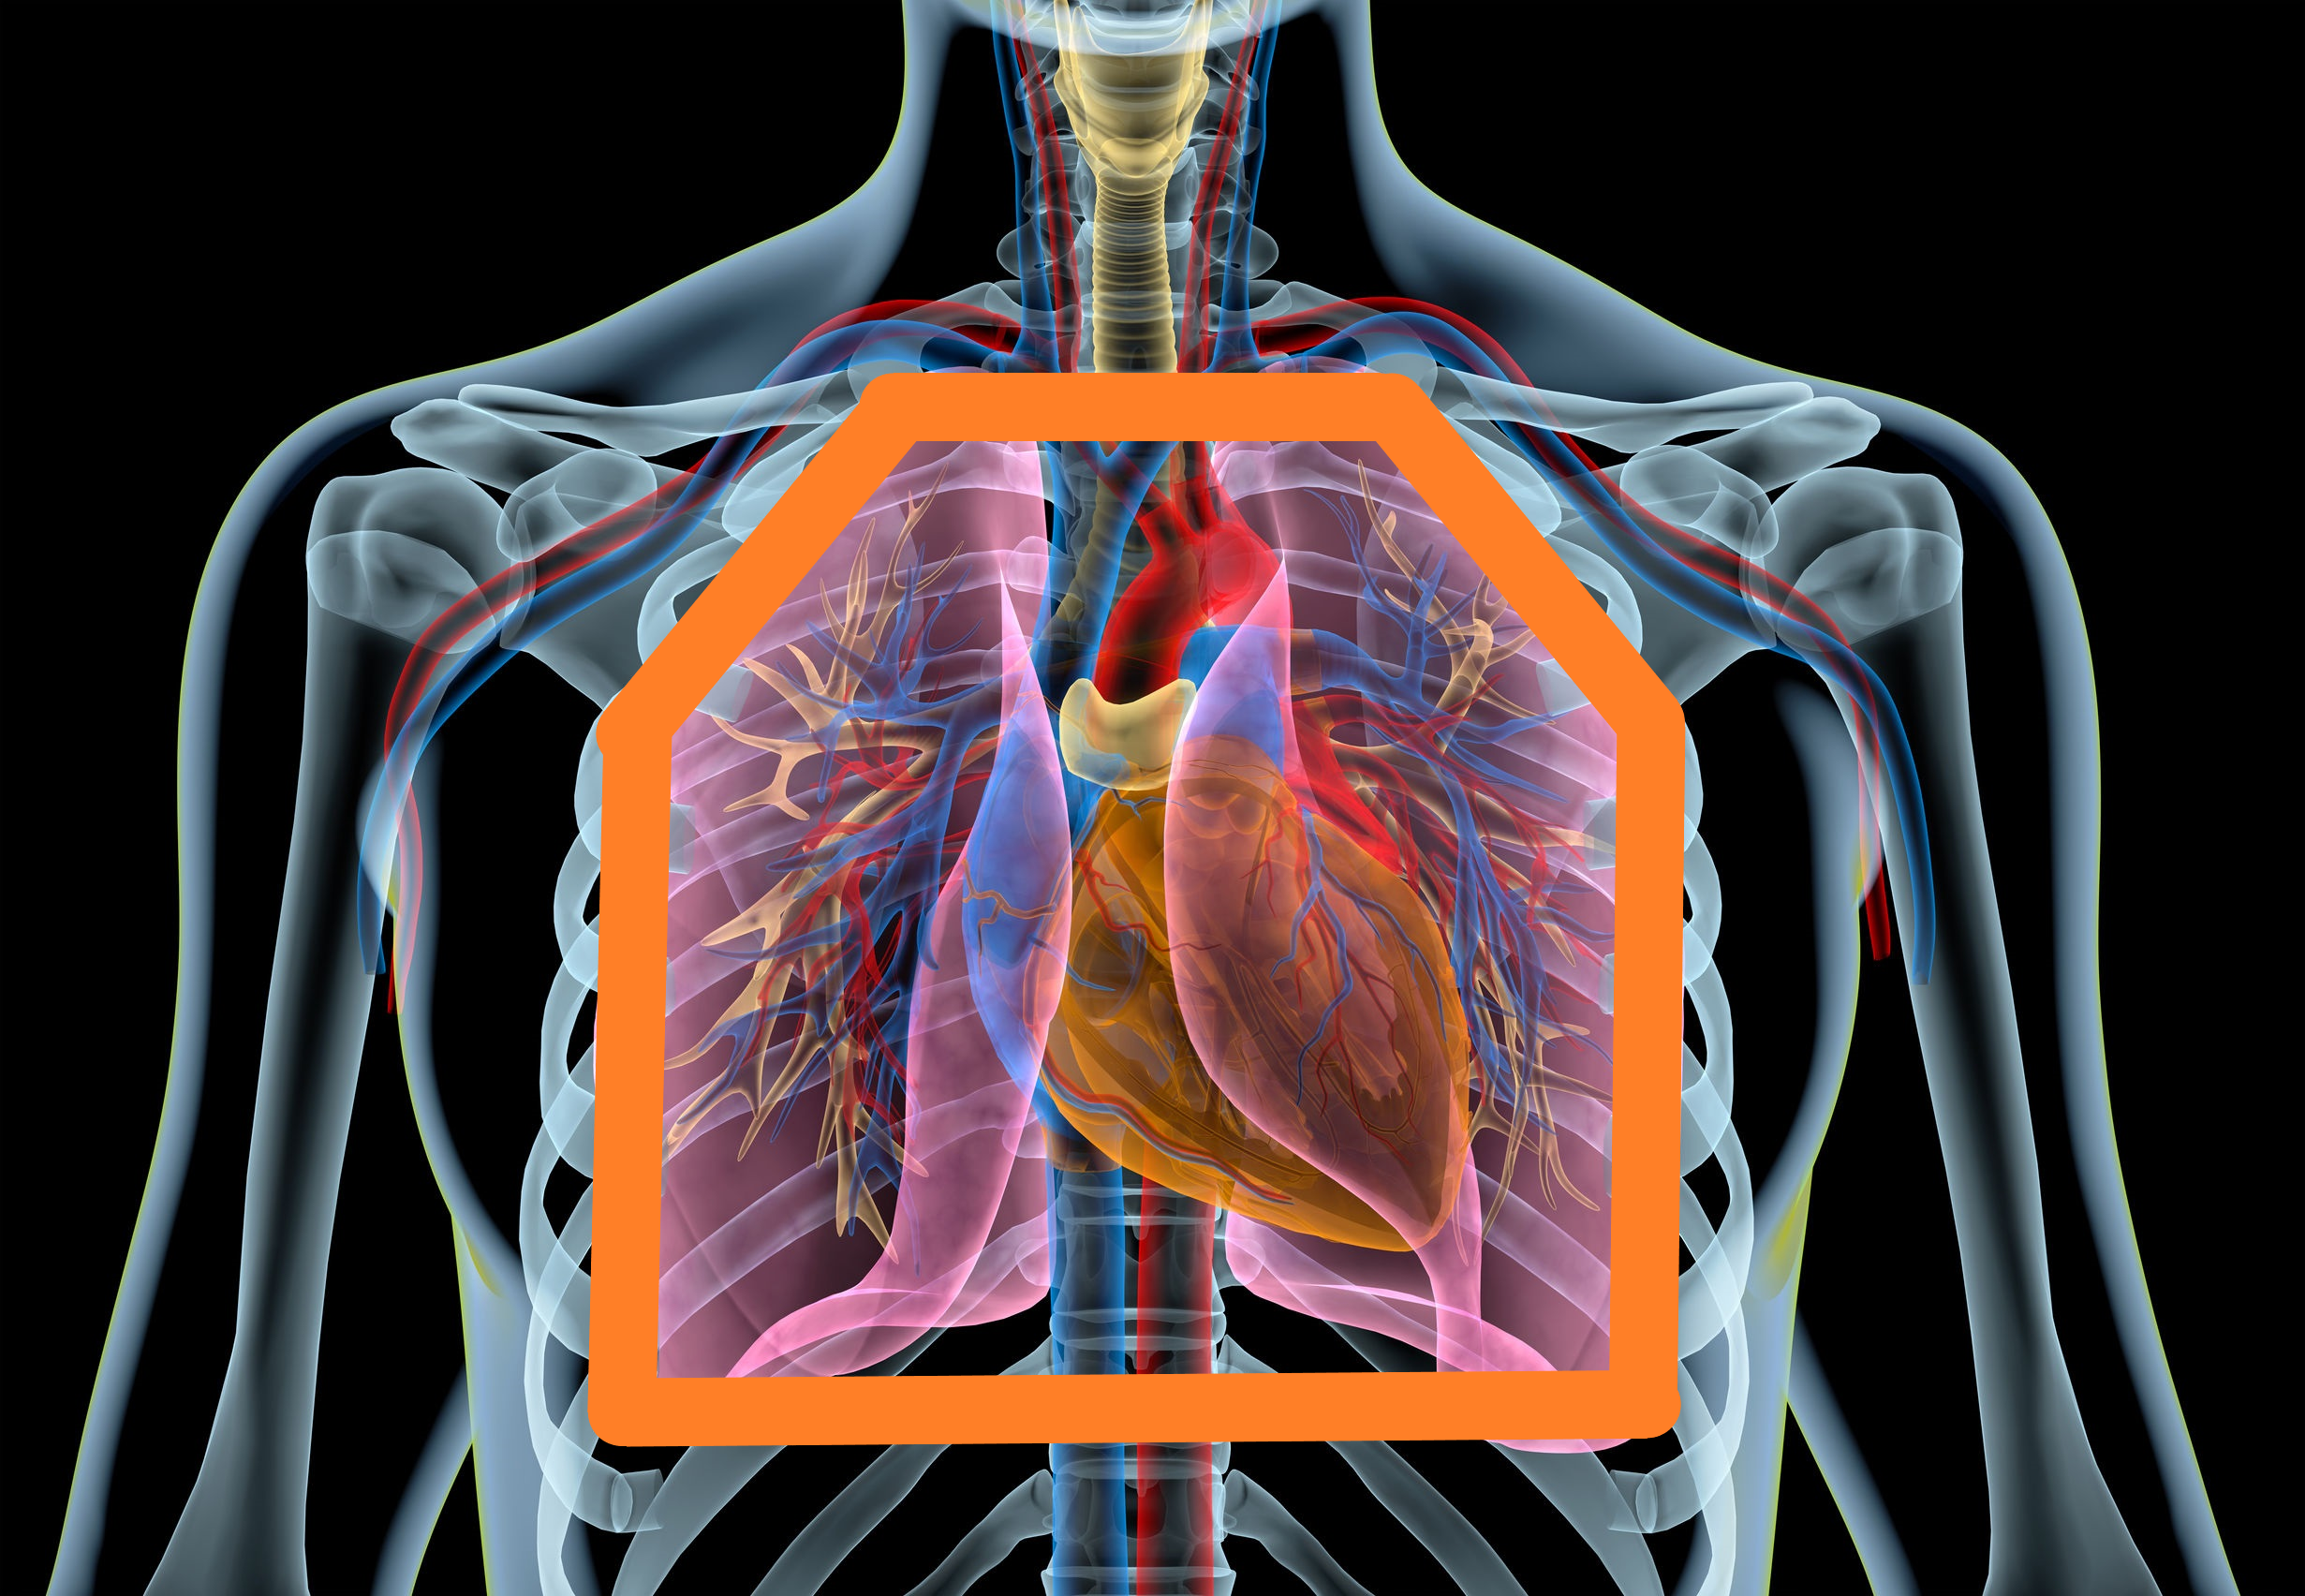
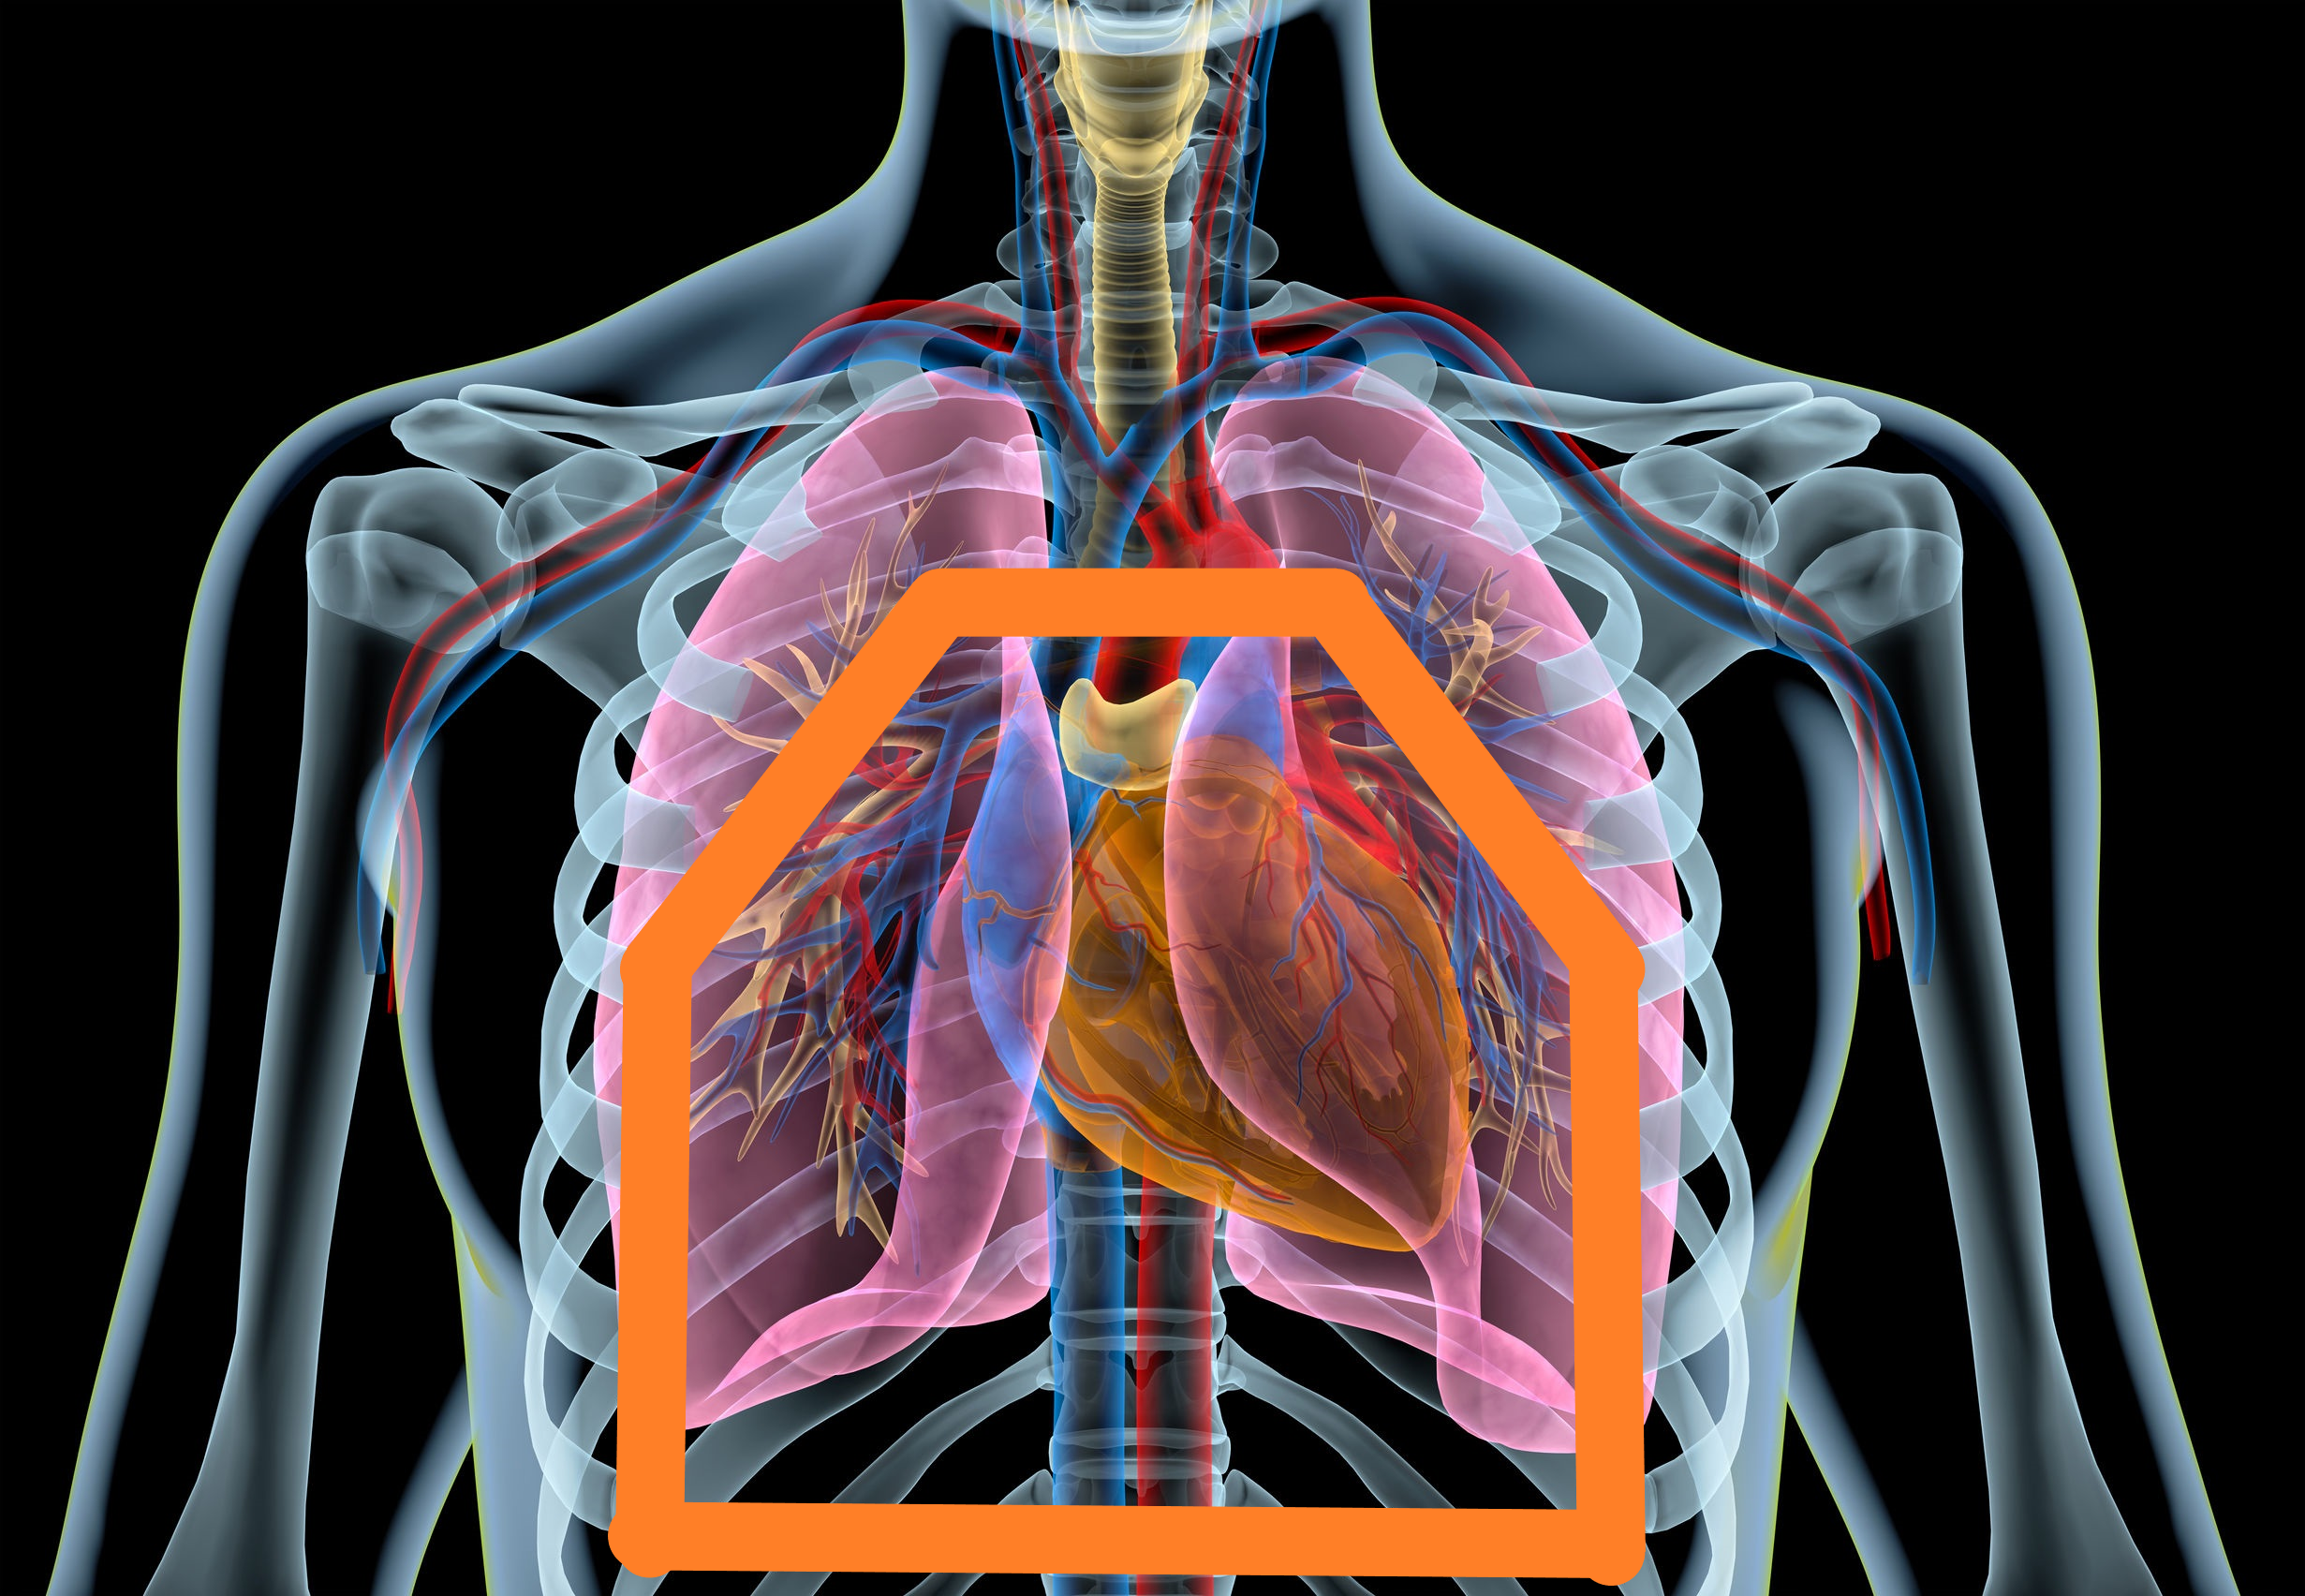
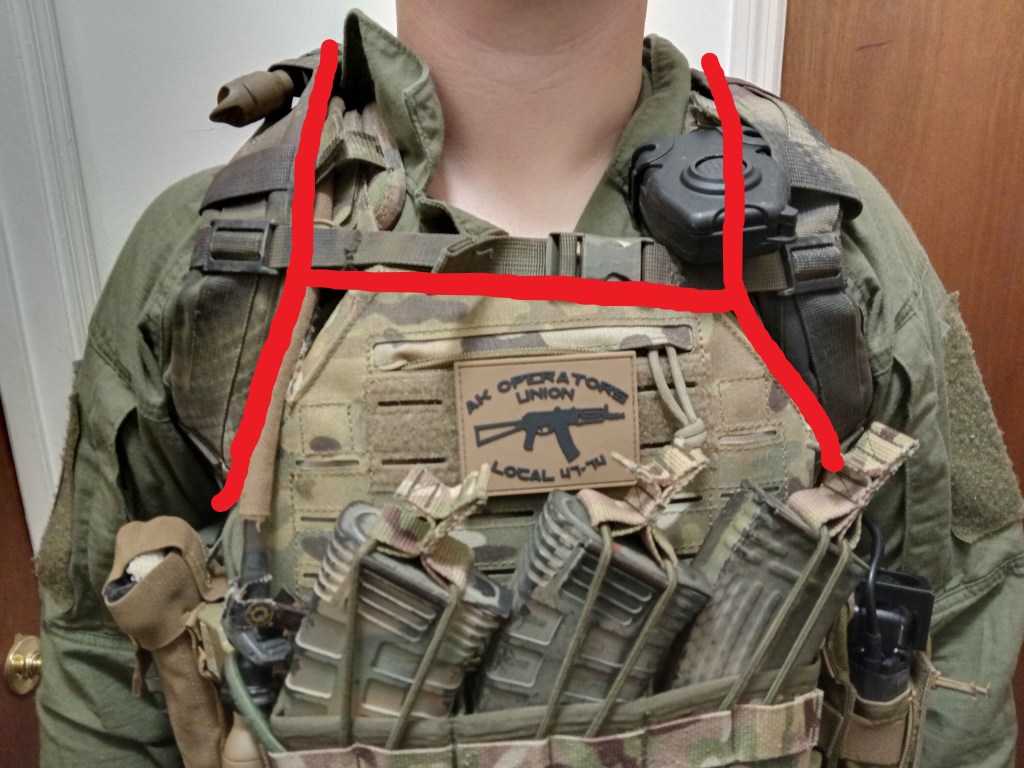
Armor plates should be high enough to protect the vital organs in your upper chest (heart, lungs, and lower trachea). Adjust the shoulder straps until your plates are at the proper height as shown below:
Top of plate at or just below the clavicle.
Top of plate at same height as front plate.
The image on the left shows the armor plate (in orange) worn properly over your heart and lungs. The image on the right shows improper plate height, leaving parts of the heart and lungs exposed.
Once your plates are at the correct height, tighten the cummerbund so that it is snug, but not tight. Take a couple of deep breaths, do some jumping jacks. It should be snug enough that the plate carrier does not slide around (which causes chafing), but not so tight that it restricts your ability to breathe. If you feel your chest being “squeezed” when taking deep breaths, the cummerbund is too tight.
Velcro cummerbunds are best because you can quickly adjust the tightness for different types/layers of clothing.
If your cummerbund has a buckle system, you will have to re-measure the fitment for different types of clothing (i.e. a combat shirt for summer vs. warming layers in fall/winter).
Wearing a Plate Carrier
Body armor is uncomfortable, you’re just going to have to accept that. That said, there are some ways to make it slightly more bearable.
What you wear under the plate carrier is important. Your base layer should be made of a moisture-wicking material that dries quickly. Cotton is a bad choice because it retains moisture and can accelerate chafing underneath the plate carrier. This means that those $25 “combat shirts” on amazon are a no-go for anything other than cool-looking selfies. Invest in a quality combat shirt, or at least a couple dry-fit long sleeve shirts in muted colors.
While not the most rugged option, cheap dry-fit shirts like these make a fine base layer underneath a plate carrier. The downside is that the material on the sleeves is very thin. Affiliate link: https://amzn.to/4880Yl8
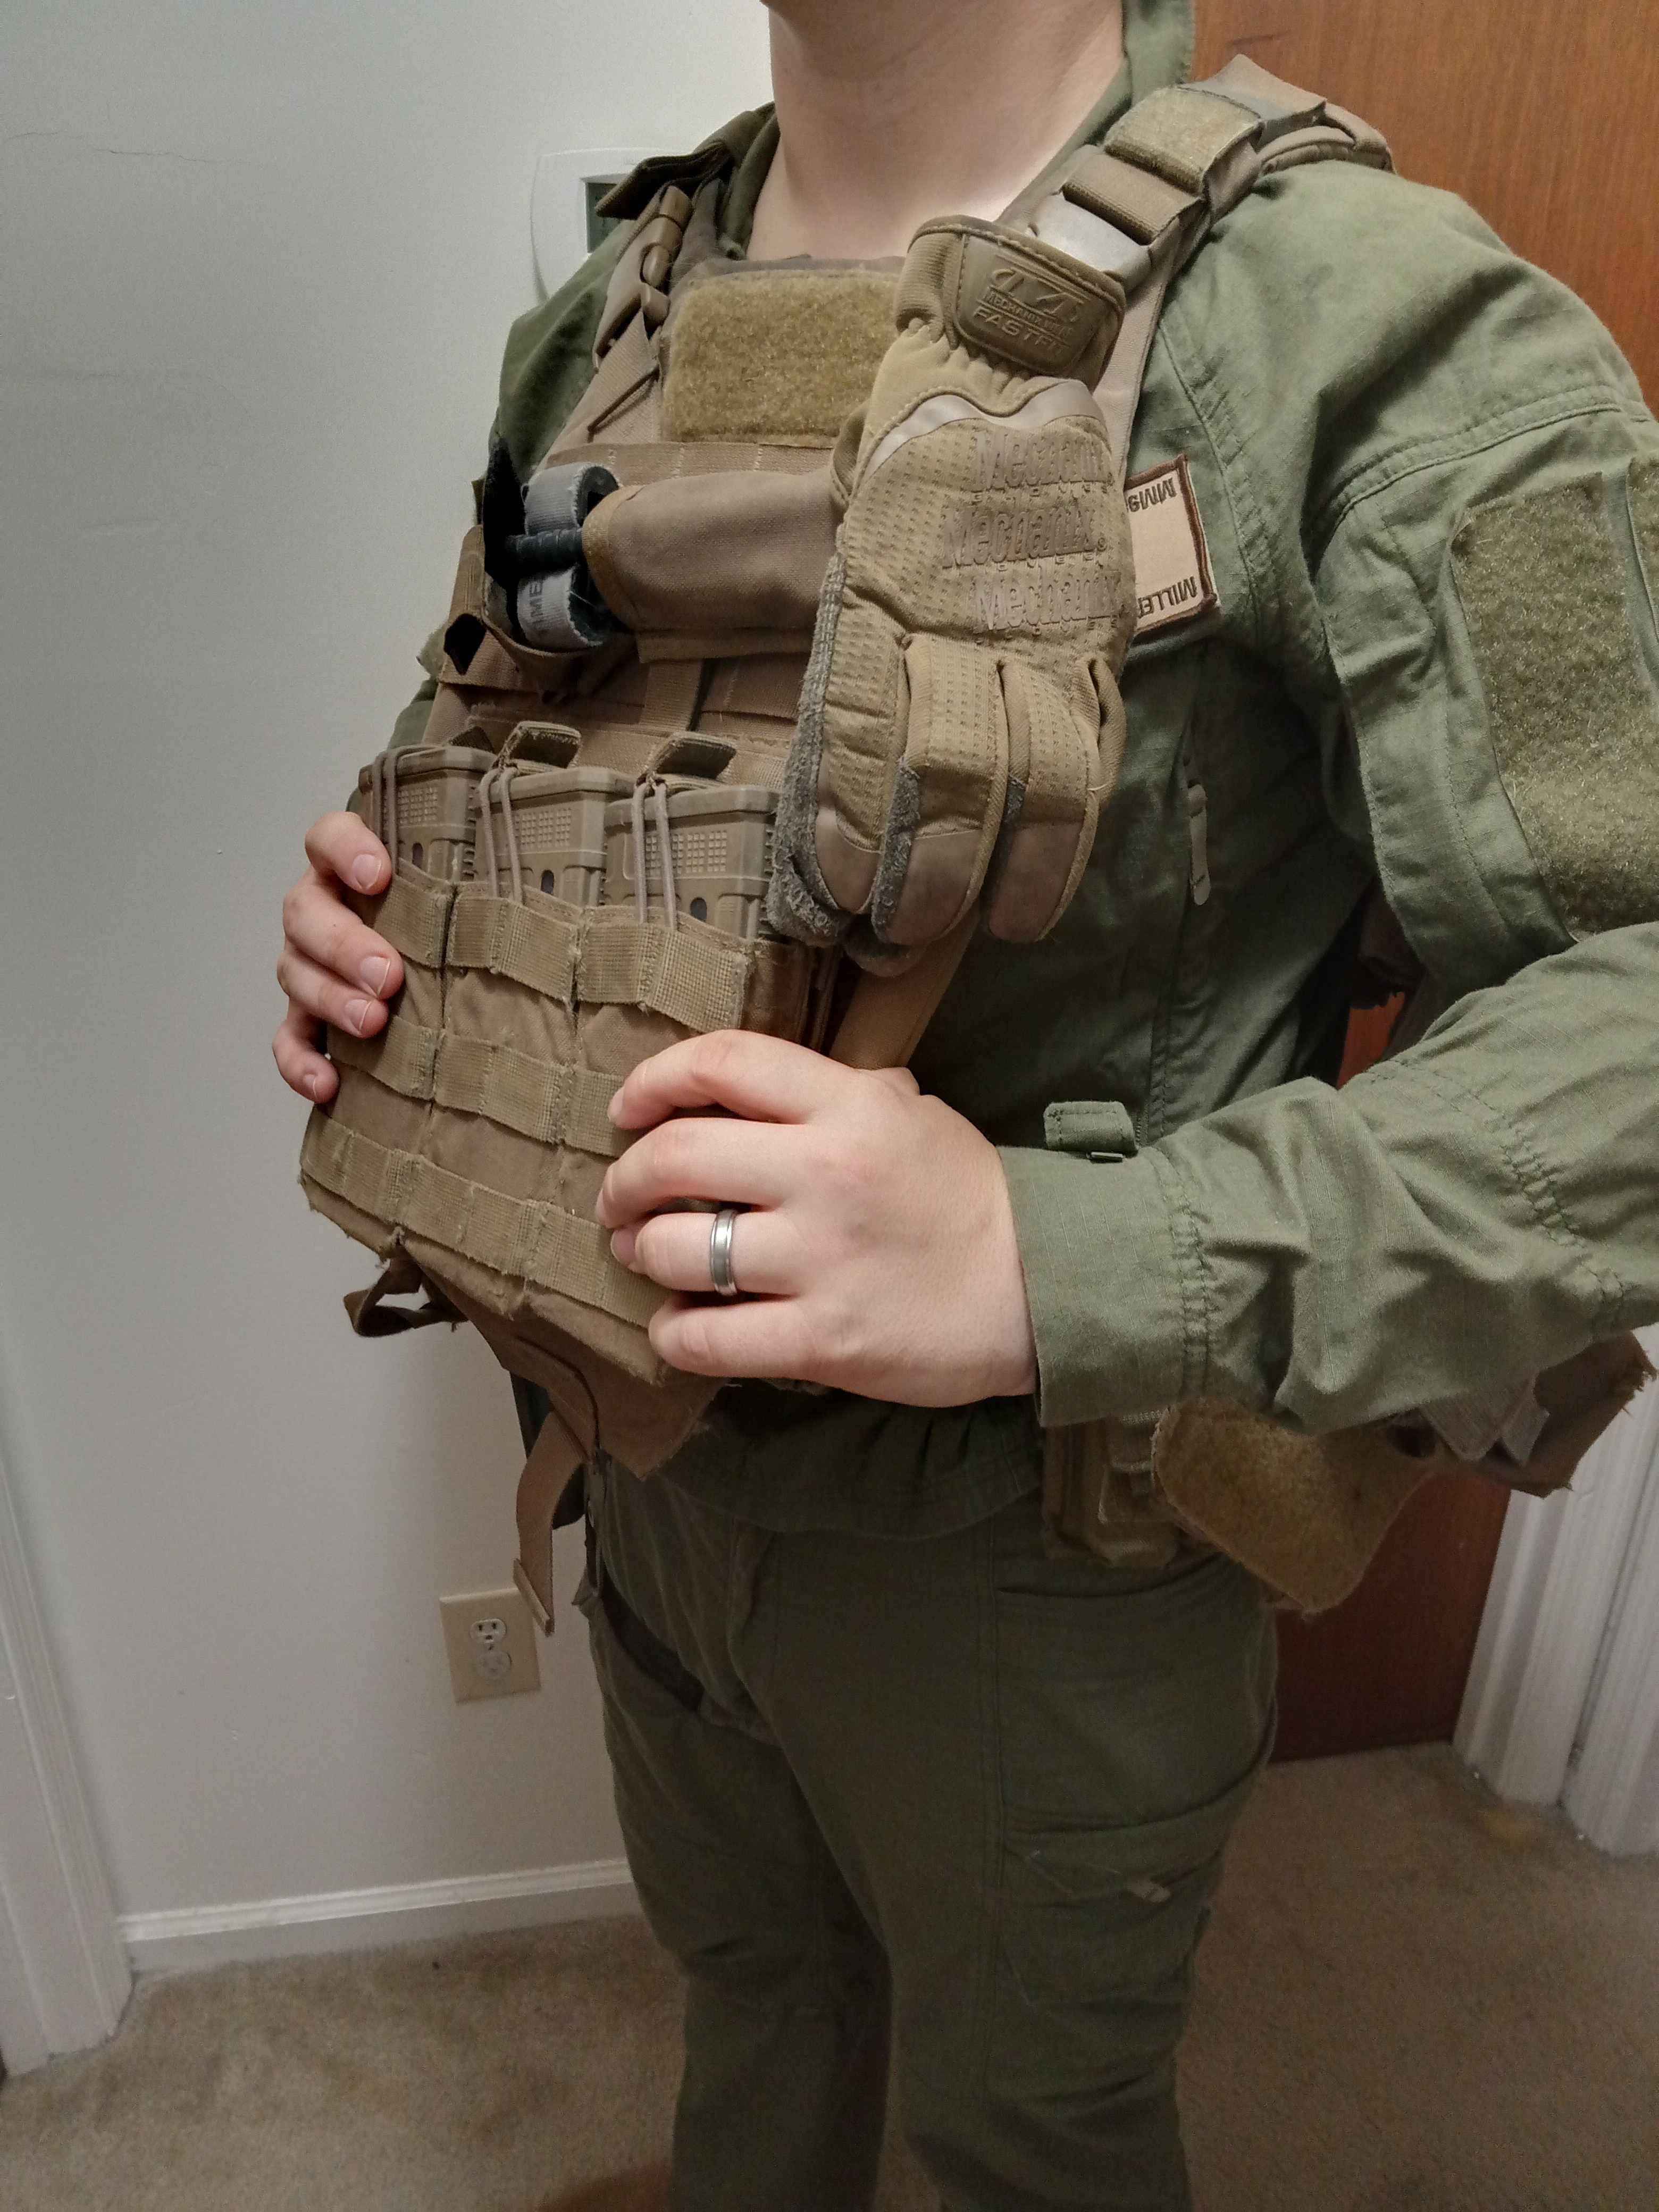
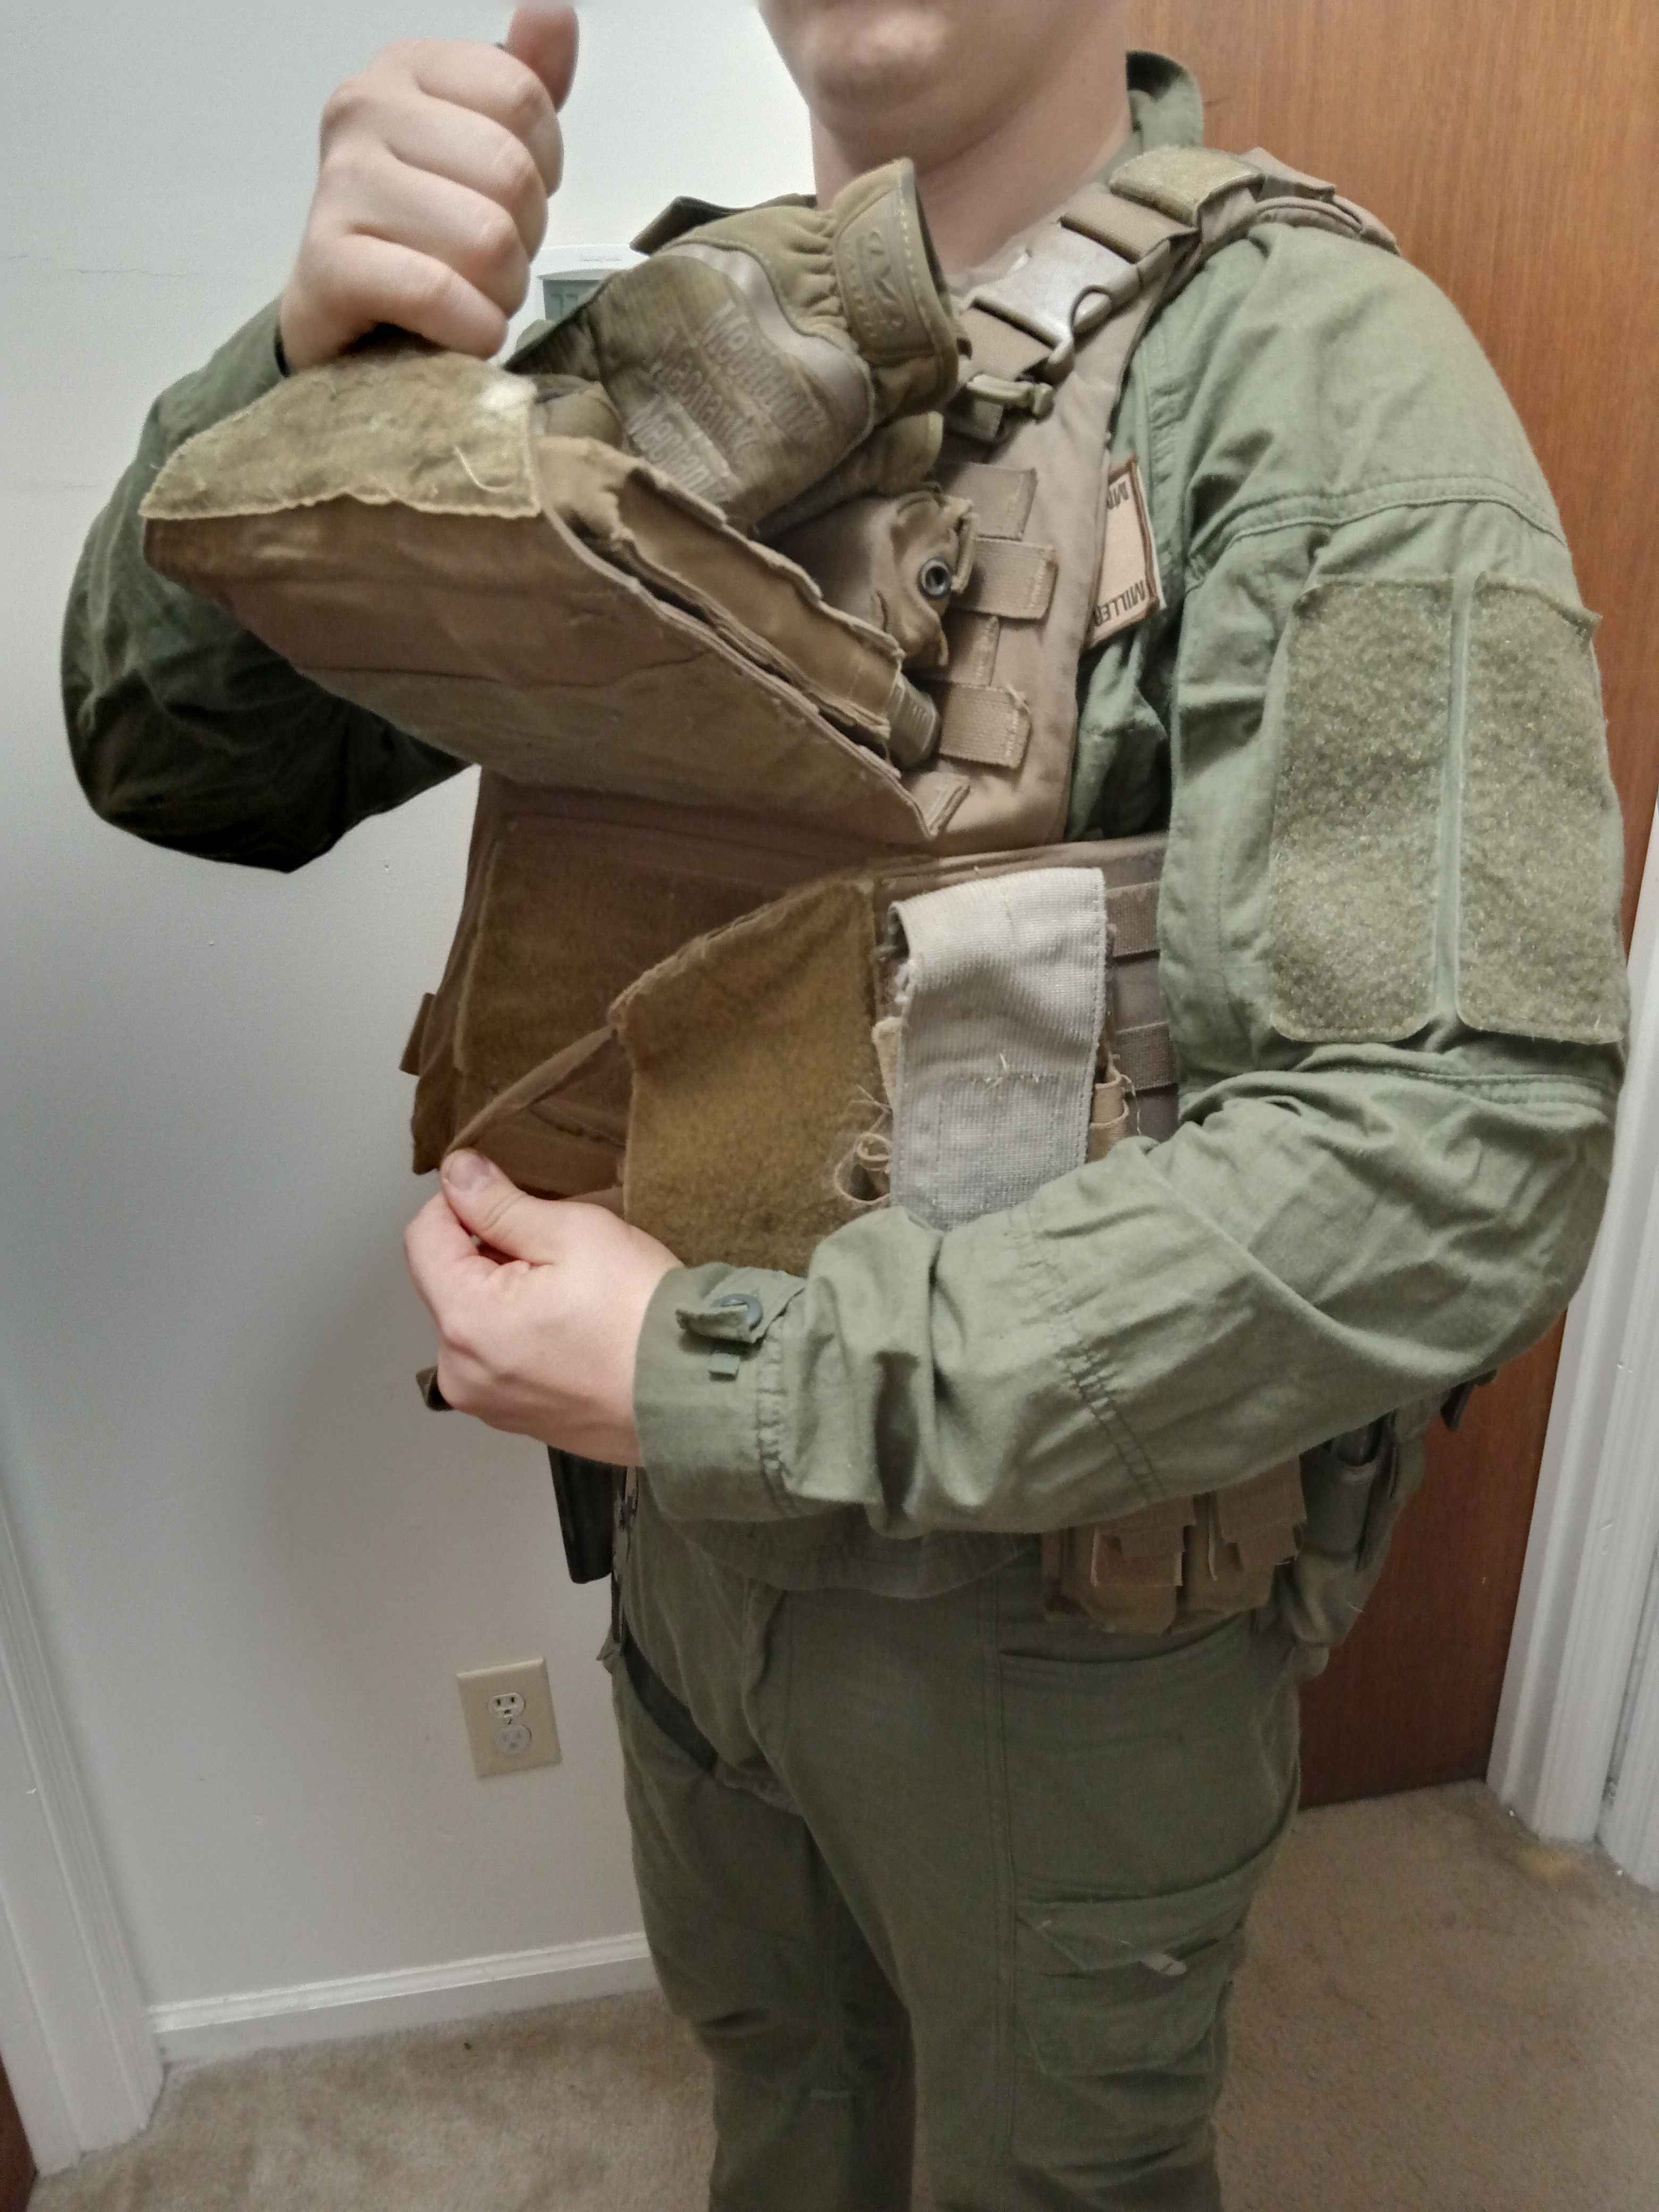
Collared shirts can help mitigate chafing from shoulder straps rubbing against your neck. To take advantage of this, make sure to “pop” your collar over the straps so they aren’t just flattened underneath.
“Pop” your collar to prevent chafing, you can fold it back down on top of the straps if you like. This also helps prevent chafing from your rifle sling.
When wearing a backpack over your armor, be sure to use the sternum cinch (the strap across your chest). This pulls the shoulder straps in so that they rest on the front plate instead of your shoulders. This distributes the weight of your pack onto the plate carrier and makes it easier to carry, while also preventing the straps from cutting off the circulation in your arms.
Correct: Sternum cinch pulls the shoulder straps in, distributing weight across the front plate.
Incorrect: Without the sternum cinch, the shoulder straps settle onto the outside of the plate carrier, putting all the weight on the shoulders.
The best way to mitigate the discomfort of body armor is simply to get yourself accustomed to wearing it. Once a week, throw on your plate carrier and run a few miles in it. I know, it’s not as easy as buying some gadget, but it’s far more effective. Once you’re used to running in your armor, sitting in a guard post or a vehicle with it on no longer seems that bad. And if you’re not physically able to run even 2 miles with a 20lb plate carrier, you need to get in shape.
Assembling a Plate Carrier
If you’ve read my other articles on gear, you know that I prefer to give general advice rather than hard rules. This article is no different, so the following are my tips from my 8 years of wearing body armor in many different configurations for many different mission sets.
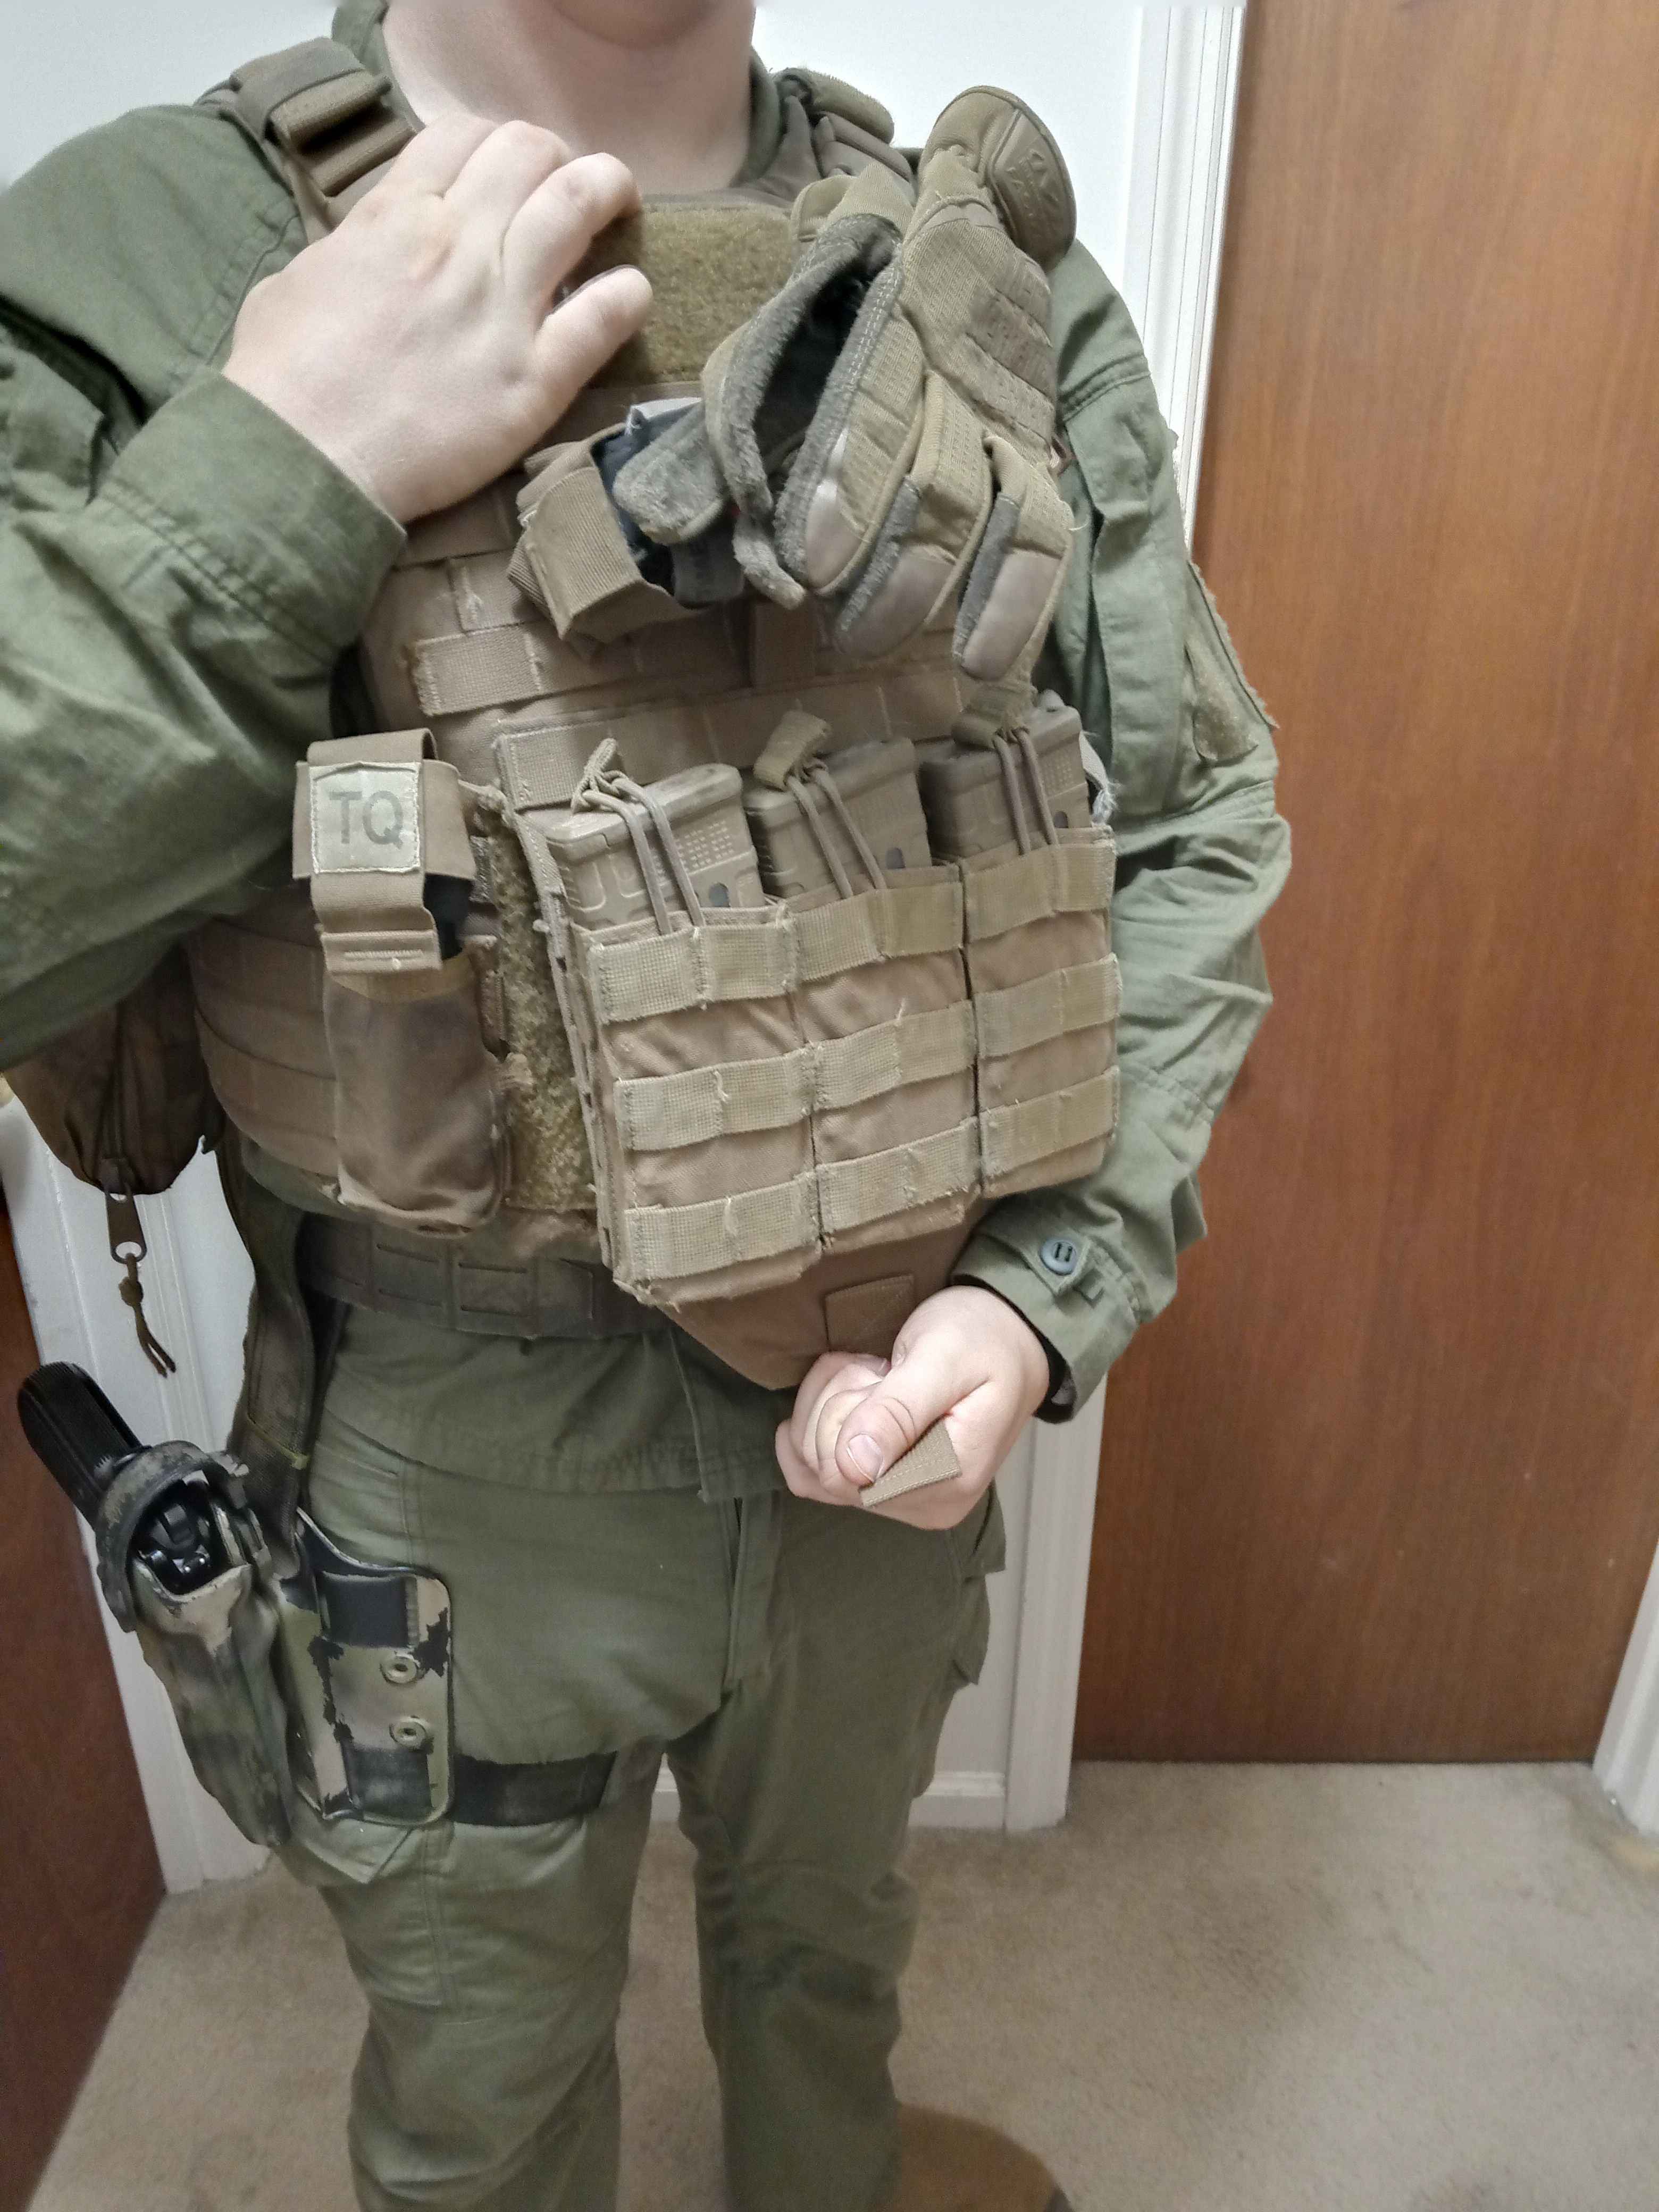
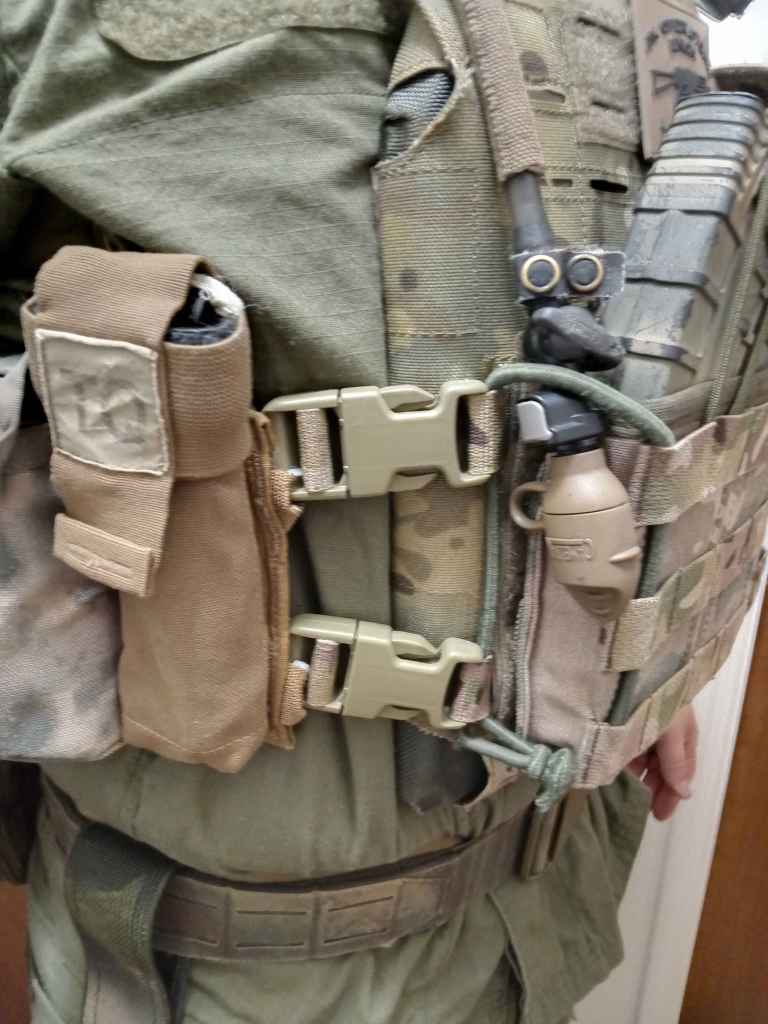
Refrain from putting a ton of gear on the front. It makes getting into the prone very, very uncomfortable when that front plate is digging into your stomach. The most I put on the front is a single row of magazines and maybe a thin admin pouch.
If you will be in vehicles, keep the back as slick as possible. Sitting in a vehicle is bad enough with a slick carrier, you don’t need to make it any more uncomfortable by having a bunch of stuff on your back. At MOST, I put a hydration pouch on my back.
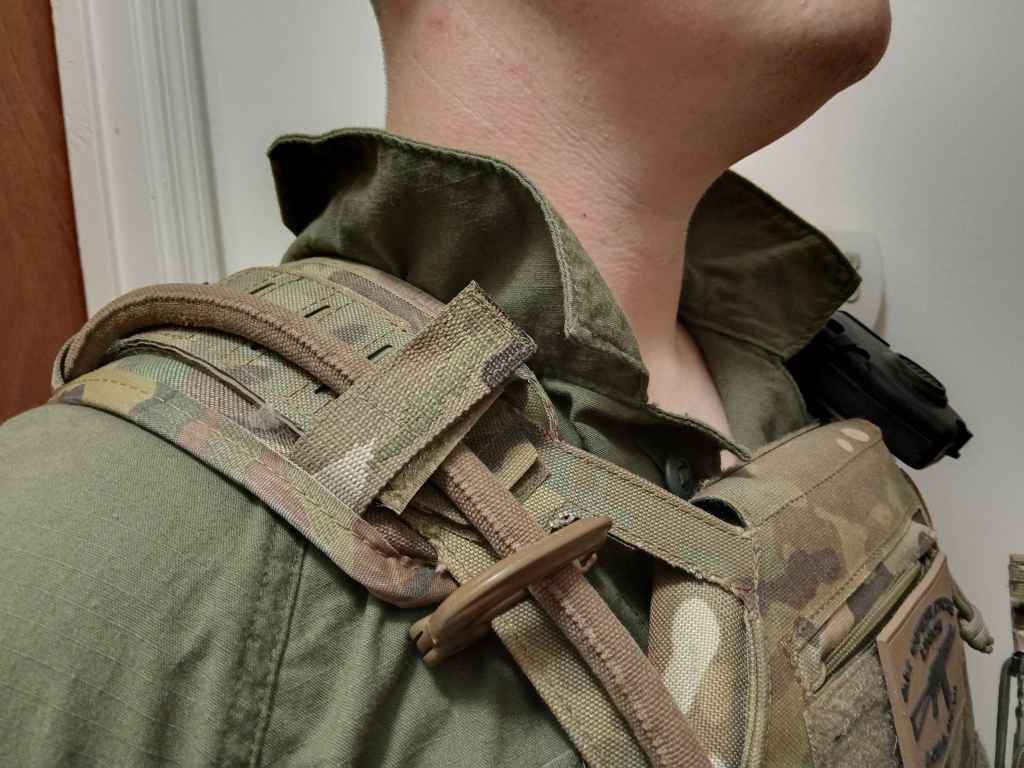
Add a DARC strap to your plate carrier. This is a very simple mod that makes it a lot easier for your teammates to drag you to safety should you become a casualty. You can buy the $45 one from Spiritus Systems, or just make your own (it’s very, very easy). There is a pretty useful step-by-step DIY tutorial with pictures at the following link. https://www.devtsix.com/how-to-make-a-quick-extraction-strap-darc-method-t12134.html
I made my DARC strap from an old ratchet strap. It’s the weird camo strap at the top and bottom of my back panel.
If you wear a tactical belt in addition to the plate carrier (as I do), ensure that nothing on your plate carrier interferes with gear on your belt. You may need to move some pouches around to accomplish this. If you will be mounted (in vehicles) most of the time, keep the belt as slick as possible or skip it entirely.
Some have found that a slick plate carrier with an LBV or chest rig over it allows for a very flexible loadout. You can have just one set of gear on the LBV/chest rig, and simply choose whether or not you want to wear the armor underneath it. I’ve actually seen this used as a team SOP before, and it was effective.
Nothing should dangle off the plate carrier, be it drinking hoses or straps or radio cables. Everything should be securely attached using zip ties, clasps, carabiners, elastic bands, or good old duct tape. This applies to other pieces of kit as well, but I see it the most on LBVs/plate carriers. Understand that you are planning to fight with this gear on, and the last thing you need is loose cables snagging on tree branches or a drinking hose smacking you in the face when you run.
Summary
This concludes my 3-part series on body armor. In Part I, you learned what kind of protection body armor offers and how to determine whether you need it based on your mission. Part II was a guide to purchasing body armor to ensure that you made an informed choice on your purchase. Finally, Part III wrapped up with some tips and tricks for wearing and setting up your plate carrier.
Body armor, like your rifle, is a tool. Having it is not enough, you must be proficient in its use. Put it on and get used to wearing it. Run in it, shoot in it, wear it to a class. If all you do is put it on for a cool instagram photo, you will be in for a rude awakening when the time comes to wear it for several hours at a time. Train like your life depends on it, as indeed someday it may.