TDG 3 Recap and Analysis

In this week’s TDG, we are greatly outnumbered and outgunned. A company of troops has set up just a few miles from our camp and is most likely looking for us. Fortunately, we still have time to take action. The mission I gave was for you to conduct a security patrol to locate and attack enemy LP/OPs. However, as many of you pointed out, that wasn’t the only course of action available to us.

Conduct the Security Patrol(s)

Since we anticipate that the enemy is looking for us, we could conduct the patrols as planned to hunt for their LP/OPs. This would hamper their efforts to find us. However, this Course of Action (COA) is a bit risky.

The enemy, in static LP/OPs, will be much harder to detect than our security patrol. That means that our patrol will most likely be spotted. If the infantry was our only concern, we could argue that this is an acceptable level of risk. However, this is a conventional military unit with organic indirect fire (IDF) weapons such as mortars, which we are well within range of.

Once detected, our security patrol would most likely be targeted by mortar fire, with the LP/OP spotting and adjusting the impacts. Our patrol would be attacked and likely take casualties without ever seeing the enemy.

Build a Decoy Camp

One commenter suggested the idea of building a fake camp away from our location to draw the enemy’s attention. If possible, he recommended ambushing the enemy when they moved to attack the decoy camp.

When I worked in a Regimental COC, our command actually tried this once during a training exercise. They had us build a fake command node, partially camouflaged and with a few radios, to draw the eye of the OPFOR’s aerial surveillance. It was a massive failure and didn’t fool anybody. When the enemy went to observe it, they quickly realized that it was fake because there was almost nobody there, and nowhere near the level of activity our actual COC had. There were other factors too, but they’re beside the point.

When you plan to raid a target, you get eyes on it and watch it for hours or days to collect as much info as possible before you risk lives assaulting it. The enemy would quickly realize that the decoy was bogus due to the lack of activity, which is exactly what happened to us when we tried this.

Even if they were fooled by the decoy, remember the mortars? They’d probably use those to blast the hell out of the place and then send in a squad to to a battle damage assessment.

All that said, a decoy may indeed be useful if we just wanted to distract the enemy long enough to buy us some time to do something else. If that’s our goal, the decoy may be worth our time and efforts after all.

Ambush the LP/OP Teams

If we do manage to locate the enemy LP/OPs, rather than attack them in place, we could ambush them en route to and from their base. This way we get to choose the time and place of the fight, and have a better chance of breaking contact before mortars rain down on our heads.

The only difficulty with this is that the enemy must make the mistake of settling into a pattern. They must use the same routes, and we must be able to locate these routes and identify the patterns so that we can exploit them. However, if the enemy is competent, they will use different routes and different LP/OPs each time, making their movements far less predictable. We can still set ambushes, but it will be difficult for us unless the enemy gets lazy.

Direction-Find the LP/OPs using radios

This is a very viable way of locating the enemy hides. If our team is equipped with directional antennas (or the means to make them), we can locate the enemy positions by triangulating their radio transmissions. This is much easier than it sounds, and I recommend you take a SIGINT class to learn how to do this.

Relocate the Camp

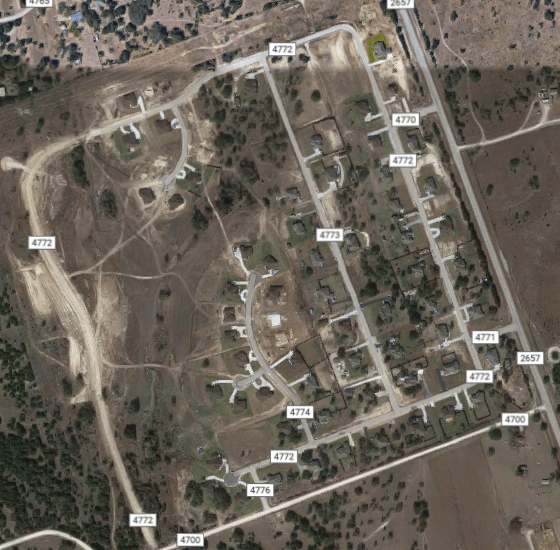
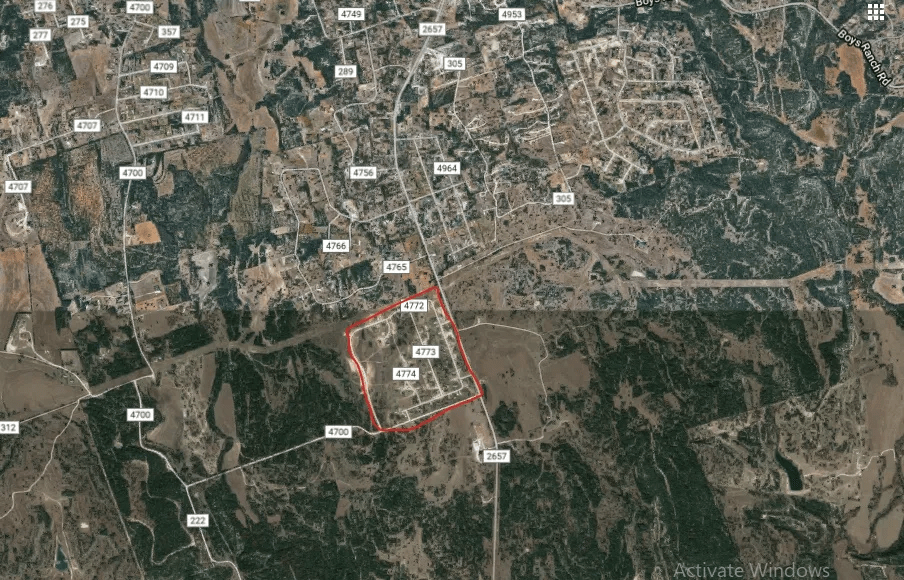
It can be argued, with merit, that the enemy presence here is too much for us to handle, and that we ought to pack up our camp and relocate NW. There is a lot to be said for this course of action. For one thing, our camp being within IDF range of the enemy is a very bad thing, rendering any compromise immediately fatal to us. For another, we are heavily outmatched, and the odds of us being outgunned in any engagement are high. It is probably wiser for us not to pick a fight, and to instead move our outpost to a more secure location.

Even if we do attempt an aggressive action against the enemy LP/OPs, it is still a good idea to move our camp. The longer we remain here, the better the chance of detection.

Bonus Solution: Davy Jones’ Locker

The last COA here is my favorite because it involves thinking outside-the-box. Reader “BH” proposed the following solution to our problems:

“The PLA camp appears to be in the flood plain of Marvel Lake. No mention of explosives in the brief, but maybe the dam can be infiltrated and opened? This should at least force the camp to move, which may force them to recall/reposition their OP’s, which in turn should allow for ambush opportunities.”

This plan is brilliantly simple. Why risk a gunfight when two guys in civilian clothes with no weapons can just walk into a civilian facility and wash all our problems away? If this can be done fast enough, we can essentially neutralize the bulk of the enemy’s strength in one fell swoop.

At the very least, it will cause the enemy to pack up very quickly and redeploy their camp. This would grant us a window of time where no mortars can attack us, which gives us the opportunity to either attack the OPs or slip away into the night with our camp. This kind of plan is exactly the creative thinking that a guerrilla force needs.

Summary

There’s a good amount of options available to us here. Mitigating risk is always a key consideration; we don’t want to bite off more than we can chew. Sometimes the best thing we can do is break contact to fight again another day. And often the best solution is the simplest one. Just because we carry guns does not mean that the answer to every problem is a gunfight, so get creative. If time permits, consult your people to tap into their creativity. One man rarely has all the good ideas.

There was a good amount of participation with this TDG, which allows for a better recap. Thank you to everyone who participated. If your plan wasn’t ideal, don’t sweat it. We make mistakes in TDGs so we don’t have to make them in real life. And if you disagree with anything I said in this recap, feel free to debate me in the comments. The more intelligent discussion we have, the more dangerous we all become.

TDG 3: Security Patrol

Originally posted on American Partisan on March 23, 2021

I started this series, TDG (Tactical Decision Game) Tuesdays, to get you more in the mindset of how you could potentially handle a given tactical scenario with a limited amount of resources and manpower. My goal is to get you to read these scenarios and think about what resources you have available, what sort of scenarios you might encounter, and what gaps you need to fill in your equipment/training.

I will use the basic 5-paragraph operations order format, or SMEAC, to present the scenario as follows;

Situation: Disposition of all friendly, hostile, and adjacent forces.
Mission: What we are trying to do.
Execution: How we are going to do it.
Admin & Logistics: Who/what is getting where and how.
Command & Signal: Who is in charge and how they are communicating.

TDG 3: Security Patrol

(each grid square is 1 square kilometer)

Situation: Guerrilla warfare scenario. Lightly armed but determined guerrilla forces are engaging occupying PLA (Chinese) forces in the area under the pretense of “stabilization” in the wake of a societal collapse.

  • OPFOR Situation: A PLA motorized infantry company is known to be operating in the East part of your AO. They arrived 2 days ago and have set up a command post at the location marked on the map, and local informants have observed them sending out squad-sized foot patrols, 2 of which returned 4-5 men short. This likely means that they are setting up observation posts to watch for guerrilla activity.
    • EMLCOA (Enemy Most Likely Course of Action): The PLA is most likely here to locate and destroy our camp in order to disrupt our ability to refit fighters and deny guerrilla forces a safe haven for rest between operations. They will likely do this by scouting the area with foot patrols and ISR drones to observe our movements and track us back to the camp.
  • BLUFOR Situation: You command a squad-sized element of 13 fighters (yourself included) currently encamped at the location marked on the map. The camp is used as a small rest/refit station for other guerrilla forces moving through the area due to the remoteness of its location. Your camp is sufficiently concealed, but you don’t want enemy observation posts potentially tracking your movements in the area.
  • Independents Situation: The region is sparsely populated, but the few people who do live here support the guerrillas. There are no effective US military or LE units nearby.

Mission: Lead a security patrol into the hills around your camp to locate, close with, and destroy enemy observation posts in order to deny the enemy effective reconnaissance intel about your camp.

Execution: (Up to you. You decide your route, when you leave, how many men you take with you, and what to carry)

Admin & Logistics: You have the following resources available:

  • 13 AR-15 carbines and about 2,000 rounds of 5.56
  • 2 captured QBB-95 automatic rifles with 300 rounds apiece
  • 4 .308 bolt action rifles, with 200 rounds
  • 6 Baofeng UV-5R radios
  • 3 NVGs

Command and Signal: You are the squad leader in charge of three 4-man fire teams, each with a team leader whom you can delegate and assign tasks to. Your comm plan is up to you, remember to use a PACE plan.

Feel free to post your answers in the comments and discuss. Stay tuned for the recap in a few days!

Support Weapons Class Review November 19-20, 2022 by “Jake”

“It’s all about force multipliers”

BLUF – this was a well crafted course that will help team leaders or individual members maximize their potential by integrating two specialized weapons/positions within their teams.  It won’t turn someone into an expert in the application of either the automatic rifle or the anti material rifle but it will lay the foundation and provide the drills to move you well along your way in developing the skills.  Remember, training is having someone else teach you things you don’t already know.  They teach you what to practice, how to practice it and why you need to.  This course provides that.

The course began with the general overview of what the automatic rifle is and how it’s use differs from machine guns or the more common general purpose rifle.  Also outlined is how to use a title one semi auto rifle in this role, how to set it up and how to employ it.  I’ll not get into all of the subjects covered but I will say that the priority of fire for the different weapons within a team is vitally important to understand and Mike does a great job in outlining these concepts.  This is why I feel it’s important to stress that the automatic rifle is a position within the team moreso than it is a piece of equipment.  A teams automatic rifleman isn’t just armed with a different gun, he’s tasked with a different role within the team.

The .50 BMG anti material rifle is the heaviest weapon that is available to the average individual without special license.  Read that again.  It’s fully capable of handling most light armored vehicles from cash transit vans that may be pressed into use by criminal organizations to most armored personnel carriers and it can do so out to probably 800 yards or more under the right circumstances.  As with the automatic rifle the priority of fire is key to it’s proper employment and this too is covered in detail.

The course covers both individual skills and how to properly integrate both weapons into a team with the required collective tasks.  How a team leader or squad leader assigns targets and control measures is covered as well so some leadership training is covered as well.

I could continue and explain quite a bit more about the class but I wanted to keep this short enough people might want to read it.  As far as I can tell this class is entirely unique in the private training realm and it is a good overview on how to integrate these two force multipliers into a small team.

I’ll close with one final topic, the equipment required.  The course outline says that a properly configured semi auto rifle and anti material rifle aren’t required and that’s true, but I believe people will get a lot more out of it if at least 1 in 4 students has a suitable semi auto rifle and probably an equal ratio of anti material rifles.  Any semi auto rifle can be pressed into service as a civilian Automatic Rifle but a properly built and vetted rifle will really show you the capabilities of the concept.  As for the AMR, a Barrett or similar semi auto is nice but in all honesty a single shot bolt action is enough to fill the role.  It’s much lighter and more mobile without sacrificing too much in terms of rate of fire.  With a little practice you can easily feed and fire 9-12 well aimed shots in a minute with one.

Jake

TDG 2 Recap and Analysis

The situation in TDG 2: Neighborhood Defense finds us tasked with organizing our untrained neighbors into a defensive force to keep out looters and gangs during a partial collapse. Although not as exciting as conducting a raid on a commie roadblock, this scenario is nonetheless a very realistic one that you may find yourself in someday.

Untrained troops, civilian concerns, and limited equipment make this a less-than-ideal scenario. This will force us to adapt to our situation with some creative solutions. Since this TDG got very little participation, I’ll do this recap by going through the priorities of work in the defense: SAFESOC

Security

Our first priority should be 360 degree physical security so that we can detect and engage hostiles approaching from any direction. This means having fixed security posts on each side of the subdivision, with good observation.

Avenues of Approach

The paved roads to the East and South present the most likely high-speed avenues of approach to the subdivision. Once we’ve identified our avenues of approach, we should place any special weapons (such as the AMR) so that they can engage enemies using that avenue of approach.

Reader “St. Leibowitz” commented, “I would put the AMR team [at a barricade along the avenue of approach], as this seems like a likely avenue of approach for a narco tank or similar vehicle if the bad guys have one.” This is exactly the kind of threat an AMR is suited to counter, and is why I teach its use in the Support Weapons Class. A good position for the AMR would likely be in a concealed Guardian Angel position on the second floor of one of the houses on the corner of the subdivision, so that it could shoot over any friendlies below.

Fields of Fire

Now that we’ve set security and placed our AMR, we need to clear our fields of fire so we can detect and engage any enemies trying to sneak close to our perimeter.

“St. Leibowitz” notes; “I REALLY don’t like all that vegetation to our west. One of the tasks of the men not manning the posts after the initial barricade construction will be to clear as much brush as possible. This will give us clear line of sight and make a deadly open area for bad guys. It will also potentially provide us with fuel and barricade/concealment material.”

Reader “Some Guy” was on the same page. “Clearing obstacles around the subdivision would be crucial, I would want open sight lines for my marksmen in all directions.”

In a light infantry context, we might be concerned about removing too much vegetation because it would make it obvious that we have a defensive perimeter here. However, given the threat we face, we may not care if the local ruffians know that we are here and we are prepared to fight.

Entrenchment

Our next priority is hardening our position by fortifying it. We should use anything we have that stops bullets to make our barricades and fighting positions more protective. Sandbags are great for this, at least temporarily. In the absence of sandbags, you can improvise by filling cardboard boxes with packed dirt or sand and they will do the same thing.

Other methods for building fortifications can be found in Joe Dolio’s book “TW-03, Defensive Operations“.

Secondary and Alternate Positions

In the face of a determined adversary, we will take losses and may be forced to pull back our perimeter. Having secondary positions already prepared inside the subdivision will buy us time by giving us hardened positions to fall back to. Attackers who break through our first line will then find themselves confronted with fire from our prepared secondary positions, giving us another chance to kill them or drive them off.

Alternate positions are set up to enable a team of men to relocate in case the enemy attacks from an unexpected direction. This gives us flexibility in our defense, and allows our teams to better support each other if needed.

Obstacles

An obstacle is anything that impedes, slows, or redirects movement. Obstacles can be man-made (barbed wire) or naturally occurring (rivers and cliffs). Ideally, we position obstacles not to stop the enemy, but to funnel him into our fields of fire where we can destroy him.

The question here is whether to emplace obstacles on the NW/SE road to our east. On the one hand, we don’t want an enemy getting that close to our homes. On the other hand, that’s a main road into the town, and we would probably have to tie down a lot of resources trying to sort through all the people trying to enter (or flee) the town as the looting gets worse. But if that road is a big enough threat, maybe we are willing to expend the manpower.

A possible alternative is to leave the road clear of obstacles but heavily observed, with barbed wire and other obstacles lined up on the near side. Then again, there is another way to keep people away…

Camouflage

The two answers to this TDG differ on their approach to this topic. “St. Leibowitz” wanted a low-profile approach, and sought to camouflage the subdivision as already looted. “Smash some windows on the outlying houses, toss some empty brass in the streets, burn some trash/tires in the front yards, maybe leave some dead dogs lying around. There should be some around…”

“Some Guy”, however, chose a more overt approach. “The frontage along 2657 would need to look as undesireable as possible…” His solution consisted of a hard roadblock/vehicle checkpoint, barbed wire along the roads, booby traps, and even posting signs.

What do you guys think. Overt or covert? Should we harden our position so much that nobody even thinks of attacking us, or should we try to look like we have nothing of value to steal? Feel free to continue this debate in the comments below.

Summary

Defensive planning is not a flashy task, but it is a necessary one in situations like this. A lot hinges on our manpower and firepower. The more of these that we have, the more overt we can be. If we are short on either manpower or firepower, a lower profile approach may be desired.

When I ran this TDG last year, some people complained about how few resources they had. That’s the nature of this kind of scenario. When it comes to defending your neighborhood, your town, or your “tribe”, you need to face the fact that not everybody is as prepared as you. You may need to take a second look at your “preps” and consider what this means. That 1,000 rounds for your rifle won’t go far when you need it to stretch for 5 more empty rifles that your neighbors bring to the fight, and your Baofeng radio is useless without other radios to talk to. I recommend stockpiling some spares, if you’re able.

You may need to trust your friends and neighbors with your life some day, and it is your responsibility to make them as ready as you can. If organizing your friends into a team sounds intimidating, come to a Team Leader Class. You will learn how to train your tribe so that you can one day be ready to go to battle together. You can also share my guide to progressively building a kit on a budget so that your friends and family know what they need to be ready for the fight.

TDG 2: Neighborhood Defense

Originally posted on American Partisan on March 16, 2021

I started this series, TDG (Tactical Decision Game) Tuesdays, to get you more in the mindset of how you could potentially handle a given tactical scenario with a limited amount of resources and manpower. My goal is to get you to read these scenarios and think about what resources you have available, what sort of scenarios you might encounter, and what gaps you need to fill in your equipment/training.

I will use the basic 5-paragraph operations order format, or SMEAC, to present the scenario as follows;

  • Situation: Disposition of all friendly, hostile, and adjacent forces.
  • Mission: What we are trying to do.
  • Execution: How we are going to do it.
  • Admin & Logistics: Who/what is getting where and how.
  • Command & Signal: Who is in charge and how they are communicating.

TDG 2: Neighborhood Defense

Partially inspired by the book “Lights Out” by David Crawford.

Situation: Partial collapse/WROL scenario. Your region has been without electricity for two weeks, running water went out one week ago. Law enforcement is ineffective, and certain rogue elements are starting to become more of a threat.

  • OPFOR Situation: Criminal elements are emboldened by the inability of law enforcement to take or respond to 911 calls. Home invasions by looters are becoming more and more common, and nearby gang elements are starting to make their presence known by providing “protection” and demanding tribute payments in certain neighborhoods. Occasional distant gunfire can be heard at night, and it’s been getting closer the last couple of days.
  • BLUFOR Situation: You live in the subdivision pictured in the map above. Although you hadn’t really known many of your neighbors, you’ve mostly all come together since the power went out and forced you all outside to socialize. You’re aware of the situation in the rest of the town, and want to take measures to secure your subdivision. Your neighbors are in agreement, and you are on a committee of your peers making recommendations for how to best set up defenses.
  • Independents Situation: LE has not been seen or heard from in over a week and is assumed to be non-existent or tied up elsewhere. They are not hostile to your group, but cannot be counted on to render assistance. You are unaware if National Guard has been activated, but have not seen any military presence yet. Civilians have started fleeing the city in small groups, walking South along the road outside your subdivision.

Mission: Establish defensive security measures for the subdivision in order to deter looters and repel potential attacks by large groups of armed gang members.

Execution: (Up to you. Remember that not everyone can be on guard 100% of the time, and that none of you have trained together before.)

Admin & Logistics: Your available resources include the following:

  • 50 families
  • 15 men with AR-15s
  • 4 men with AKMs
  • 10 men with scoped hunting rifles
  • 1 .50 cal AMR
  • entrenching tools (shovels & picks)
  • 200 yards of barbed wire
  • a decent supply of lumber and woodworking tools from a house under construction
  • 6 FRS/GMRS Walkie-talkies with a solar charger
  • Assorted vehicles
  • Assorted camping equipment
  • Average 200 rounds per carbine, and 50 rounds per hunting rifle and the AMR.

Command & Signal: (Up to you. Cell towers are down and there is no power. You should still have a PACE plan, even with limited comm options. Remember, there are non-electronic ways of communicating.)

Hint; The acronym for priorities of work in the defense is SAFESOC:

Security
Avenues of Approach
Fields of fire
Entrenchment
Supplemental and Alternate Positions
Obstacles
Camouflage

I cover defensive fundamentals in Team Leader I, as well as how to organize and train a group of like-minded individuals into an effective team. Check the training schedule for class openings and get trained.

Feel free to post your answers in the comments and discuss. Stay tuned for the recap in a few days!

“Mission Essential”; Planning your Personal Logistics in the Field

If you read my article about how to pack a ruck, you have a good idea how to choose what gear to take on a patrol. The next step is determining what you need to take in order to keep that gear working for you. Many items that we carry have consumable components that must be replaced from time to time to keep them working, so we must plan for this too. In this article I will lay out what consumable items you have and how you determine the quantities of those items that you need to carry. I’ll close with some tips to simplify your personal logistics in the field.

Basic Logistics Items; The 4 B’s

First lets take stock of the consumable items that we carry. I’ll be using the 4 B’s of logistics planning; Beans, Bullets, Band-Aids, and Batteries. As you go through this list, start writing down all the consumable items that you carry. This will help with your logistics planning, which I cover later in this article.

  • Beans: Food and water. Anything that we use to fuel our bodies and keep ourselves running. I’ll break this into a few sub-categories.
    • Chow: Be it MREs, Mountain House meals, or cans of chili, you must plan your meals. It is best to choose foods that can be eaten with minimal preparation, as cooking on a patrol can very easily compromise you. Also consider the amount of trash that you will produce as you work through your rations.
    • Water: You need a way to carry water. Without it you die. I strongly recommend having water on your fighting equipment so you have something to drink when separated from your pack. A good rule of thumb is 1/2 gallon (or 2 Liters) in canteens, bottles, or a camelback on your kit, with at least that same amount in your pack.
    • Cooking supplies: If you must heat up your food, that means a heat source of some kind. If you use a small stove, you will need extra fuel for it (propane, briquettes, etc.). If you intend to start a small fire, you will have to plan for fire starting materials, all of which are consumable (matches, lighter fluid, even flint). If you use starting aids such as vaseline-soaked cotton balls, add that to the list of consumables.
  • Bullets: You need to carry ammunition for your weapon(s) and you need to carry it in magazines. Some folks advocate that extra ammunition should be carried in boxes or stripper clips to save space and weight in your pack. I disagree. Magazines themselves are consumable items. You can and should attempt to retain your mags, but that won’t always be possible. Magazines fall out of dump pouches (and even magazine pouches) all the time. Also consider that your buddy may need extra ammo in a hurry, and handing him a bag of loose rounds or some stripper clips is not nearly as effective as tossing him a loaded mag.
    • This category also includes any pyrotechnics that you carry, such as flares and smoke grenades.
  • Band-aids: Medical and hygiene gear.
    • Medical: This consists of any items you carry for treating wounds and injuries. It also includes any non-emergency medical supplies you may need such as prescription medications, anti-diarrhea pills, and (yes) band-aids. Hopefully you don’t use up too many items from this category. If you do, resupply is probably not your biggest concern.
    • Hygiene: Anything you use to keep yourself clean and free of sickness/disease. This includes toothpaste, hand sanitizer, baby wipes, and toilet paper just to name a few.
I carry my batteries in this waterproof holder that fits in the counterweight pouch on my helmet. My buddy designed, makes, and sells these. It even holds a UV-5R battery!
  • Batteries: Radios, night vision, drones, lasers, and flashlights all take batteries of some kind. You must carry spare batteries for everything electronic, or else risk carrying around some very expensive dead weight on patrol. If you carry something like a tablet that has an internal battery, you need a way to recharge that too (solar panels, battery banks, etc.).

Planning Your Logistics (“How much should I pack”)

To start this process, first identify how much of each item you expect to use up in a day. This is called 1 Day of Supply (DOS) worth. Below are some guidelines for your planning purposes:

  • Beans:
    • 1 DOS food = 2,000-3,000 Calories
    • 1 DOS water = 1 gallon or 4 Liters.
  • Bullets: HIGHLY mission-dependent. Just make sure that you have enough ammunition to accomplish your planned mission as well as a few extra magazines to handle any unexpected action.
  • Band-aids:
    • 4-6 baby wipes per day, if the tactical situation permits you to clean yourself.
    • One small bottle of hand sanitizer (about 2oz) will be enough for about a week’ in the field (use before eating to avoid disease).
  • Batteries: Many electronic devices have the battery life listed in the instruction manuals. Estimate how many hours a day/night you will be using your devices, then divide that number by the battery life of each device to get the amount of batteries to pack. Then pack 2 extra of each type for unplanned contingencies.

Simplifying your Logistics

The simpler our logistical requirements, the less gear (and therefore weight) we must carry. The following is a series of tricks from my personal experience about how to simplify your personal logistics in the field. These are in no particular order.

  • If you will be in the field for more than an overnight trip, you should look into ways to procure safe drinking water in the field to avoid carrying 30-50 pounds of water weight. No matter what method you choose to render water safe to drink, it will entail some form of consumables. Purifying tablets, iodine, high-concentration bleach, etc. are all consumable. Filters may require spare filter cartridges. If you choose to use purify by boiling, you will need to consider the fuel that it takes.
  • Solar panels are only worth carrying on extended patrols (5+ days). On shorter missions, I’ve found that it costs less weight and bulk to just carry all the spare batteries I need.
  • Try to have as many of your electronics take the same batteries as possible so you don’t need to carry as many different types.
  • A microfiber cloth can eliminate the need for baby wipes. I use a Norwex microfiber cloth infused with silver, which disinfects itself after 24 hours. This enables almost infinite re-use in the field, necessitating very little washing of the cloth itself. I’ll write a separate article on this in the future.
  • Extended patrols of 2 weeks or more can be enabled by planning for tactical resupply. This can be done via caches, dead drops, or resupply patrols/convoys. I can’t do the topic of resupply justice here, it merits its own future article.

Summary

Today we looked at what consumable items you carry into the field and how to determine what to pack. It is important to take these considerations into account rather than going off of a single cookie-cutter list for every patrol. Know your situation, know your gear, and determine for yourself what you need. The only way to really get to know your gear is to train with it, so bring it out to a class.

Note that this article is limited to personal logistics. Planning logistics for an entire patrol is similar, but different enough to deserve its own article in the future.

TDG 1 Recap and Analysis

TDG 1: Antifa Roadblock presents a relatively simple tactical problem, intended as a primer on this sort of mental exercise. We have (seemingly) solid intelligence on the enemy’s disposition, the element of surprise, just 4 men, and a very flexible timeline to work with. And yet, even with a simple exercise like this, there are nearly infinite ways to approach the problem. I looked at the answers to this TDG and noted a few trends, which I have simplified into a few possible Courses of Action (COAs). Today we’ll look at the pros and cons of some of these COAs.

Keep everyone together for the attack

This COA is the simplest, and as with most things, simple is good. By keeping everybody together we eliminate the need for coordination of multiple elements, which removes a LOT of potential points of failure in our plan. Given our small size, this seems like a good choice, especially for our first real-world operation as a team.

Split into two elements and attack from different directions

If our team has trained realistically and is confident in doing so, we may be able to pull off an attack from two angles (ideally 90 degrees offset, or as close thereto as possible). By attacking from two different angles, we make it harder for the enemy to survive. If they take cover from one element, they remain exposed to the other. The last thing we want is for them to have time to call for a QRF.

Reader “Michael in nowhereland” took this a step further and stated that “each team [would] infil/exful independent of each other.” I’m reminded of an old saying among the Austrian Jägers, “Wer zwei Hasen auf einmal jagt bekommt keinen.”, which means “He who chases two rabbits at once gets none.” Splitting a larger element into smaller teams for exfil reduces the chance of a successful pursuit/track by the OPFOR. However, this is normally done by squad sized elements or larger. A 4-man fire team is small enough as it is, and is rarely split up in practice.

All that said, if we are confident and have trained together enough, it could be argued that the risks of splitting the team may be worth the risk of complicating the operation.

Leave the roadblock, ambush the oncoming shift

Some readers decided to leave the roadblock in place, at least for now, and instead ambush their relief further down the road when it’s time for the shift change. After all, we know the enemy’s schedule and approximate strength, so why not hit them when they’re in a vulnerable, thin-skinned vehicle?

An ambush, however, has its own set of complications. There is civilian traffic on these roads, so we need to be able to Positively Identify (PID) the exact vehicle, down to the license plate. The enemy isn’t exactly rolling around in marked, camouflage-painted trucks, so this can be a bit tricky. We would need some very powerful optics that could pick up a license plate (or identifying marks such as stickers) from a distance.

We might even need an observation post up the road to give PID and early warning, or else risk the vehicle getting through our kill zone before we could get PID. Given how small our unit is, I don’t believe we could afford to divert any of our firepower away from the ambush site, so the OP is a no-go.

We would also need to ensure that the target vehicle was not near any civilian vehicles. If, for example, the target vehicle approaches but is right behind a farm truck going the speed limit, we can’t engage because of the risk of civilian casualties. Bottom line, there are less variables and less risk involved if we attack the roadblock instead of attempting an ambush on their relief.

Use vehicles to rush in and attack swiftly

This wasn’t a common answer, but I’ll address it anyway because it brings up a point that I wanted to make anyway. Just because I give you a resource for a TDG does NOT mean that you need to use it. I listed the vehicles as resources available because I wanted to see how y’all would try to use them.

There are two ways to achieve surprise on the battlefield: speed and stealth. Since the enemy is prepared and watching for vehicles (they’re manning a checkpoint, and you can only approach along the roads), it is unlikely that we can achieve enough surprise using the speed of our vehicles. Thus, we should instead lean on stealth.

What do we do with the bodies?

Every time I run this TDG in the Team Leader Class, someone suggests either looting, burning, or mutilating the corpses of the enemies. Whatever arguments are made for this COA, everyone always overlooks the forensic investigation that will inevitably follow our action.

This isn’t a full on WROL or guerrilla warfare scenario, just a partial collapse. It is in our best interests not to leave behind evidence that could eventually point to a member (or members) of our team. By walking up onto the objective and messing with bodies/vehicles/equipment, we would leave behind a treasure trove of forensic evidence. Boot prints, fingerprints, fibers from our clothes, and even DNA from bubba’s dip spit. Not to mention that we risk someone seeing us and taking pictures.

The risk doess not seem to be worth the reward, and we are likely better off just leaving the bodies for their friends to find.

Long range or short range attack?

Another consideration was whether to conduct the attack from longer, stand-off distances, or to approach closer. Most submissions decided to take advantage of the range of their weapons and have at least one element engage from “long range” (in this case, the furthest engagement distance that the terrain will allow is roughly 600m). One reader proposed using long range fires to distract the enemy while a maneuver element closed in to destroy them.

A key consideration here is how the enemy will react to our actions. As soon as they start taking fire, there’s a strong chance that they’ll call for a QRF, either their own people or from LE. If that happens, we will find ourselves in a tricky situation where we need to escape and evade a pursuing force that outnumbers us, even if we win the initial skirmish. The only way to prevent this is to eliminate all the commies quickly before they can make that call, a long firefight is not in our favor.

Back to the engagement distance. We stand a much better chance of killing all 4-5 enemies if we take advantage of the terrain to infiltrate as close as possible before shooting. Once we get to our firing positions, we can assign a different target to each shooter, and synchronize our shots. If we do it right, everyone fires 2-4 shots and the fight is over. No shots are fired back at us, mitigating the risk to our team. Locals probably wouldn’t even think twice about the noise because it would be over so fast. It would take some rehearsals, but with a team this small it should be easy.

The psychology of killing

This is a factor that is often ignored in TDGs, but is absolutely critical when you are working with green troops or civilian volunteers. We, as made by our creator, have an innate resistance to killing our fellow man. In fact, prior to Vietnam, this was a very serious problem in the military, with many soldiers finding themselves unable to kill the enemy even when a rifle was aimed at their face.

This is a very, very complex topic that I could not hope to do justice to here. If you haven’t already, read “On Killing” by Dave Grossman. It’s absolutely indispensable reading material for any warrior, and lays bare the psychology of killing in war and peace.

For now, suffice to say that the closer you are to an enemy, the less willing you are to kill him, especially if you can see his face. Since this is our first operation together, there is a serious possibility that one or more members of our untested team may find themselves unable to kill at close range, which jeapordizes all of us. This reason alone may be enough for us to back off a few hundred meters so that at least our enemy’s faces are harder to make out.

Summary

Hopefully you got something useful out of this TDG. TDGs are excellent supplements to in-person training classes because they’re an inexpensive way to get you to think. The best way to play these is to post your solution in the comments, read each others’ submissions, and debate them. You’ll find very quickly that there are many, many ways to tackle any tactical scenario

I plan to post these every week or so going forward, as regularly as possible. Thank you to everyone who played, I look forward to reading your solutions in the weeks to come!

TDG 1: Antifa Roadblock

Originally posted on American Partisan on March 9, 2021

I am starting this new series, TDG (Tactical Decision Game) Tuesdays, to get you more in the mindset of how you could potentially handle a given tactical scenario with a limited amount of resources and manpower.  My goal is to get you to read these scenarios and think about what resources you have available, what sort of scenarios you might encounter, and what gaps you need to fill in your equipment/training.

I will use the basic 5-paragraph operations order format, or SMEAC, to present the scenario as follows;

  • Situation: Disposition of all friendly, hostile, and adjacent forces.
  • Mission: What we are trying to do.
  • Execution: How we are going to do it.
  • Admin & Logistics: Who/what is getting where and how.
  • Command & Signal: Who is in charge and how they are communicating.

TDG 1: Antifa Roadblock

Situation: Partial collapse scenario, National Guard are caught up trying to maintain order in the large population centers due to BLM/ANTIFA riots and civil unrest.

  • OPFOR Situation: Communist insurgents from the group “Redneck Revolt” are taking advantage of the chaos and have started setting up armed road blocks to check for “fascists” in some rural areas, the nearest one at crossroads “Alpha”. They are harassing, beating, and sometimes robbing anyone with any sort of pro-Trump or pro-America stickers on their cars. Our scout team has observed them wielding a mixture of AK/AR type rifles, shotguns, and handguns depending on who is currently on the rotating shifts. Their strength is normally about a fire team (4-5 shooters) and they rotate watch every 8 hours.
  • BLUFOR Situation: You and your 3 buddies are thus far ordinary citizens who occasionally meet and train together but have not yet conducted operations. However, armed communists setting up roadblocks on American soil is a crossed line for you and you will not allow it to go unanswered.
  • Independent Elements Situation: LE is reluctant to do anything about the roadblocks due to political pressure and the press is praising the insurgents as “freedom fighters.” However, most of the population resents the roadblocks but are unwilling to act for fear of retributions from LE. Average response time for 911 call is roughly 10 minutes.

Mission: Clear the roadblock at crossroads “Alpha” in order to demoralize the enemy and discourage them from manning roadblocks in the future.

Execution: (Up to you!)

Admin & Logistics: Also up to you. You have the following resources:

  • 4 shooters (including yourself)
  • 3 AR-15s, 1 Mosin Nagant, and 1,000 rounds of ammo for each
  • 2 pickup trucks, 1 mini-van, and 1 jeep
  • 2 Baofeng UV-5R radios
  • 1 PVS-14 NVG

Command and Signal: You are the team leader. Your comm plan is up to you. Remember to use a PACE plan.

Feel free to post your answers in the comments and discuss. Keep in mind, the more complicated a plan is, the more potential points of failure.

Edit: The recap is up! Thank you to all who participated!

Jäger Loadouts: The Team Leader

The Team Leader is a specialist of sorts. His primary weapon is not his carbine, it is his team; the men to his left and right. His loadout is therefore tailored to support his handling of his primary weapon. Today I will describe what a Jäger Team Leader should carry at all times and what mission-specific equipment he may consider carrying.

Weapon

The Team Leader should be equipped with the same model carbine as everyone else in his team to simplify the team’s logistics. At the very least, it should take the same magazines and ammunition. He may opt to have a magazine of tracers somewhere on his kit for use in marking targets. The specific setup of the rifle does not matter that much.

Squad leaders are a little different. I am of the opinion that squad leaders should not have a magnified optic on their weapons in order to discourage them from getting tunnel vision engaging targets. The squad leader should only be firing his weapon in self defense or when absolutely necessary, so he can focus on coordinating the maneuver of his teams. For this reason, I believe that squad leaders should have at most a red dot or 1x prism optic on their weapons.

Minimum Gear (always carried)

  • The Rifleman’s Essentials. The team leader employs the fighter-leader concept, which means leading by example. Although his primary weapon is his team, he still employs his carbine and must still be prepared to survive in the field. Therefore, he is no exception to carrying the Rifleman’s Essentials of ammo, water, and basic medical supplies.
  • Notepad and Pencil. While this important for every rifleman to carry, it is absolutely essential for the Team Leader. Writing material is indispensable for keeping a patrol log, preparing combat reports, making a sleep schedule, etc. I strongly recommend a 4″x6″ Rite-in-the-Rain notebook with at least 2 pencils.
  • Wristwatch. Another item that every rifleman should have that is even more important for a team leader. A watch is necessary for keeping pace, setting sleep schedules, noting the time on combat reports, and synchronizing maneuver. The watch should NOT be a smart watch/cell phone, unless you want the enemy tracking your position.
  • Map and Map Tools. Although navigation is primarily the task of the point man, the Team Leader should have a copy of the local map and all map tools for 1: redundancy, 2: situational awareness, and 3: mission planning. A full set of map tools includes the following:
    • Map inside a plastic sleeve (can be improvised with a page protector)
    • Compass
    • Map Protractor
    • “Map Pens” (extra fine-tip permanent markers)
    • Map Pen Eraser (I recommend a Mr. Clean Magic Eraser)
  • Inter-Team Radio. If the team is operating in conjunction with other teams in a squad, the team leader needs to be able to communicate with the other team leaders (and the squad leader, if there is one). This does not need to be powerful or extra-fancy, as you will rarely use it to talk further than a few hundred meters. The team leader is the ONLY ONE who needs this tool, don’t let everyone carry a radio or everyone will talk on it. My personal choice is a Baofeng UV-9R, but there are many great options to choose from.
  • Smoke Grenades. Smoke can be used for many things such as signalling and marking locations. They are also good for temporary concealment when you need to break contact or maneuver. Since the team leader is normally positioned where he can maintain the best situational awareness, he will be in the best position to identify when and where smoke is needed. I strongly recommend that he carry at least 2 smoke grenades where they can be easily accessed in a hurry, with more in his pack.
  • Weapon-mounted IR/Visible Laser. I put this here because a laser is useful for far more than just aiming the rifle. As a team/squad leader, I’ve used my laser to mark targets, assign hasty fields of fire at night, and identify my team’s position to my squad leader. I recommend a full power class III laser like a Perst-4 (if you can get one) because the visible beam on high power has so much utility for a team leader. Just don’t get carried away using the laser or you’ll make yourself a target.

Mission-Specific Gear (NOT always carried)

  • Analog Signaling Tools. Electronics fail, and occasionally the team leader may need to fall back on analog forms of signal to coordinate his actions with other team leaders. In fact, some of these tools are so reliable that I occasionally prefer using them over radios.
    • Whistle. A good, loud coach’s whistle will do the trick. It is obvious, unmistakable, and can be used day or night. I recommend a plastic one that doesn’t rattle as much as metal. If a rattling whistle is all you can find, you can remove the pea. I always keep a whistle attached to my chest rig and have found opportunity to use it many times.
    • Flares. Used primarily for signaling at night but can also be used during the day in certain weather conditions. Be mindful that you do not light the forest on fire around you. Can be handheld or fired into the sky from a launcher.
    • Chemlights. Like flares, but without the fire hazard. They also last much longer (8 hours average) and have nearly an infinite amount of uses. Available in several colors, including IR.
  • Binoculars/monoculars. For when you want to take a closer look at something far away without aiming a weapon at it. Binos offer a greater field of view than rifle scopes, and often have greater magnification. A simple, compact 10x25mm bino will do for a Team Leader. Squad Leaders should probably have larger optics with a 50mm objective lens for better performance in low light. If you can, get a set with a milliradian reticle so that it can also be used to spot and adjust fires from support weapons.

Summary

The Team Leader’s job is to control the actions of his team. To do so successfully he must be equipped to plan his part of the mission, communicate with the squad leader, and coordinate with other team leaders. The above list of equipment is designed to fill those requirements.

When we are talking about the context of a Jäger Team Leader conducting light infantry style operations, he must be able to do so with as little dependence on electronics and outside infrastructure as possible. This is why I didn’t include a fancy tactical tablet on this list. I’ve seen small unit leaders lean too heavily on this kind of tool, and it often ended up being more of a hinderance than an asset.

If you are interested in learning more about what it takes to be an effective team leader, sign up for a Team Leader Class. I’ll be adding new classes for 2023 over the next month, so check the training schedule often for new class listings.

The Rifleman’s Essentials

I’ve helped many people set up their combat equipment over the years, from family to students to fellow Marines. Earlier I wrote an article entitled “Priorities of Purchase: Progressively Building a Rifleman’s Kit on a Budget“, in which I laid out the order in which an aspiring rifleman should purchase gear. In that article I started with what I call the rifleman’s essentials, the bare minimum equipment necessary for a rifleman to carry on his person. Today I want to go a bit deeper into these essentials, listing why they are important and how I recommend you carry them.

Ammunition

This is the first and most obvious of the rifleman’s essentials. A rifleman, who carries a rifle, must carry additional ammunition for that rifle. This ammunition must be loaded into magazines (or stripper clips, if you’re running a vintage bolt gun) so that the rifle may be reloaded quickly.

You may be wondering, “how much ammunition should I carry?” The answer is that it depends. Depends on what your mission is, the nature of your perceived threat, whether you’re alone or in a team, etc. If you’re doing work around the homestead and carry a rifle in case you encounter a trespasser, 1 extra magazine may be plenty. If you’re conducting a lengthy patrol with multiple objectives against occupying PLA forces, you might go up to 15 magazines. Assess your threat and mission and decide for yourself how much ammunition is appropriate, but always have at least 1 extra magazine.

I’ll probably step on a few toes here, but I don’t care. The type of pouches you get is important. If you plan to do any serious work in the field, closed-top pouches are a must. I have seen many, many bungee retention systems fail. I have seen every high-end open-top pouch drop magazines in the field once guys started running, climbing, and crawling through the mud with them. Unless you intend to always fight standing up (dumb idea), you need closed-top pouches.

Water

Without water, you die. Never assume that you do not need to carry water because you don’t know if the unexpected may happen and you find yourself stuck in the field for an extra day. Better yet, try to carry the means to purify water in the field.

I recommend that you carry a minimum of a half gallon in canteens/water bottles OR a 3-liter camelback. Be warned, however, that camelback bladders tend to pop if you lean on them, bury them in your pack, or wear a backpack over them. I can’t tell you how many times this has happened to me. If you use a camelback, carry at least 1 hard canteen/water bottle so you aren’t completely screwed when it pops.

Individual First Aid Kit (IFAK)

When you throw on a plate carrier, chest rig, battle belt, etc., it means that you plan to go into an environment where somebody might shoot at you. And even if you do everything right, once in a while the enemy does something right too. You need to be prepared for that.

Your IFAK contains only critical lifesaving supplies that can be used by your teammates to stabilize you so that you can be CASEVAC’d. It is not a boo-boo kit with band-aids and moleskin. Mech Medic wrote a pretty good article on what to put into an IFAK. He’s the expert on all things medical, and he also sells IFAK refill kits.

In addition to your IFAK, you need tourniquets to stop the massive hemorrhaging that occurs when you get wounded in a major artery/vein. I strongly recommend the CAT tourniquet from North American Rescue. It’s the easiest to learn and train others on, and it’s what the military uses. Carry at least 2, and carry them somewhere on your kit where they can be reached by each hand. Carry them in actual tourniquet pouches, DON’T rubber-band them to your gear. Constant exposure to the elements can cause the tourniquets to fail when you need them most.

The excellent Combat Application Tourniquet (CAT). Be warned, there are a lot of counterfeit CATs out there, so only buy them from NAR or an NAR dealer, like Stuck Pig Medical.

While you’re at it, grab an extra tourniquet to practice with. DO NOT practice with your go-to-war tourniquets, they are only rated for 1 use of the tension band. Mark your practice tourniquet and keep it separate from your go-to-war ones. Practice applying it to each extremity (arms and legs), and when you’re good at that, practice doing it one handed. Then switch hands. You should be able to apply your tourniquet to any extremity with any one hand in under 90 seconds. Faster is obviously better.

Summary

These three items are the bare minimum for a rifleman to carry at all times. Ammunition for his rifle, water to keep him alive and moving, and basic medical gear to patch himself up. If you have nothing else on your kit, you need these three items. Not in a backpack, on your kit. Everything else is supplemental.

I personally run a battle belt with a chest rig. The way I set my gear up, all of my rifleman’s essentials are on my belt, and my chest rig contains additional tools like my radio, map, and smoke grenades. Whatever you run, however you run it, ensure that you have the essentials squared away.