Tactical Applications of Civilian Vehicles

There’s a lot of material on the internet about “tactical bug-out vehicles.” While there are many useful accessories that you can get, some guys end up spending a lot of money tricking out their truck with a lot of do-dads that they will likely never use (that’s a nice fording kit you’ve got on that lifted truck, how many 5-foot deep rivers do you ford in a year?). In reality, there is a lot that you can do with your current vehicles with little to no modifications at all. All you need to do is take a serious look at what your METL requires of your vehicles.

Before I begin listing these uses, it is important to recognize the risks inherent in using vehicles for tactical applications. First, it is very easy to trace your vehicle back to you, even without your license plate or VIN number. This is even easier if you have identifying markings on your car such as bumper stickers, personalized license plates, or identifiable damage. If your vehicle is caught on a cell phone camera, dash cam, or simply seen by someone observant, it does not take much to narrow down the few people in your town with your specific make, model, and color vehicle. This is why the IRA always “borrowed” vehicles for their operations.

Second, civilian vehicles are very bad places to be when bullets are flying. Cars are bullet magnets, and without protective armored plating, you only have 2 real options if you find yourself in a vehicle during a gunfight. Either 1: drive away, or 2: dismount and fight on foot. Despite what Hollywood would have you believe, car doors won’t even stop pistol rounds, so trying to fight from your car is a very bad idea. Fortunately, most tactical applications of civilian vehicles don’t involve fighting from them.

No one suspects a minivan of anything, ever.  Especially if driven by a woman.

Covert Troop Transport

The biggest utility of civilian vehicles is their ability to blend in while moving things or people. Covert insertion and extraction of tactical teams sounds simple enough, but there are some simple measures you can take to even further avoid suspicion.

Ideally, the insertion/extraction would take place at a time and place that fits the patterns of life for that vehicle. For example, if “Jerry” uses his minivan to drive his kids to school along country road A every morning at 7, the neighbors are already accustomed to seeing that vehicle at that place and time, and will thus ignore it. So if you need to recover a 3-man scout team along country road A, the team would set some prearranged signal on the side of the road so Jerry knows to stop and let them hop in the back. An opposition force asking the neighbors if they saw anything suspicious wouldn’t find anything, as no new vehicles came through the area that day. And if Jerry gets stopped and questioned, he has a perfect cover story. After all, the best covers are always true.

Another way to mitigate suspicion is to get creative where you carry your personnel. For example, a small van might seat several people, but if the opposition is looking for a squad-sized element, they’re likely to notice and stop such an obvious exfil vehicle. However, you can fit 2 fire teams (8 guys) in the covered bed of a pickup truck if they’re not claustrophobic. This is but one example, there are countless ways to disguise a troop transport as something else. You could also use the passenger seats like normal, and have a bunch of extra large sweatshirts for the team being inserted/extracted to throw on over their gear. You get the idea. Hiding in plain sight is the name of the game.

Covert resupply should use covert containers.  A cooler like this won’t get a second look in the back of a truck, and can hold a couple USGI ammo cans.  Throw some ice and drinks on top of the cans for added security.

Resupply of teams in the field

The same principles apply to covert transport of “stuff” as with covert transport of personnel. Appear to be something that you are not. Blend in, use existing patterns of life. The best covers are always true.

A minivan with all but the front seats removed.  Plenty of space for two stretchers.

Ambulance/CASEVAC

Having a vehicle set aside for CASEVAC is a good thing to plan out ahead of any operation, even defensive ones. An ambulance should have enough room to accommodate a stretcher or two, with space for a medical attendant to ensure continuity of care. It should be stocked with additional medical supplies to handle trauma, such as extra wound dressings and bandages. If you have someone with the training to use them, a couple of IV bags would be a worthwhile addition.

When it comes to your ambulance, functionality takes precedence over stealth. Minivans, some pickup trucks, and even trailers can be used for this purpose. If you believe that the opposition will respect it, you may choose to mark your ambulance with a large red cross. Or you might not, situation will dictate. Hopefully you have a field hospital set up, adequately staffed and supplied. Otherwise, you may have to come to terms with your casualties getting treatment from the enemy, or no treatment at all.

Surveillance Platform

Vehicles can be used for surveillance of an area, or a specific building if done correctly. In this case, it is not always possible to use a vehicle that already has patterns of life at the target, so the best thing you can do is avoid patterns. Do not drive through the same area with the same vehicle multiple times, as that will get you noticed. Instead, use different vehicles and come from different directions at irregular time intervals. Have a different set of clothes on each time as well. It also helps if the person driving is not the one doing the surveillance, so they aren’t observed looking around and can act like another bored driver focused on the road. Meanwhile the observer is concealed in the back seat, where many SUVs have tinted windows.

If conducting recon in a static (parked) vehicle, you must give the impression that the vehicle is unoccupied. Sitting in the driver’s seat of a parked car for long periods of time is not something normal people do, so you shouldn’t let people see that. In a van or other vehicle with an extended cab, often the back windows are slightly tinted while the front row windows are not. If this is the case, move to the back row and let the world see an empty cab. I have personally used this technique successfully in the past, and my vehicle was completely ignored. Nobody looks at a vehicle without a driver and guesses that there is someone in the back, unless you give them reason to. Avoid unnecessary noise and movement while observing. This should go without saying, but you should make sure that you’re parked somewhere that one would expect to see a parked car, not just randomly on the side of the road.

Sniping from vehicles has its advantages, as long as you don’t stick around after the shot.

Covert Weapons Platform

One does not need to look very hard to find examples of guerrillas, terrorists, or special forces soldiers modifying a vehicle to use it for an improvised sniper hide. Perhaps the most recent and memorable example is the beltway snipers, who cut two small holes in the back of a car for their muzzle and optic. Not only did this conceal the muzzle flash, the vehicle acted as a baffle and suppressed the sound of the gunshot a bit. By firing from inside a vehicle, the shooter also didn’t need to worry about their brass getting found by a forensics team.

Using a thin-skinned vehicle as a covert firing platform relies on the vehicle not being discovered. Normally, this means firing one shot and leaving. If multiple shots are to be fired from the vehicle, steps should be taken to protect the shooter and driver from return fire. The IRA accomplished this with improvised steel plating concealed within cars and vans that they used as weapons platforms.

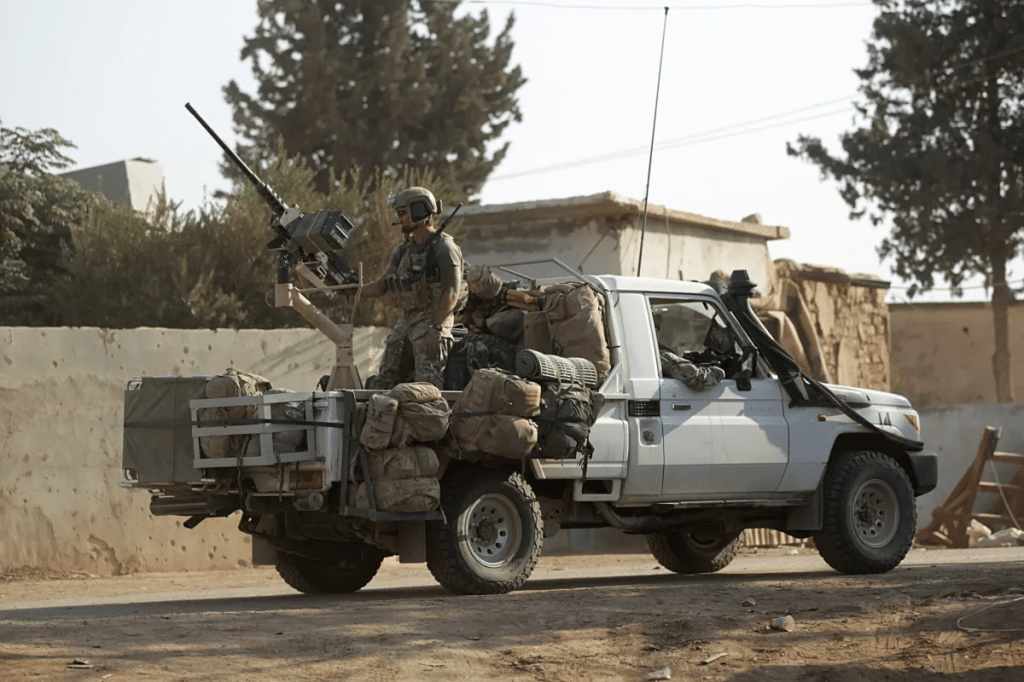
Even when unarmored, technicals pose a significant threat with mobile firepower.

Overt Weapons Platform

More commonly known as “technicals,” these have tactical applications in come scenarios when you don’t care about being covert. Any number of large weapons can and have been mounted in the back of pickup trucks, from machine guns to recoilless rifles to mortars. Use overt vehicles like this for a QRF or personnel recovery team when you need to bring some firepower and bring it quick. While your typical Somali warlord would typically mount a machine gun and leave it at that, there are some other modifications you should consider when going overt.

First and most obvious, you should try to find a way to protect the driver and gunner in the vehicle. Improvised cab and turret armor are generally the way to go here, provided you have the materials and expertise to make such a modification. It should be noted that armor adds a great deal of strain on your vehicle’s suspension, so make sure that your Marvin Heemeyer contraption can still drive with that kind of weight.

Next, your overt tactical vehicle should be given a new paint job so you can effectively camouflage it from hostile ground troops and drones. All civilian vehicles, regardless of color, have a glossy finish that is impossible to camouflage effectively because it reflects light. You will need to paint over this with flat earthy colors. Krylon works fine, if you can get enough of it. Once the paint job is done, you should get some mil-surp cammie netting and size it for your vehicle. The practice of camouflaging a tactical vehicle is such an in-depth topic it deserves its own article.

Finally, make sure that whatever weapon you’re mounting on the back of your technical is worth going overt. This typically means a light machine gun at a minimum, or something else that is too heavy or cumbersome to transport and operate on foot. Or you may not mount a weapon at all, and opt to use your truck as an overt troop transport with benches in the back. Perhaps some combination of the two, let your needs dictate your actions.

Summary

Civilian vehicles can be incredibly useful for tactical applications if you appreciate them for what they are. As long as you use proper tradecraft and don’t try to make your car into something it isn’t, you will be successful in whatever operations you conduct. Remember that “tactical” means that you are using proper tactics to approach problems, not simply throwing a bunch of expensive mods at your truck. Equipment doesn’t solve problems, people with brains do.

If you want practice solving tactical problems, I still have plenty of spots available in the Force-on-Force Lab on March 26-27. Come out and get practice working in a team of shooters facing a living, thinking enemy. I also have a Team Leader Class scheduled for March 5-6 if you want to learn how to be an effective small unit leader. Email me at vonsteubentraining@protonmail.com to register.

Team Equipment Part 2: Sustaining Operations

Last week, Part 1 covered force-multiplying tactical equipment that a team might invest in.  This week we cover the boring, yet important, topic of logistics.  Having gear is nice, but if you actually plan to conduct operations, you need to make some more investments to keep you and your equipment in the fight.

Military radio operator with a SPACES solar charger and a VHF/UHF radio.  The solar panel is likely charging extra batteries or a tactical tablet.

Solar Chargers

Whether you’re preparing to fight a guerrilla war or just looking to defend your property during a crisis, you cannot rely on the lights staying on or being able to run to Wal-Mart for more AA batteries. You should seriously consider having some way of continuously powering your mission-essential equipment like night vision and radios, and that generally means solar power.

If you’re static (defensive) and have large power needs, you may choose to invest in an expensive solar setup that includes battery banks to store energy so you still have power when the sun’s not shining. If you’re foot-mobile and only need to recharge AA batteries for your night vision and radios, you’ll want a more lightweight (probably foldable) panel that can fit in your pack. S2 Underground made a thorough video on solar power here.

A “field stripped” MRE.  By removing the heater, cardboard, and unnecessary items, you can cut the size of an MRE in half to save room and weight in your pack.

Emergency Food Storage/Field Rations

You should have already stocked up on food by now, and if you haven’t you really should start while you still can. Everyone’s situation is different, and there are many options out there. This is an incredibly involved topic that I can’t hope to do justice here, so I’ll redirect you to this article about long-term food storage.

What I would like to discuss here is field rations. If your METL involves multi-day patrols or field operations, you need something that you can carry with you to continually fuel your body. Military MREs are good for this, but they have a shelf life of around 2-3 years. Canned food works if you don’t need to heat it up (or you can, if the tactical situation allows), but it can get pretty heavy in your pack. Freeze-dried food from places like ReadyWise or Mountain House are also good options that still taste good. Whatever you choose, make sure you have the ability to support yourself and your team through whatever operations you plan to execute. Don’t just assume you will go innawoods and hunt/gather what you need, PLAN YOUR MEALS.

The Sawyer Mini water filter.  Not the best option out there, but for $20 you get a reliable 0.1 micron filter that weighs almost nothing and takes up only a few inches of space in your pack.

Water purification

Again, there are a myriad of resources and options for water collection and purification/filtration. Suffice here to say that a 7-day patrol cannot carry all the water that they will need to survive, they need a way to get drinkable water in the field. At a minimum, every member of your team should have a Sawyer Mini filter or iodine tablets on them when in the field. Badlands Rifleman wrote a comprehensive article on field purifaction/filtration options here.

Be sure to store your ammo properly to ensure that it will last.  GI ammo cans are excellent if the rubber gasket is intact.

Ammunition Stockpile

You should standardize your team around one type of ammunition. Ideally, you also all have the same weapon and optics so that at any time you can grab your buddy’s gun and know how to use it. However, it can be a hard sell to convince someone to sell their prized rifle just to match what everyone else is running. At a bare minimum, your fighting carbines should all use the same mags and ammuniton to simplify your logistics in the field. Obviously, exeptions can be made for specialized weapons as discussed above (except the automatic rifleman; he needs to be able to resupply off of the rest of the team).

Once you’ve standardized your ammo, you may consider having a team ammo stockpile that you all contribute towards when you’re able. Talk with your teammates and set up a goal that you want to reach for what you want to have when SHTF. Once you reach that goal, you continue adding to the stockpile, but everything more than your emergency reserve you plan to use towards training events. This would only be used for when the team trains together, not for individuals to go off to shooting competitions by themselves. Folks will get grumpy when they think they’re funding someone else’s hobby.

A good resource for bulk ammo purchases is ammoseek.com. Ammoseek is a search engine for online ammunition, and it sorts your results of what’s in stock by cheapest per round. It also updates every few minutes. You will very rarely find an online deal better than what ammoseek provides, and you will never find a better deal at your local gun store.

In rural parts of Africa, this is the ambulance.  Better than nothing.  A minivan with all the back seats removed would also do the job.

Medical Supplies

As a team, you should have access to more medical supplies than just what is in your IFAKs. Best case scenario, you have a doctor in your group for long term care of wounded/ill people. At a minimum, you need the ability to do an ad hoc CASEVAC if someone on your team goes down in a fight. This means a stretcher/backboard, a vehicle to use as a provisional ambulance, and someone with the training to keep the casualty alive long enough to get to a higher echelon of care. I am not a medical professional, so I cannot provide an in-depth look at what you would actually need for this. However, MechMedic has several excellent training classes available for TCCC, so you should check him out.

Conclusion

Equipment and supplies are important, but at the end of the day you need to have a skill set to use those supplies. In a pinch, you can use skills to overcome a lack of equipment, but you cannot use equipment to overcome a lack of skill. You and your team need to train regularly and realistically for whatever it is you are preparing for. And if you are the team’s leader, it is your responsibility to plan and coordinate training events for your people.

If you want to learn how to do this, as well as learn how to lead a small team in a tactical environment, I have classes for that. Check out my Training Schedule and learn how to be a small unit leader. And if you want to see how well you work with a team in a series of tactical scenarios, sign up for the next Force-on-Force Lab in March.

Team Equipment Part 1: Force Multipliers

Several months ago I wrote an article entitled “Priorities of Purchase: Progressively Building a Rifleman’s Kit on a Budget,” where I listed important items to buy for an individual rifleman in order of importance. Today I will do the same sort of list, but for team-based assets. Whether you’re defending your “retreat” or conducting operations as a guerrilla force, you should be training and planning to work with a team of shooters. After all, you can’t stay awake on watch 24/7. Once your individual kit is out of the way, you should consider investing in some additional items that can increase your team’s effectiveness. Today I will list some of these items, but unlike the last article, they’re not listed in any particular order.

The reason I’m not listing team gear in order of importance is because every team has a different set of mission-essential tasks, and therefore different requirements for their gear. Your mission-essential task list (METL) should determine what equipment you invest in, not the other way around. For example, a team defending a suburban neighborhood in a WROL/rioting scenario has far different needs than a dedicated guerrilla group operating in swamps and forests. Sit down with the other members of your team, determine what it is you are actually training to do, and then consider what tools will help you accomplish your mission.

That said, here is my summary of team-level equipment for your consideration. This article has a lot of links to more thorough articles and videos about these items, so you may want to save this article to use later as a resource.

A US Marine piloting a quadcopter drone

Drone/SUAS

Drones are incredibly useful for low-risk reconnaissance, and come in two main configurations: fixed wing and quadcopters. Fixed wing drones generally have greater range and longer flight times, but they are bulky and not easy to carry on the move, as well as harder to pilot. Quadcopters tend to be compact and lightweight at the cost of a reduced operating range and flight times.

It should be noted that most commercial drones come with software that not only tracks the location of the drone, but the location of the pilot. It is allegedly possible to “jailbreak” these drones, but it is unclear exactly how effective this is. Another option is to build your own custom drone, but I am not knowledgeable enough to discuss this in detail.

I should also note that quadcopter drones are mostly useful for scouting specific areas at specific times, not general observation for security. They simply do not have enough battery life for this task, and while imagery from the air is helpful it is not nearly as complete as what a human recon team can gather on the ground.

In a defensive posture, drones can also be used to provide overwatch for troops in contact. If the defense is coordinated enough to have a TOC coordinating the defense, a drone operator at the TOC could provide on-demand drone support to security outposts or patrols when they take contact. If the TOC is in radio contact with the element they are supporting, the drone operator can report what they see to the men on the ground. This is preferable to having the drone in the patrol, as it is hard to fly a drone while you are being shot at. It also lowers the risk of losing such a valuable asset.

A YPG Kurd fighter with a homemade AMR

Special Weapons

There are three basic types of special weapons that I will list here as they pertain to the armed citizen. They are the AMR, the Automatic Rifle, and a DMR.

AMR: The Anti-Materiel Rifle is optimized to counter a specific type of threat, namely armored vehicles. It won’t do you any service against a tank, but can be effective against lightly armored vehicles with the correct ammunition. I wrote a full article on what an AMR is here and a second on how to use it here. I also teach its use in my Support Weapons Class.

Automatic Rifle: The automatic rifle is an incredible force-multiplier for any infantry-type force due to its ability to contribute towards suppressing a hostile force. I wrote an article on how to build and utilize a semi-auto version of an automatic rifle here. Johnny Paratrooper wrote a similar article on the same subject here, and Hawkeye has posted several videos on his “area denial weapon” build as well.

DMR: The Designated Marksman Rifle is a potent tool. It is not a “sniper rifle” so to speak, but rather a fighting carbine that has been optimized for more precise fire when the need arises. My good friend NC Scout wrote a very good article on what he dubbed the “Guerrilla Sniper Rifle,” which is essentially the same concept. When operating within a squad, the designated marksman should stay close to the squad leader so he can be quickly assigned priority targets (like enemy machine guns or radio operators) and neutralize them with precision fires.

The (now iconic) Baofeng UV-5R

Radio Communications Equipment

Radios are incredibly useful for coordinating multiple teams or reporting back to a TOC or Patrol Base. And when you can still get cheap Baofeng radios on Amazon for under $30 each, there’s no excuse not to have a couple on hand. Bear in mind, not everybody should have a radio on a team if they don’t have something important to say. Too many people with radios will clog up the airwaves, and too much traffic will get you found by someone with even a basic SIGINT capability. Give radios to team leaders and squad leaders to coordinate maneuvers and keep the radios on low power to minimize your electronic footprint. While you’re at it, go to a class where you can learn how to use those radios more effectively.

View through night vision (left) and night vision paired with a Clip-on Thermal Imager (COTI).

STANO Equipment

STANO stands for Surveillance, Target Acquisition, and Night Observation. STANO assets enhance your ability to observe an area and detect people (friendly or otherwise) from an observation post or on the move in a patrol. This includes binoculars, night vision, thermals, and periscopes.

Binoculars: Field Marshall Rommel was once asked what his most powerful weapon was, to which he responded “binoculars.” A good set of field binoculars is very useful for getting a closer look at things, especially when operating in an AO with lots of open spaces. While you may have scopes on your rifles that also provide some zoom, it is a good idea to have an option for observation that doesn’t involve you aiming a weapon at people to get a closer look at them. While there are several cheap sets of pocket binoculars available, they far too often have a very small objective lens, which makes them significantly less effective in low light. However, their size and weight still makes them a good tool for a foot patrol. For an observation post, you’d want to get something bigger with more magnification and wider objective lenses.

Night Vision: As I mentioned in my article about individual equipment, having the ability to see and fight at night is such a massive force multiplier that I recommend selling your extra rifles to buy just one of them. I include it in this article about team equipment because, if you have the ability to do so, getting a few extra night vision devices to share should you need to use them is something that you should consider. It’s also helpful to have them available as backups if your main NVG gets broken, lost, or captured.

Thermals: While night vision devices are useful for getting around and aiming weapons at night, thermal optics are extremely potent for detecting and locating targets via their heat signature. Sure, the ability to see at night is a huge advantage, but it doesn’t change the fact that conventional camouflage techniques for daytime use still work at night against night vision. Thermal optics largely remove this shortfall by reading heat signatures of warm bodies, weapon barrels, and recently used vehicle engines, even through smoke, fog, and light foliage. Thermal optics can be weapon mounted, but for the same reasons as with binoculars, it is a good idea to have a handheld option as well.

Periscopes: The ability to observe something without exposing your head may or may not be important to you, but it is a good option to have if you need it. Handheld periscopes are especially useful in urban environments where it is very difficult to hide the distinct silhouette of a human head. These can be homemade using a tube and two mirrors, or you can try to find an old Soviet trench periscope. S2 underground made two very thorough videos about trench pericopes and their utility here and here.

To be continued…

Next week, Part 2 will focus on resources that will not just enable, but sustain your operations for however long you need.  In the meantime, make sure that you have the requisite skills to use this equipment effectively.  If you want to test your gear and your ability to use it, bring it to a class.

To learn how to make a training program for your teammates, come to a Team Leader Class where I teach how to be an effective small unit leader.  I’m continually adding classes to my training schedule, so be sure to check it once in a while for more class offerings.

Team Leader II Class and Force-on-Force Lab in March; Von Steuben Training

Good morning patriots!

I am pleased to announce the first Force-on-Force Lab event is now on the training schedule for March 26-27, 2022.

Force-on-force is a term that describes an exercise consisting of a battle between two opposing wills.  In this event, participants will be split into two squads and given a series of tactical scenarios with an objective.  It will then be up to each squad to determine how they accomplish their mission within a given amount of time.  Participants will be using blanks in their rifles to simulate the sounds, sights, and smells of combat.

This event will be tied in with Team Leader II, a 3-day sequel to my Team Leader Class.  While the first class covers basic team organization, training, and leadership, Team Leader II is focused on mission planning and tactics.  Students will receive one day of instruction on tactical planning, and the remaining 2 days actually leading a team in the Force-on-Force Lab.  Through repetitive, raw practical application, these students will leave with a solid foundation of knowledge and skill required of a combat leader.

For participants, the Force-on-Force lab isn’t just class.  It’s an opportunity to experiment with different approaches to tactical problems.  You can spend all the time in the world theorizing and reading about how to survive on a battlefield, but this event is an opportunity to truly find out what works and what doesn’t.

You will learn strengths and weaknesses of your tactical equipment.  You will discover just how physically demanding combat is.  You will run through scenarios both day and night to fully understand the challenges of each.  Most importantly, you will get experience operating in a team, coordinating your fire and movement with other shooters.

The scenarios are realistic and require a measured, tactical approach.  Respawn is either non-existent or CASEVAC based, to highlight the seriousness of what you are training for.  Participants who try to go “Rambo” on their own will not do well.  You will need to to balance aggression with caution to achieve victory.

This event is also an opportunity to experiment with your force-multiplying equipment.  Participants will be allowed to use any and all force multipliers they have, provided they do not pose a hazard to other participants.  This includes:

  • Radios
  • SIGINT equipment
  • Night Vision/Thermal optics
  • Drones
  • Smoke Grenades
  • and more!

The price for Team Leader II is $200, the FoF Lab is $300, both together are $500. Space is limited, so don’t delay in registering!

I’m also putting the finishing touches on a “Support Weapons Class,” covering the use of automatic rifle and anti-materiel rifles, to be offered this coming year, so stay tuned!

If you have questions about the event, or to register, send me an email at vonsteubentraining@protonmail.com.

Schweiss Spart Blut

Mike

Ohio Team Leader Class

We are getting close to the registration deadline for the Ohio Team Leader Class on December 11-12!   The class is still wide open for anyone who wants to tough it out in the cold with me for some good training.  Email me at vonsteubentraining@protonmail.com to register.

The Team Leader Class is a 2-day non-firing course of instruction designed to teach students to be effective small-unit leaders. You will learn how to organize effectively into fire teams and squads, and how to take full advantage of commonly available, specialized weapons. We will cover how to use team-based training to mold a group of willing volunteers into a cohesive fighting force. Finally, you will lead a team of fellow students in a series of battle drills to get the experience you need to apply what you’ve learned on your own.

Topics covered include:

  • Task organizing a team
  • Fire and Movement (day and night)
  • Fire and Maneuver
  • Neighborhood/retreat defense
  • Patrolling basics (day and night)
  • Mission planning
  • How to make a training plan for your team

No previous experience or knowledge is required to take this class.  Once again, this is a non-firing course of instruction, so you don’t need to dip into your precious ammo supply for this training.  I have several course reviews up on my website by students from past classes.

The cost of the class is $250.  Again, email me at vonsteubentraining@protonmail.com to register.  The deadline to register is December 4th.  Get out here and get trained!

How to use Airsoft for Training

Now hold on, I can already hear the stampede of “It’s MILSIM bro!” guys rushing to fight the “useless toy guns!” crowd in the comments. I’d like to preface this article by saying that I don’t fall into either of these categories. I know better than to refer to the sport of playing airsoft as “MILSIM.” However, I also recognize that there is potential training value in these “toy guns.”

Strengths and weaknesses of airsoft guns

Before I go into how to use airsoft guns for training, we must first analyze what they can and cannot do. For a start, airsoft guns can be easily configured to be exact replicas of almost any firearm in the world (or in your gun safe). This allows you to “clone” your own guns so that you can build the same muscle memory with your airsoft gun as with your defensive firearms. The magazines are the same dimensions as the real thing too, so you can (and should) use your normal load-bearing gear to carry them.

My Mk47 Mutant (bottom) and airsoft clone (top).  The foregrip is in the exact same place and they both have 3x optics with similar reticles, so I still get practice acquiring targets up close with the magnification.

Airsoft guns are also great for avoiding potential legal repurcussions of getting caught training with actual firearms in certain locations. For example, you and your teammates want to practice patrolling in the local forest and some Karen walking her poodle calls police on you because you look scary. Police show up and start asking questions about what you’re doing, and you can innocently say “we’re playing airsoft.” Just make sure that you don’t paint over the orange tips on your guns.

The best strength of airsoft guns is their utility for force-on-force training. You squeeze the trigger and a small plastic BB is fired at about 400fps which stings your opponent and lets him know that he is hit. I would argue that this is better for force-on-force than simply using blanks because you get to see what actually works and what gets you “killed.” You become more conscious of cover and concealment when there are painful consequenses for carelessness.

All that said, we must recognize that airsoft guns have some pretty hefty limitations on their realism. First of all, the maximum range of most airsoft guns is 100-200ft, which means that the force-on-force utility is limited to those ranges. Second, there are certain aspects of firing a real weapon (muzzle flash, sound, and recoil) that airsoft guns cannot mimic. And third, the fact that they shoot plastic BBs means that a lot of materials provide “cover” from airsoft guns that wouldn’t stop real bullets, creating the potential for training scars.

How to train

Now that we understand what this tool is capable of, I’ll provide some tips on how to employ it in your training.

  1. Force-on-force in dense forests and suburban terrain. This is where airsoft truly shines as a training tool. Avoid a training area with open areas in excess of 100 yards across so you don’t get used to dismissing enemies as “out of range” when you could easily hit them with a real rifle.
  2. Limit everyone involved to semi-auto fire only.
  3. Most airsoft guns have magazines with grossly unrealistic capacity, ranging from 50 round mid-caps to 600 round hi-caps. Stick with mid-cap magazines and load them to a more realistic 30 rounds instead of filling them.
  4. When “hit,” take note of where you are hit and walk through the steps you would take to save your life as if it were a real gunshot wound. Apply a tourniquet if you are hit in a limb.
  5. Plan structured events where each side has a realistic objective rather than an unstructured free-for-all. For example, have one team plan a raid to capture supplies, and tell the other team that they need to defend them. Have them coordinate their actions and fight as teams.
  6. Do not respawn individuals, respawn groups of individuals and require them to function as teams. This encourages collaborative play and keeps the event organized.
  7. Public airsoft fields can be used too, but with far more limitations. If you go to public events keep in mind that most of the other people are there to play a game, not get realistic training. Don’t be a jerk and ruin their day trying to boss them around, you’ll only earn yourself some angry looks and maybe a “friendly fire” incident.

Summary

Airsoft can be a potent training tool if used correctly. As long as you take into account its limitations and plan accordingly, you can get a lot of valuable training for very little monetary cost. A quality electric airsoft gun will run you about $150-$200 including batteries, magazines, and chargers. 5000 BBs costs $15-$20, so it’s extremely cheap once you get past the up front costs.

In the future, I plan to run Force-on-Force Labs through Von Steuben Training, so keep an eye out in the future for these realistic training exercises. If you want to learn how to coordinate and lead a team of shooters, join me in Ohio on December 11-12 for the next Team Leader Class. I look forward to training with you!

How to Use Shooting Competitions for Training

Shooting competitions come in many different forms. Cowboy action matches, USPSA pistol matches, run and gun events, etc. Using competitions to improve shooting skill is a wonderful American tradition. However, there is a tendency in the competitive shooting community to lean very hard into the competitive aspect at the cost of realism or training value. Unfortunately, having what it takes to win a competition does not mean you have what it takes to win a gunfight.

That said, competitions are still a great way to build shooting skill if you do them correctly. Here are my tips for how to get training value out of competitions.

Tip #1: Don’t try to win

This is probably going to shock a lot of people. “What’s the point of a competition if you aren’t going to compete?” you ask. Remember, you are using competitions as training events. The objective is to train well, not to win. Competitions (especially those with time-based scoring) are often set up in a way that the highest score is attained by not using good tactics. Therefore, getting the most training value out of a competition means that sometimes you will need to do things that will make you slower.

I’m not saying that you shouldn’t try to shoot well, just that you shouldn’t get hung up on your score. Once you get this out of the way and put your pride aside, then you can move on and focus on what’s really important.

Tip #2: Use your “real world” firearms

Many people fall into the temptation of making or buying a “race gun” that is designed to give them an edge in competitions. These tend to be very lightweight and may shoot low-recoil ammunition for extremely fast follow-on shots. However, this tends to come at the cost of reliability and combat effectiveness.

Light and fast, but would you trust your life to this rifle?

We’ve all heard “train like you fight,” and it rings true here. If you can shoot faster with the .22LR but your “patrol rifle” is an AK, why wouldn’t you want to get better with the rifle that you trust your life to?

This also goes beyond simply building skill with your “real world” firearms. Competitions are great places to learn what works and what doesn’t work on your weapons. During one match, I discovered that a certain type of ammunition gave me stuck casings repeatedly when the gun warmed up after firing 20 rounds in under a minute. I would never have discovered this issue plinking away slowly at 200m on a square range.

Bottom line, you need to be training with your actual defensive firearms. “Race guns” are counterproductive and a waste of your money.

Tip #3: Use your “real world” equipment

This goes hand-in-hand with the previous tip. By “equipment” I am referring to your load bearing gear, slings, magazine pouches, and clothing. For example, it makes no sense to practice reloading from open-topped magazine pouches when your “minuteman kit” has flaps on the pouches.

Many people are hesitant to wear their combat gear to a competition, and with good reason. When everybody else is wearing polo shirts and jeans, showing up wearing a helmet, plate carrier, and multicam head-to-toe will draw some weird looks. This is not what I’m suggesting that you do. Wearing normal clothing with your belt/LBV/plate carrier is not that uncommon at most events, as long as you take the context of the competition into account. 2-gun or 3-gun matches have a lot of people wearing vests of some sort to hold all their ammo, but a long-range marksmanship match won’t. Of course, if you want to wear a plate carrier to get used to shooting with it on, this is still America and you can do what you want.

“Real world” equipment can also mean that you wear less gear. Most people at pistol matches wear a war belt to hold their holster and ammo, but this is unrealistic. Very few of us do this on a daily basis, so it doesn’t make sense to train like this. Instead, for pistol matches, try to carry your gun in the same holster and the same clothing that you use for concealed carry. Not all events will allow you to do this, but if they do you should take advantage of it. Draw from concealment when you can. If you carry an extra magazine in your pocket, reload from your pocket instead of a pouch on your belt. This will cost you some time, but as I stated in tip #1, speed is not the goal here. Training is.

Tip #4: Go for accuracy, not speed

I’ve been to matches where guys who sprayed rounds at the targets and missed a lot scored much higher than those who shot the match “clean” with no misses. While speed is conducive to your score, accuracy is more beneficial for your survival. It’s a bad habit to fire three shots at a target and then move on to the next one without checking to see if you hit it or not. It’s especially bad to practice spraying rounds at a pistol match when you consider those actions in the context of self-defense with a handgun, and that you are responsible for each bullet you fire no matter where it goes.

Take your time, get accurate shots on target, and eventually the speed will come naturally. It is better to hit slowly than to miss quickly.

Tip #5: Take a friend

Having someone else to critique your shooting is incredibly helpful for seeking self-improvement. There is only so much that we can correct purely on our own, so having a friend that you trust to watch you and give you corrections is a great asset. Even better if they record videos of you so you can look back and see what you are doing wrong. Plus, shooting is always more fun with a friend.

Conclusion

Shooting competitions are great opportunities to improve your firearms skills, and they can be even better opportunities if you make them. If you can put aside your pride, forget that you’re at a competition, and handicap your score in exchange for better training value, you will see marked results in your real-world skills.

Speaking of training, I have classes on the training schedule. If you want to move beyond your individual skills and learn how to work within a team, register for a class and I’ll get you squared away. Email me at vonsteubentraining@protonmail.com.

Team Leader Class AAR and Future Plans

Two weeks ago I had the great pleasure of running another successful Team Leader Class.  I was honored to have Timbersour in attendance, and he wrote a great course review that I posted yesterday.  I am constantly modifying and adding to the course to improve the quality of the training.  At the end of every class, I run through a series of after-action points with the students to get input on what to sustain, what to improve upon, and what to get rid of.  Here are some of the bullet points from the July 10th TL class.

  • I added a night vision familiarization portion to the Friday night prior to the rest of the class.  Students brought their own night vision devices or borrowed mine for this.  We practiced walking around under NVGs, both on a flat road and through the woods, and for some of the students this was akin to getting their “sea legs” so to speak.  We also demonstrated use and utility of IR lasers, how they look from downrange, and how to use them against a night vision-equipped adversary.  Finally, we took our camouflage clothing and tactical equipment and discovered how it looked through night vision (i.e., how effectively we could hide from night vision).  This portion of the course was an overwhelming “sustain” and I intend to make it a permanent part of the course going forward.
  • During the course, I briefly touched on defensive principles and defensive positions.  Some of the students said the class could be improved by devoting more time to this topic because of how useful it would be for defending a neighborhood or rural retreat.  This being the second time I received such input, I have decided to listen and will cover defensive principles in depth in future classes, including an interactive defense exercise.
  • The drills we practice during the class are done with the students’ personal rifles, unloaded for safety.  One student suggested using airsoft guns for cheap force-on-force practice, and to avoid certain legal ramifications of training/travelling with firearms.  I’m still working out how to fit this into the scope of the Team Leader Class.  I may eventually run a multi-day force-on-force training event in the future if I get sufficient interest and a suitable location.

In order to accommodate these and other changes, I am extending the class to a 2-day course, beginning Saturday morning and ending around noon on Sunday.  The Night Vision familiarization portion will be optional for students who choose to arrive Friday evening.  Going forward, the Team Leader Class will be structured as follows:
Friday (optional):

  • Early students arrive in the afternoon/evening
  • Night Vision familiarization

Saturday:

  • Remainder of students arrive, class starts at 0900
  • Part 1: Know your team
  • Part 2: Train your team
  • Fire Team level fire and movement drills (day and night)
  • Defensive Fundamentals
  • Patrolling basics (day and night)

Sunday:

  • Lesson: “The Godly Warrior” (optional)
  • Part 3: Lead your team
  • TDG exercise
  • Squad level Fire and Maneuver
  • AAR

The next Team Leader Class is scheduled for October 30-31.  I will post future classes on my training schedule. For more information or to register, email me at vonsteubentraining@protonmail.com
Schweiß spart blut.
-Mike

July 10th Team Leader Class

We’re just under a month away from the next Team Leader Class on July 10th, offered through my business VonSteuben Training & Consulting. For those of you who missed the previous announcements, I’ll briefly summarize what I teach in the class. Additionally, WWes wrote a pretty good course review from the test run of the class back in February, so you can check that out as well.
If you’re reading American Partisan, it’s probably safe to assume that your mind’s already in the right place as far as training goes. You may even have a group of like-minded friends in your local area that you plan to rely on should SHTF, and if you do that’s awesome. However, it can be hard to motivate all of your friends to spend the time, money, and ammo to go to courses, so how can you get them the training they need for you all to be effective? The answer is simple; YOU have to train them.
This is where the Team Leader Class comes in. My goal is for you to leave my class with the ability to train your friends back at home effectively and efficiently, and at as low a cost as possible. You will have the knowledge and confidence necessary to plan, lead, and conduct training with your buddies to forge them from a “group” into a cohesive “team”.
Now that the mission statement is in the clear, I’ll go over the details of the class itself. The TL class is 1 full day of training, starting at 9am and ending around 4-5pm depending on class size. I will teach you how to effectively organize a group into fire teams and squads and how to utilize any special weapons you may have or come across. We will cover how to use progressive team-based training to mold a handful of volunteers into a lethal fighting force. Finally, throughout the day you will lead a team of fellow students in a series of battle drills, learning the dynamics of a gunfight and getting the experience you need to apply what you’ve learned on your own.
Full disclaimer, there is some physical activity involved in this class for the battle drills. Expect to run short distances, getting up and down a lot to kneel/lie behind cover.  You will probably get muddy/dirty too, so dress accordingly.  I’m not going to slay your body, but you will get a bit of a workout in. Combat is physical, training should be too.
The gear list is posted here on my website. There is zero, I say again ZERO ammo requirement for this class. The reason for this is twofold. First, given the current ammo shortage, I want to lower the barrier for you to get the training that you need. Second, I want to show you that you can train your teams without burning anyone’s precious rounds that you might need in the not-so-distant future.
The location is in Eastern NC in the New Bern area. The class registration fee is $100 per student, paid up front. If you have to cancel after paying the registration fee, I will grant you a slot in a future class. This is to ensure that I do not waste your time driving out to a team-based class where everyone else backs out last minute. To register or get more information email me at vonsteubentraining@protonmail.com.  If you want to attend a future class, I have another class in October posted on my training schedule.  I look forward to training with you.
Semper Paratus, Semper Discens, Semper Fidelis.
-Mike

The Mission Profile

I want to approach a related topic that pertains to your own mental preparedness, the mission profile.
Your mission profile is, simply put, a list of mission/operation types that you anticipate having to conduct in the future. This will vary greatly from group to group, as we all have our own unique set of scenarios that we forsee ourselves in, and we prepare accordingly. For example, a neighborhood protection team organized to defend against rioters/looters will have a vastly different mission profile than a militia in a rural area preparing to fight an occupying army.
However, mission profiles that exist merely in our heads are useless because not everybody in your group will be on the same page. Sure, your neighborhood protection team all understand that your goal is to protect your homes and families, but everyone has different ideas about what exactly that entails. Setting up checkpoints? Internal patrols at night? What about security patrolling outside your perimeter?
The point I’m trying to make is that everyone in your team needs to be on the same page with what exactly you are preparing to do. The only way to do this is to sit down with every member of your team and a whiteboard, and discuss exactly how you plan to accomplish your mission in the future. There will be disagreement, even debate as you discover that not everybody is on board with the idea of patrolling 10 miles and staying in the field for a week at a time like you envisioned. Be respectful, be polite, and have good reasons for what you propose. Listen to your people, they probably have legitimate concerns that you hadn’t thought of. Once all is said and done, you will all walk away with a common vision and clear goals for your training and preparedness.
Once you have this talk and everyone is on the same page, you can begin to craft a training schedule that supports your mission profile. You plan to establish observation posts watching a nearby intersection? Spend a Saturday in your “OP” documenting the traffic that passes by. You want to use vehicles for covert team insertion/extraction? Practice doing that, coordinating with your driver over radios. Make your own TDGs for your mission profile, and wargame both sides.
We can only accomplish so much on our own, gentlemen. Make sure you have clear and common objectives so you can train your people effectively for what’s headed our way.
Schweiß spart blut