
Last year, I wrote a series of articles on my “Jäger Kit”, the equipment that I carry for light infantry operations and extended patrolling. However, one’s equipment is a constant evolution as you find things that work better for you, and I am no exception. And with the Jäger Course coming up in a month, I thought it would be appropriate for me to make an updated article about my gear.
Full disclosure: I am now an Amazon affiliate, and some of the equipment that I list here will have affiliate hyperlinks embedded. If you click on these links and buy the gear, I may make a small commission on the sale. You pay exactly the same price for the item as you otherwise would, but by using my links you are supporting VSTAC at Amazon’s expense.
Legal speak out of the way, let’s look at some gear.

In it’s current state, my kit is divided into my belt, chest rig, assault pack, and main pack. We’ll look at each section and I’ll break down what I carry, what has changed, and why I changed it.
War Belt
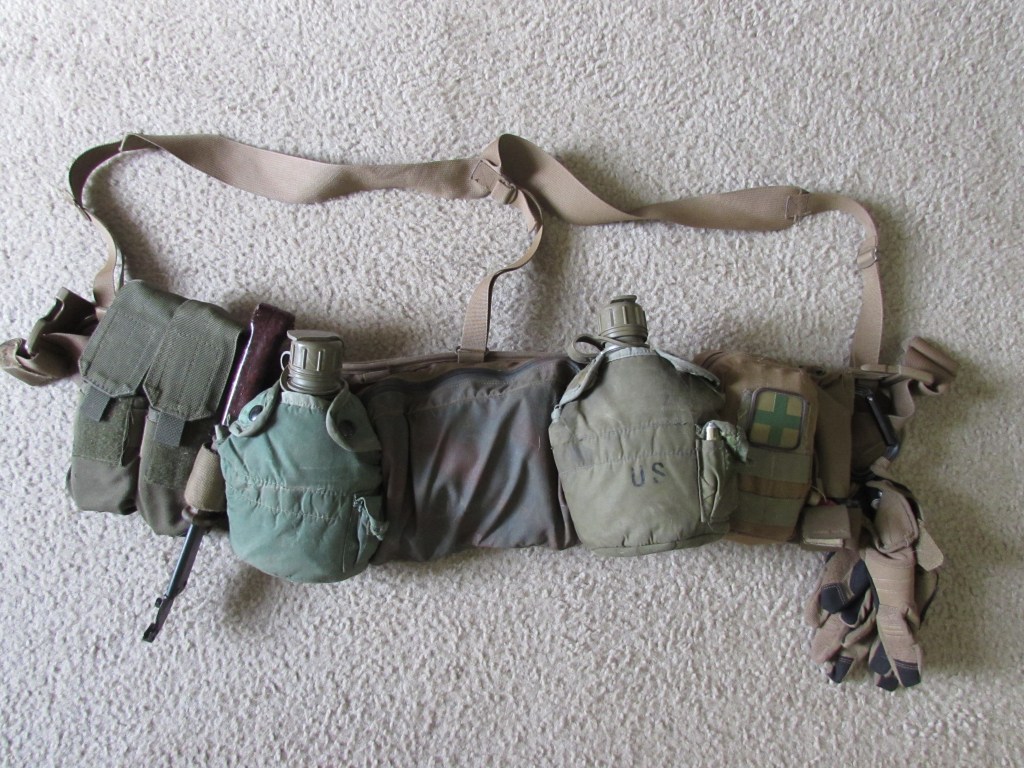
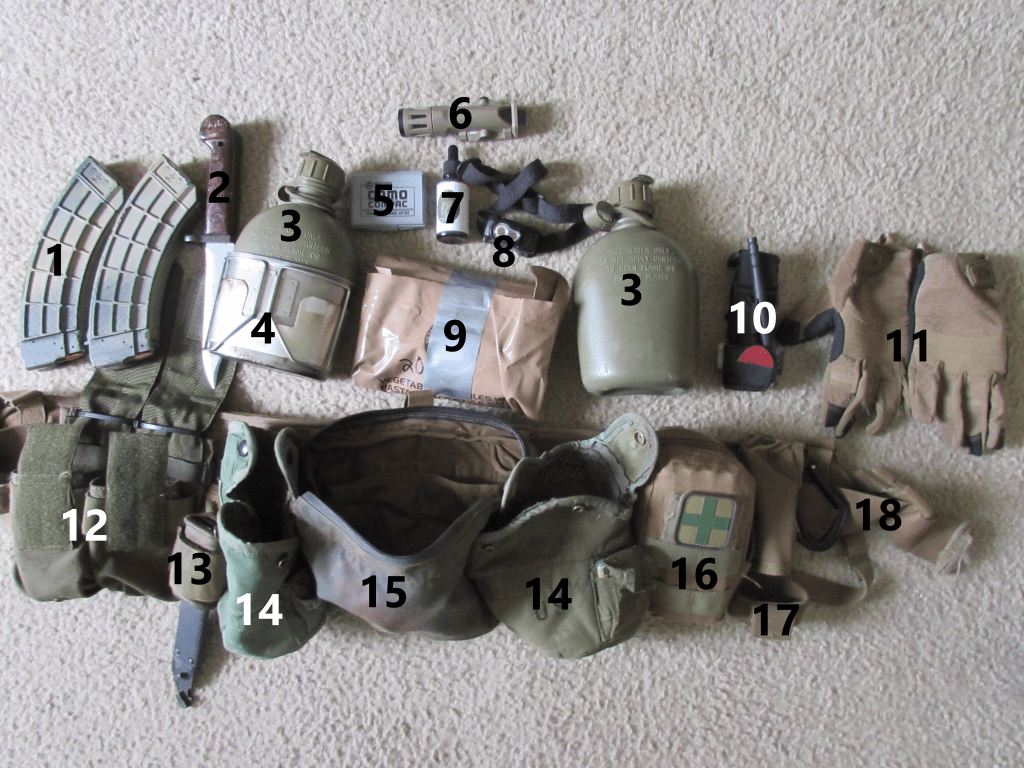
1. 2x AK magazines
2. AKM Bayonet. I replaced my Ka-Bar with the AK bayonet because I want the option of fixing the bayonet on my rifle, and this bayonet can attach to the sheath and function as wire cutters.
3. 2x canteens. A common trend in all of my personal AARs from last year was that I never had enough water. In the heat of summer when I dropped my pack for a mission, I could drink my full 2-liter camelback after about an hour of patrolling, I was sweating so much. Thus, I felt the need to carry more water on my combat gear, and added the canteens.
4. Canteen cup and stove. I had this in my pack anyway, and only moved it to the belt when I put the canteen pouches there. It fits over the canteen and takes up virtually no space, and is very useful when I want hot coffee or gatorade. Never use gatorade powder in a canteen or camelback. It’s almost impossible to clean, and attracts bacteria and mold. In a camelback, it will destroy the anti-microbial lining that keeps mold at bay.
5. Camouflage face paint
6. Inforce WML-X weapon light. I carry this on the off chance that I may need to clear a structure, and its QD attachment allows me to put it on and take it off my rifle at will. I leave it off so that I don’t accidentally trigger it on a patrol, which could be fatal.
7. Bleach bottle with dropper. This is a part of my water purification kit. I keep it on my belt in case I am away from my main pack and must purify water without my filter. Iodine tablets or tincture would work as well, but the bleach is much more commonly available. 2 drops per quart with a 30-minute wait.
8. Headlamp. I really like this model, it defaults to the red light and takes deliberate action (holding down the button after red light is on) to activate the white light. My only complaint is that it takes AAAs, and nothing else in my kit does. This adds one more type of battery that I must carry spares of.
9. Field stripped MRE, or 1/2 day’s rations.
10. CAT Tourniquet. I always recommend carrying at least 2, with at least one accessible with either hand. My second one is on my chest rig.
11. 511 Tactical gloves. I like these because they’re breathable and have leather to protect my hands from a hot gun barrel/suppressor, as well as protecting my hands from thorns.
12. Blackhawk double M4 mag pouches. I like these because they can hold any rifle ammo I own. as configured, I can carry 4x AR mags OR 2x AK mags OR 2x AR-10 mags OR 12x rounds of .50 BMG for my AMR.
13. AK Bayonet sheath and homemade frog
14. 2x ALICE canteen pouches. Not that they’re better than MOLLE pouches, they’re just what I have and they work.
15. FILBE Assault Pouch. This replaced my MOLLE II buttpack because, with the addition of the canteens, the belt was too heavy and bulky. I moved some of the contents to my assault pack, and needed a smaller pouch. The FILBE Assault Pouch is very low profile and still holds items 5-9 comfortably.
16. IFAK. I chose a smaller pouch because I wanted to reduce bulk on the belt. It still holds all the same stuff, but only takes up 2 MOLLE Columns instead of 3.
17. Tourniquet pouch. Mine is inverted so that my chest rig or plate carrier don’t get in the way when I pull out the tourniquet.
18. The belt itself, a USMC MOLLE War Belt with suspenders.
Chest Rig
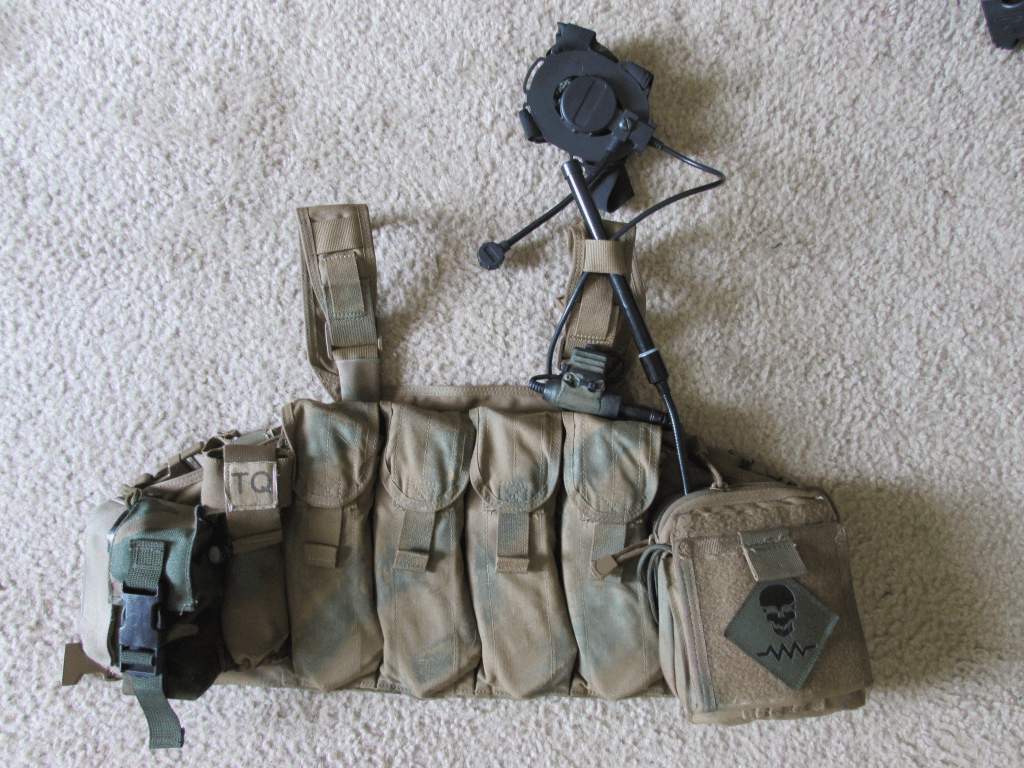
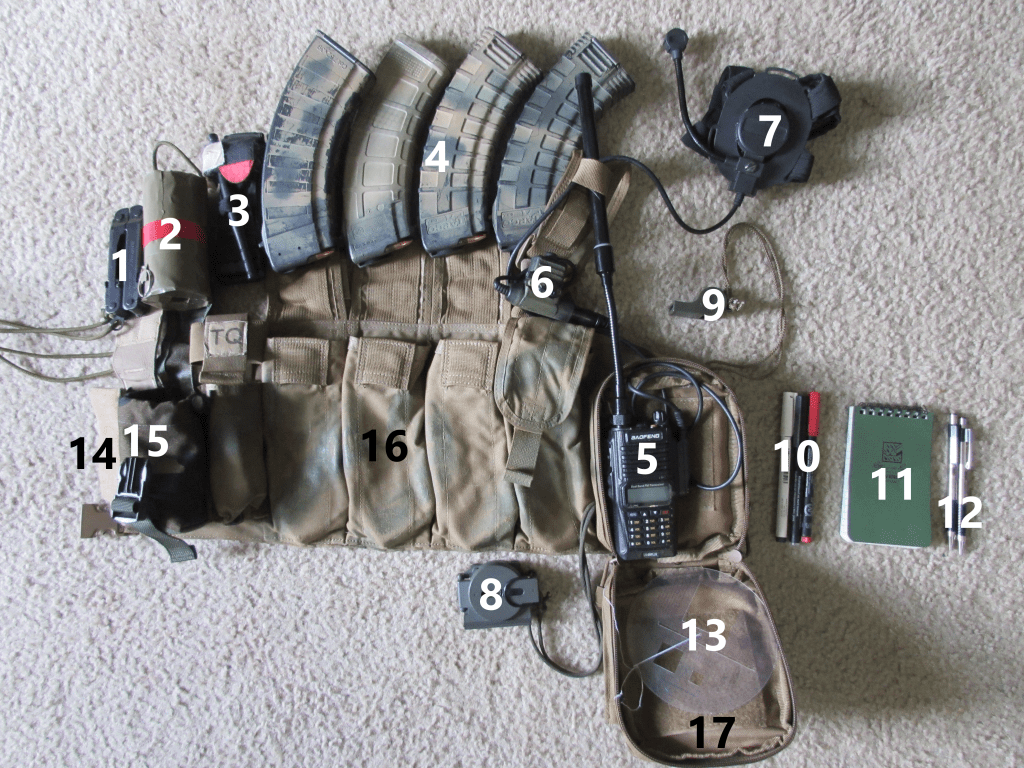
1. Leatherman multitool. Note that it’s dummy corded to the chest rig. I’ve lost too many of these things in the past.
2. EG-18X Smoke Grenade, ruggedized with duct tape and marked with the color. See my article on tactical smoke employment.
3. CAT Tourniquet. I always recommend carrying at least 2, with at least one accessible with either hand. My second one is on my belt.
4. 4x AK magazines
5. Baofeng UV-9R radio. This is my personal favorite so far for a tactical radio that I wear on my kit because it is waterproof, but more importantly has a much better connection to the headset that screws in and doesn’t come loose like the 2-pin Kenwood connectors. I just recently purchased an AR-152, but I haven’t played with it too much yet.
6. PTT
7. Bowman-style headset. I love this option because it is comfortable, doesn’t make my ears sweat, doesn’t block my natural hearing, and doesn’t take extra batteries. And since it’s a headset and not a handset, I never miss a transmission that my radio receives due to loud noise around me (i.e. gunfire).
8. Lensatic Compass
9. Signal Whistle
10. Map pens and eraser
11. Rite-in-the-Rain notebook
12. Zebra ball-point pens. The Rite-in-the-Rain pens are crap, but these pens I have confirmed will write while under a running faucet. I have 2 because in case I lose or break one.
13. Protractor
14. Leatherman pouch
15. Smoke grenade pouch
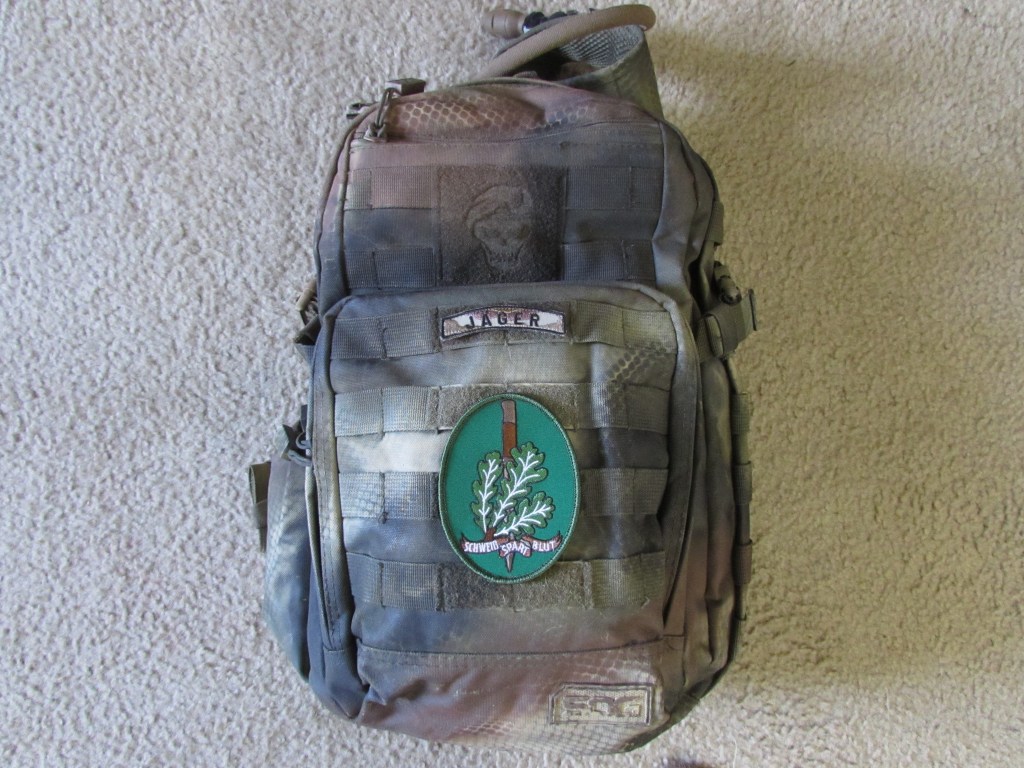
16. The chest rig itself, a custom Minuteman-4 made by UW Gear. This is a massive step up from the modified chicom Type 56 that I had been using.
17. Condor map pouch (as I call it, the “Team Leader Pouch”). Read my review of this pouch here.
Assault Pack
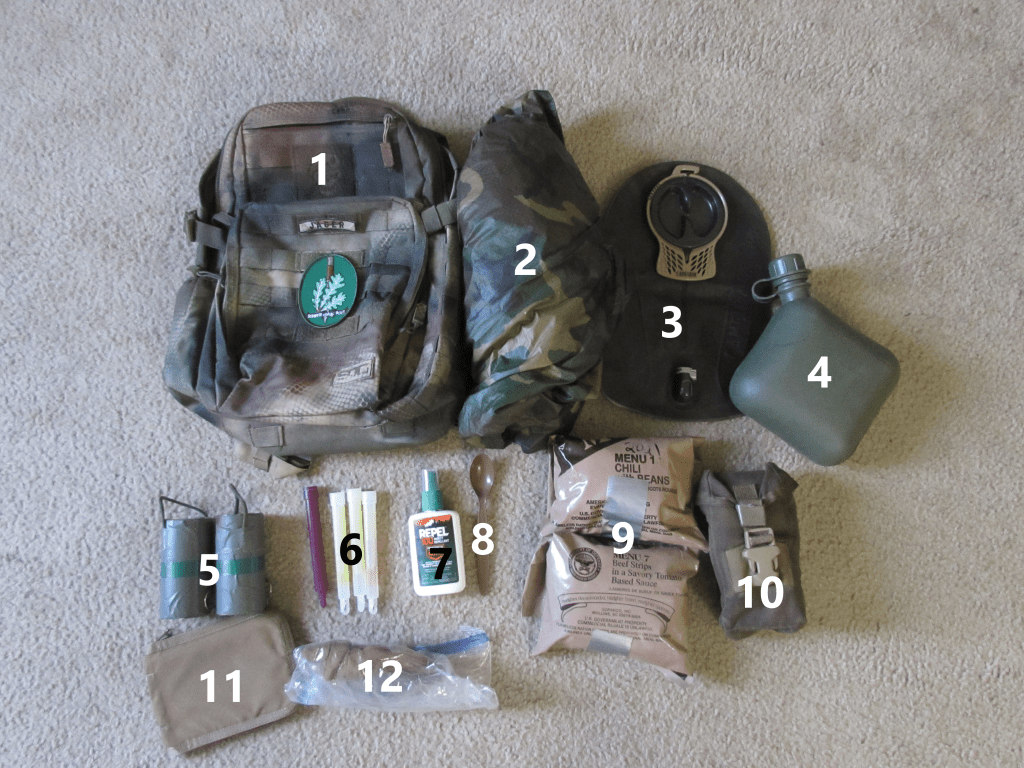
1. SOG Ninja Assault Pack. I am still in the process of testing this pack for durability, so I cannot fully recommend it yet. I will post a review of it after the May Jäger Course.
2. USGI surplus poncho
3. 3-liter camelback bladder and hose
4. USGI 2-qt canteen. I do not normally fill the camelback bladder until I am wearing the assault pack by itself, as the bladder is prone to popping. When the pack is stowed or carried in my main pack, I leave my water in this collapsible canteen which will never pop. When I leave my main pack in the patrol base and put on my assault pack, then I fill the bladder from the canteen, which collapses and rolls up.
5. 2x extra EG-18X Smoke Grenades, ruggedized with duct tape and marked with the color.
6. Chemlights. As per my team’s SOP, we each carry 3x green and 3x red at a minimum. I also have 1x IR chemlight for an additional signalling option. My red chemlights are in my IFAK.
7. 100% Deet Bug Spray. This is the only stuff that works in the coastal Carolina swamps, besides permethrin.
8. MRE Spoon. I carry one of these in the pack so that I don’t have to carry one in every MRE. It’s not much, but every little bit of weight savings counts.
9. 2x field stripped MREs, or 1 day’s rations.
10. USMC RCO pouch containing my night vision and thermal (Gen3 Photonis WP PVS-14 and a FLIR Breach)
11. Rite-in-the-Rain notepad with cover and 2x Zebra pens.
12. Beanie hat, neck gaiter, and warm gloves in a ziploc bag. This is a seasonal item, and will be removed from the pack in a week or so as the weather warms up.
As some may remember, I previously used only one pack, a FILBE Assault Pack. I decided to switch to a 2-pack system consisting of an assault pack and a main pack for the following reasons:
- While my previous pack system worked and did sustain me for up to a week, it had zero room left over. I want my pack to have extra space for mission-specific items such as radios, extra ammunition, STANO gear, etc.
- I had already been doing a 2-pack system, but I was using my butt pack in place of the assault pack. With the addition of 2 canteens onto my belt, the belt became overly bulky and heavy. So I removed some items from my belt and put them in a small 20 liter assault pack, which I carry any time I am away from my main pack.
Main Pack


1. Assault pack. As seen in the top photo, this straps to the top of the pack under the lid nicely. It also fits inside the main compartment if I wanted to look like an inconspicuous backpacker.
2. Silky Saw. This saw is very lightweight and is excellent for cutting small branches to clear a field of fire, or roots when digging a fighting position.
3. USGI E-tool (folding shovel). Essential for many tasks in or around a patrol base.
4. 4x field stripped MREs, or 2 days rations. Combined with the contents of the assault pack and my belt, I carry 3.5 days rations all together. There is extra space in the pack for more if the mission requires it, but this is what I have packed on a normal basis.
5. 2-step water treatment kit. This contains a Sawyer Mini filter, 2x 2-liter squeeze bags, a Steripen Ultra UV purifier, and a small funnel to pour water into canteens. I switched to a pouch instead of the 1-liter Nalgene that I had been using because it is easier to use and more compact.
6. Jäger Rig, shelter and thermal camouflage.
7. Sleeping pad
8. Pack cover. This one is in Flektarn made by Mil-Tec. I recently bought it but was disappointed to discover that, through night vision, it looks like a great white blob. For this reason, I can’t recommend this model. I will use it to waterproof my pack until I can find a suitable replacement.
9. Camouflage mesh. When draped over the camouflage pack cover, it makes my pack damn near vanish into the forest floor.
10. Sleeping bag in a waterproof bag. The bag is a Snugpak Jungle Bag. It is in a MACS sack waterproofing bag because I learned the hard way that the Snugpak stuff sack is NOT waterproof.
11. Skivvy Roll in a waterproof bag
12. The pack itself, a Teton Sports Scout 55L. Boltboy and I have been using these packs for a couple of months, and we’re pretty happy with them so far. Enough space for what we want to carry with room left over, rugged enough, very comfortable, and very affordable at $89. It has the added advantage of not looking overtly tactical if we decide that we want to look like harmless backpackers.
13. Non-reflective duct tape
14. Weapon cleaning kit (cleaning rods, CLP, AP brush, bore snake, and a rag). This had previously been in my buttpack. I moved it to my main pack because the only time I would do weapon maintenance is in a patrol base anyway, so it made sense to save weight and space on my fighting load.
15. My “fix-it kit”, 50ft of paracord wrapped around a pack of 12″ zip ties. Combined with the duct tape, I can use this to fix almost any gear failures in the field.
16. Medical Kit. This has some extra trauma supplies and a “boo-boo kit” containing band-aids, antiseptic, and moleskin for non-emergency aid.
17. 2x canteens
18. Hygiene kit containing toothbrush, toothpaste, deodorant, a silver-infused microfiber cloth, razor, and hand sanitizer.
The intent for the 2-pack system is for me to carry the main pack into the field with me, stash it at a patrol base or ORP, and take my assault pack with me when I go on a mission. Any supplies I use from my fighting load or assault pack, I resupply from my main pack when I return to it. That is why I carry my spare water in canteens, so I can swap them out with the ones on my belt. If I use my smoke grenade, I replace it with one from my assault pack. If I ate the MREs in my assault pack, I replace them with the ones from my main pack. I may also carry extra rifle magazines in the main pack. This ensures that my gear remains at the highest possible level of readiness.
Helmet
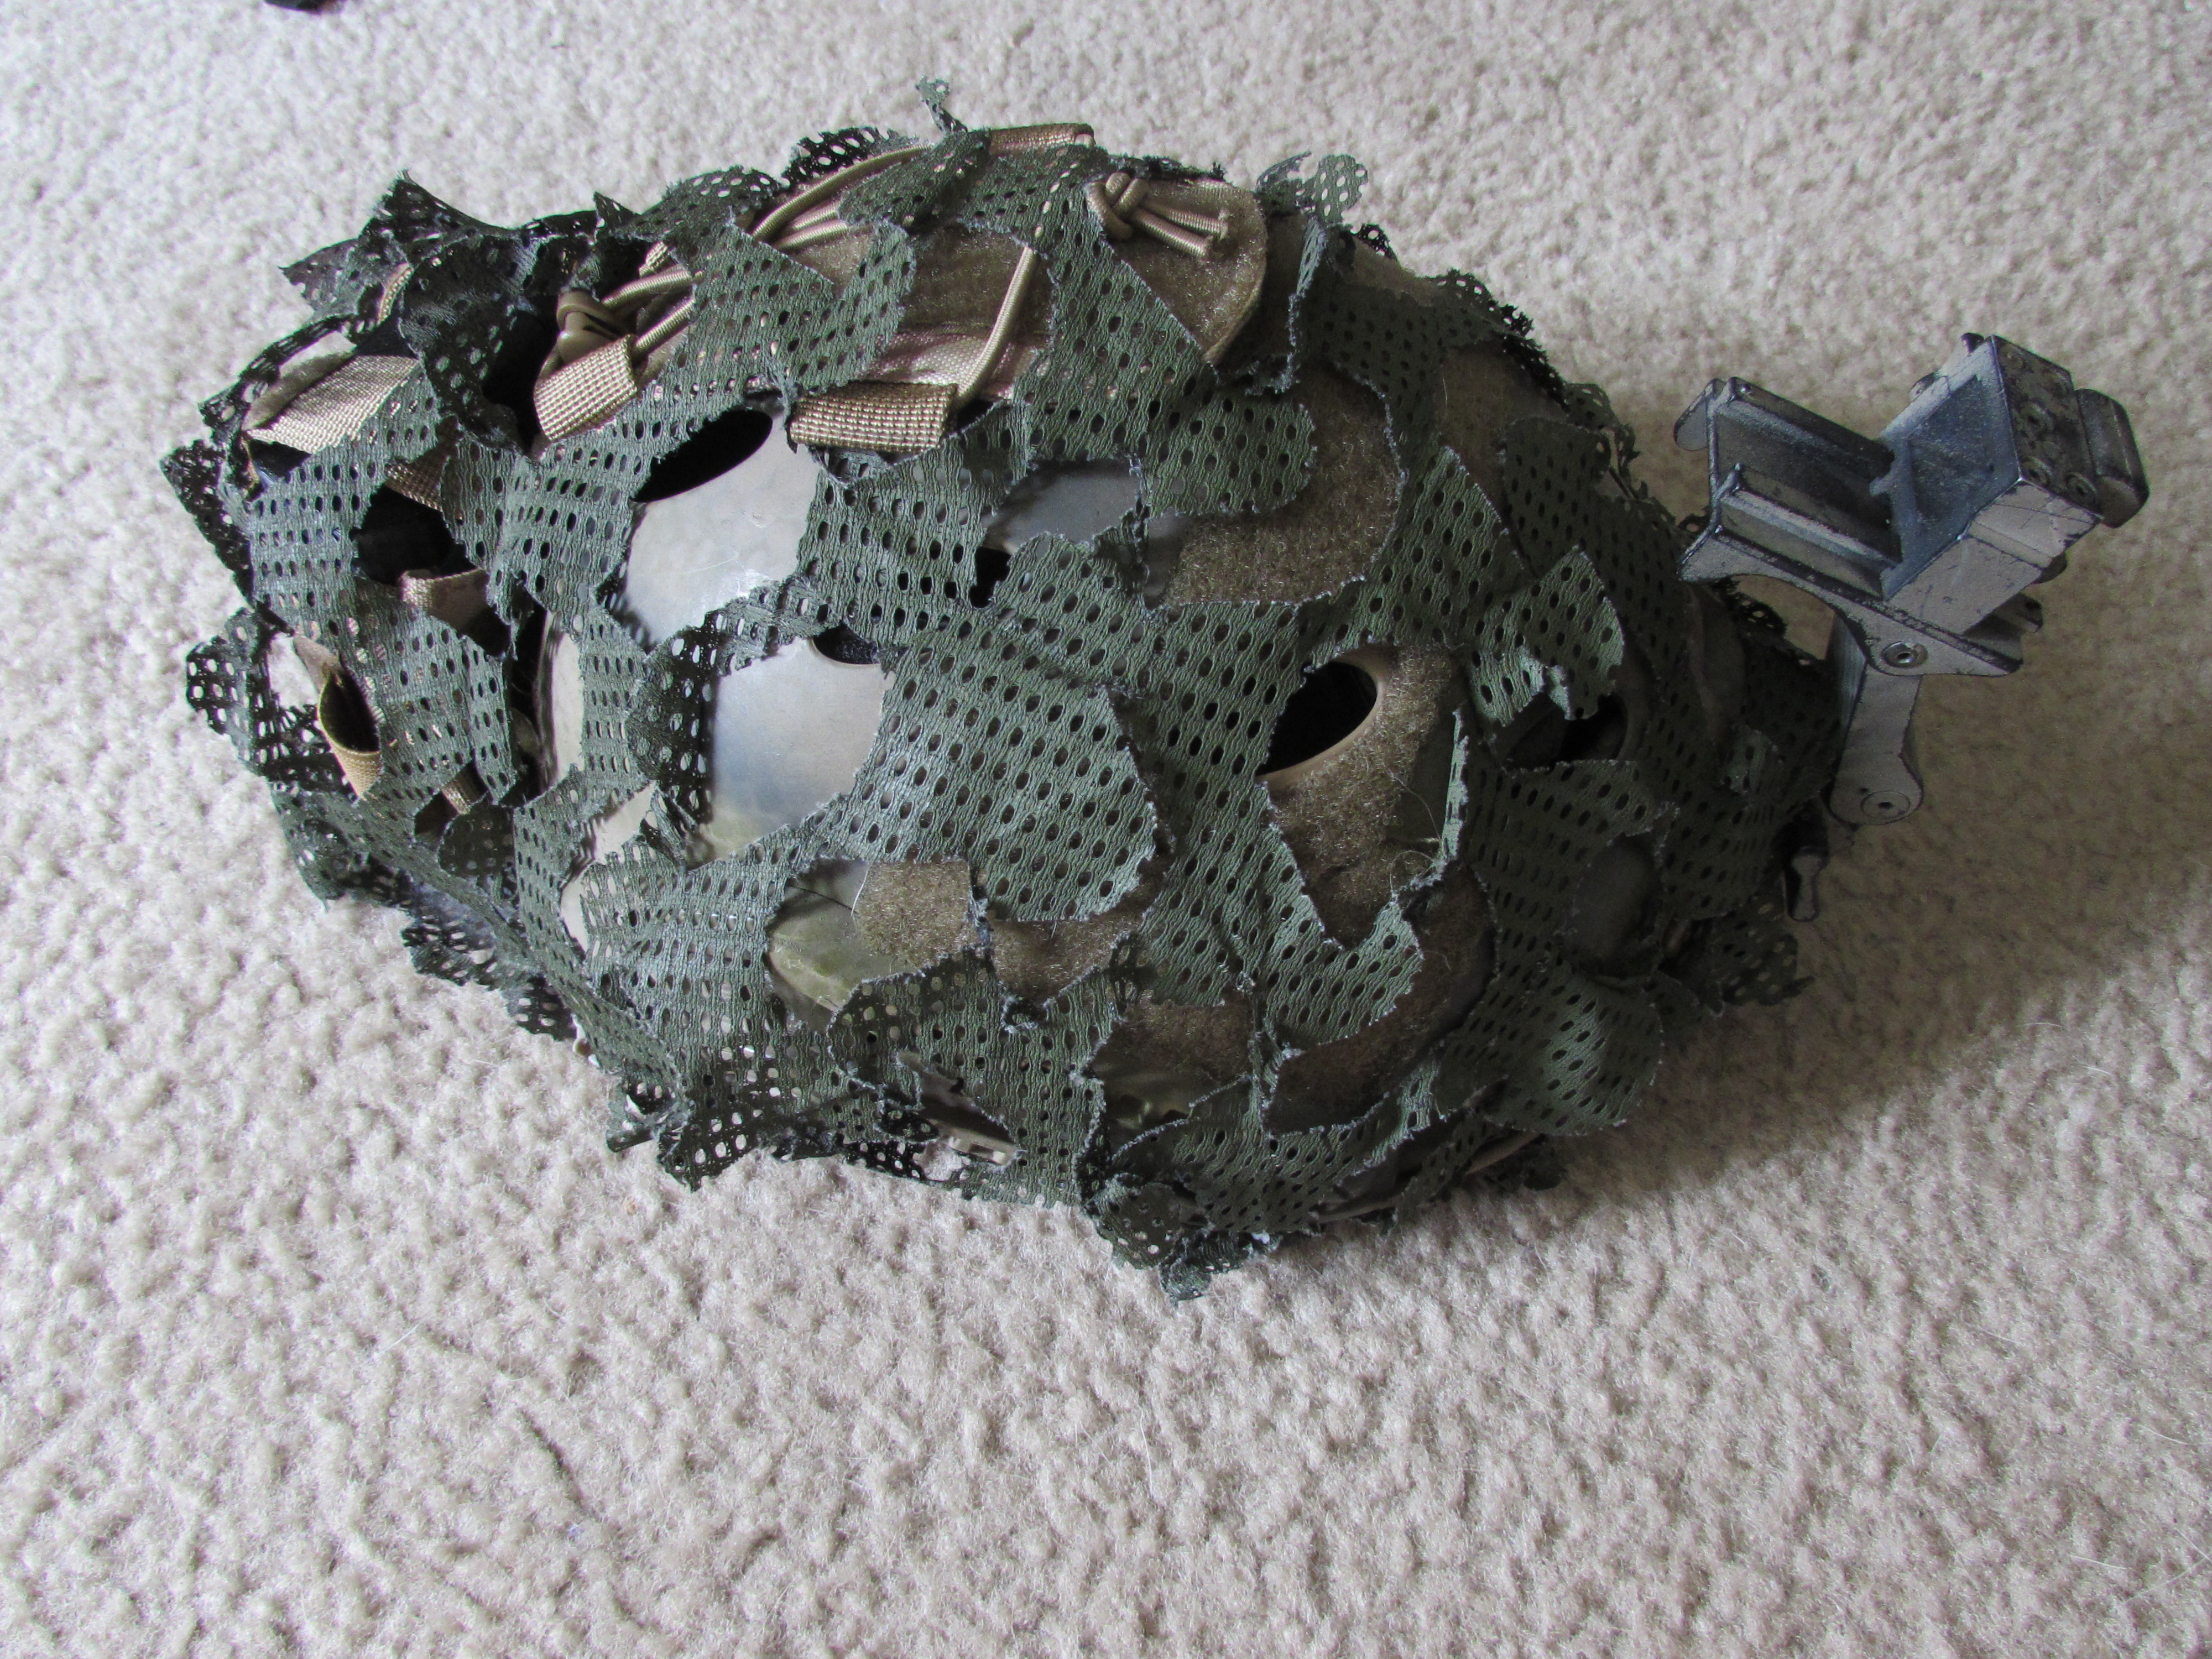
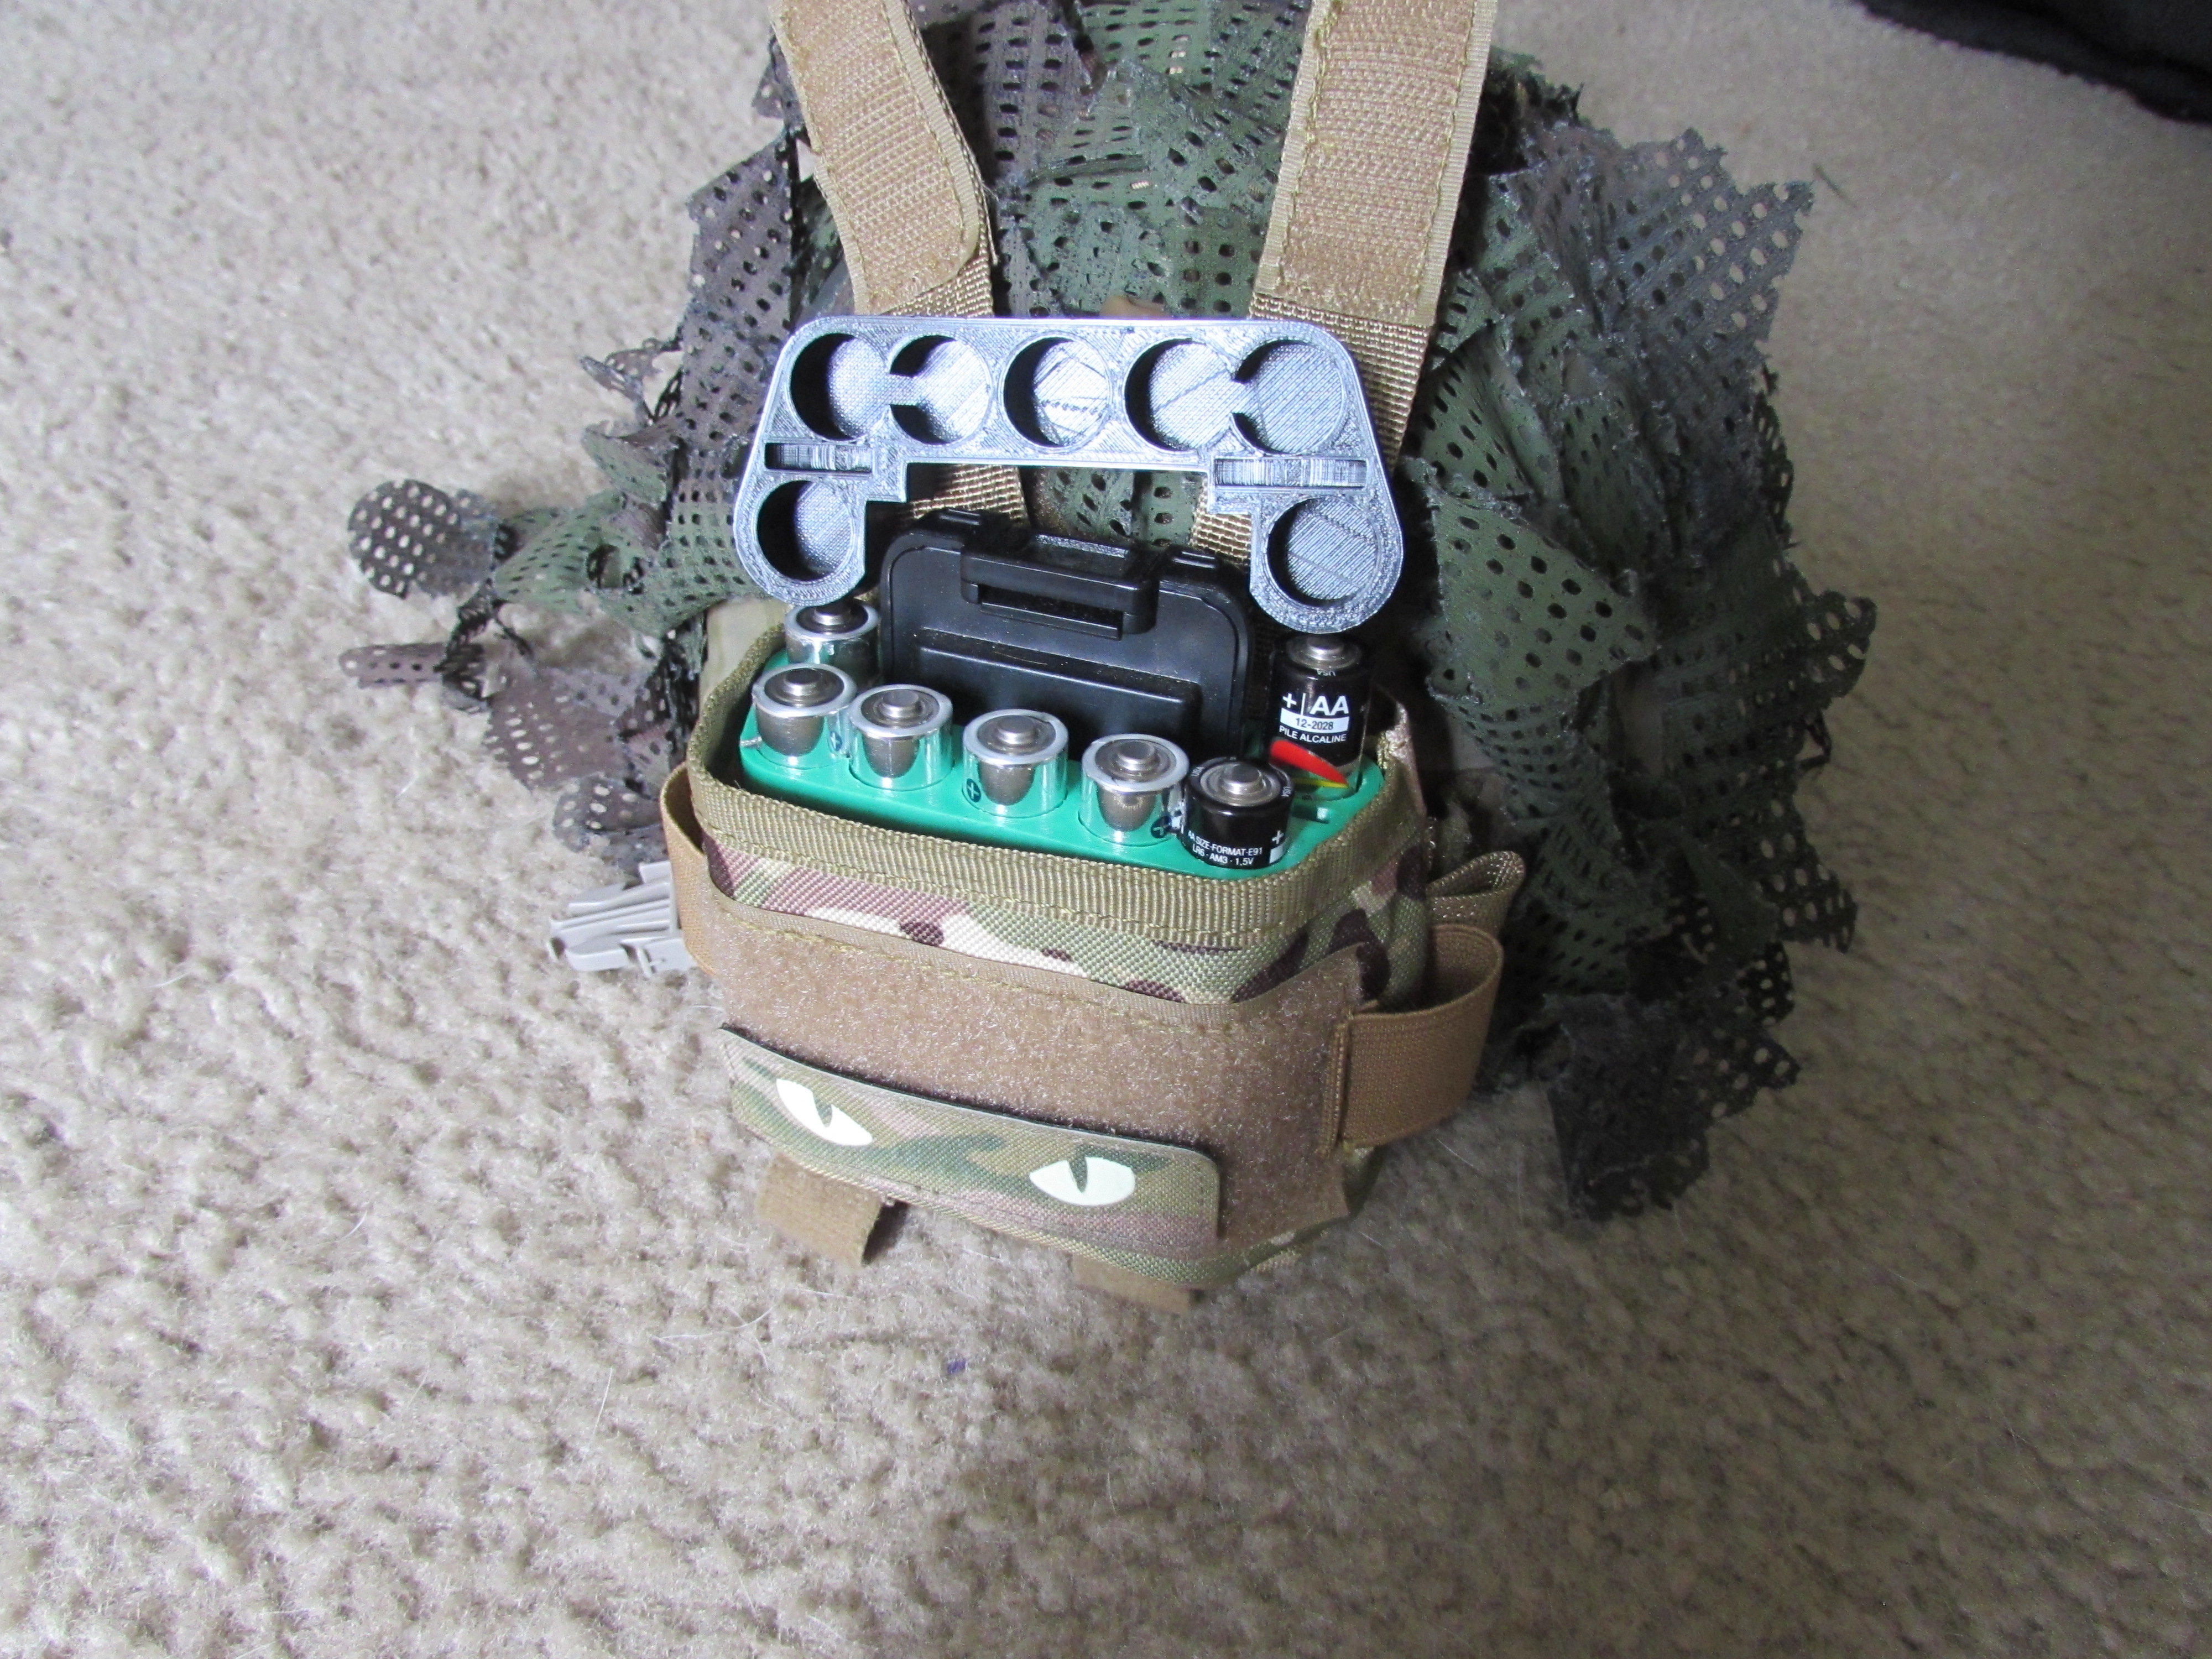
One last thing I want to mention is my helmet. I wear a light bump helmet so that I can wear my NVG. It is painted camouflage with camouflage netting draped over it to break up the shape. On the back I have a battery holder counterweight in a PVS-31 battery pack pouch. This allows me to balance the weight of the helmet while carrying all of my spare batteries (AAs, AAAs, CR-123s, CR2030s for my scope, and a spare UV-9R or 5R radio battery).
Summary
There you have it, my combat equipment set up for light infantry operations in rural wooded areas. A good amount has changed with my kit, and will no doubt continue to change as I go forward. Despite the experience and thought that went into this setup, I am fully confident that in a few months or so I will have changed something significant about my gear. I am always learning and adapting my doctrine and my equipment.
You should be doing the same. Don’t just copy my kit, or anybody else’s. Identify your requirements for your equipment, ask yourself “What do I need this to do for me?”, and only put stuff in your pack that fills those requirements. Above all, don’t ever be satisfied with where you are, be constantly testing yourself and your equipment. It is far better to find out what doesn’t work now than when your life depends on it.
My friend Badlands Rifleman has another excellent way of setting up his equipment that you should check out. His is a different perspective than mine, and he has some insights that are quite valuable. So go check him out.

Excellent write up and thanks for sharing your expertise. One thought on anti-insect practice. Having done transmission/distribution line work in regular time and in emergency situations, I have had good success with a combination of cedar oil, lavender oil, and a sock -doubled up and knotted – filled with sulfur.
LikeLike
Interesting, thanks for sharing!
LikeLike
Love it. Not all that different from what I like to run.
LikeLike
Reblogged this on Alpha Charlie Concepts and commented:
Ya’ll pay close attention to what folks like Mike are running. It’s very similar to what I use, and what others of like mind run as well. Take note of the commonalities and similarities, but also take note of what is NOT present and being used. Compare it to what what your favorite youtube/instagram kool kid klub super operators are running and recommending.
LikeLike
Indeed, pay attention to John’s advice here.
Searching youtube for armed prepared citizen load outs is like searching the ocean for a single fish or two. There’s a good idea here and there, but they sure make you work to find it !!
Not only is there too much cool guy stuff, there’s a lot of follow the leader. There’s also a lot of “wants” vs needs in too many of their rigs. You can easily tell too many guys just build em and obviously don’t run em.
The top guys I always reference and send to others are Mike Von Steuben, John of Alpha Charlie Concepts/UW Gear (go check out his APC loads on his channel), Mike at Badlands Fieldcraft, and I’ve since added Joe Dolio of Tactical Wisdom on John’s recommendation a week or so ago. Mr. Dolio has done some recent YT’s on setups well worth your time. Also a couple old articles NC Scout did on his setup.
Reason I hold what these guys are doing with their rigs in high regard, is I noticed over time I started doing very similar things with mine. They confirmed I was on the right track and it made me pay a lot closer attention to their examples. Ever since then my systems improved leaps & bounds and I’ve learned to be ruthless with my gear decisions. I’ve passed these things on to help those around me get better squared away.
One bit of advice I’d like to pass on: when looking at a former military guy’s rig ….. listen to see if they say & fully accept they are no longer in the military. It forces one to go about it very differently. Many of these vets on the scene do not seem to realize this yet. All of the above men clearly understand this, also part of my admiration for them.
Point is, I really appreciate what you guys are sharing. A thank you to each of you.
LikeLike
I went the route of going with LAPG 3-Day 2.0 backpack last year and had to return it. The shoulder straps joined together in an uncomfortable way and started ripping away from the main bag after 5 hikes with 20 lbs total weight. Avoid that brand.
Mike – what paint do you use on your packs and does it rub off easily? I wanna avoid buying camo packs for the same reason of looking like another hiker.
LikeLike
I painted the assault pack with flat hunter camo spray paints. I’ve used krylon as well, the same stuff I use on my rifles and everything else. It takes more paint than you’d expect to paint fabrics because it has to soak in, and the paint smell goes away after about a week (faster if you use the pack or let it sit outside for a day or so). It doesn’t rub off except on the plastic buckles.
The whole reason I painted the pack was because, under night vision, it looked like a white blob with black stripes where the webbing was. The paint neutralizes this and makes the pack much harder to see through NVGs.
Affiliate link to the paint I used: https://amzn.to/3o41Swu
LikeLike
If I missed it I apologize but do you run the belt suspenders over or under the chest rig?
LikeLike
Underneath.
My belt has all of the rifleman’s essentials (ammo, water, and medical) on it, so for short-term missions I could just wear the belt and be combat effective. My chest rig has additional tools and ammunition that supplement the belt.
LikeLike
What? No words of wisdom from the Ultimate Tactical Handbook? Maybe Ecclesiastes 11:2?
LikeLike
Mr. Von Stuben,
Thank you very much for the excellent detailed article ! I really appreciate you noting the changes and why. Very valuable imo. Wish more would show these evolutions. Dig it !
My crystal ball told me you might eventually add water to your battle belt and go to a two pack system. :-). Still amazes me how light and streamlined you get your setup and with mostly inexpensive surplus items. Inspiring !
couple questions/observations if you don’t mind
– I’m assuming you are not running main pack belt since running battle belt. I’m also assuming Mike at Badlands is running his pack belt since he doesn’t run a battle belt. Also assuming same for John at Alpha Charlie.
This has been a struggle for me. I like a simple light battle belt like you’re running, mine is very similar. But I can’t stand running a larger sustainment pack without the belt. Did it for too many years. Been back and forth with this, even contemplated attaching the small patrol pack as well as the simple belt rig to main pack, putting it on at the patrol base. Doesn’t seem quite practical though.
– not seeing any dedicated observation gear (non NVG or thermal). Assuming your plan for that is the prism on your rifle ?
Thank you.
LikeLike
Not so! I do indeed use the waist belt on my main pack. It works by shortening the back adjustment on the pack (this pack allows me to do that easily) so that the pack belt sits just above my battle belt. I agree, not using a waist belt for this much
The lack of magnified optics is because I consider those to be a team asset, not an every-man asset. I have a few sets of binoculars, I just don’t take them on every mission. Only one man per team needs to carry large binoculars, a spotting scope, or a rangefinder. This saves weight overall for the team. The same goes for drones, radios, etc. If I am tasked with carrying the binoculars for a mission, I’ll tuck them into my assault pack, which purposely has extra space in it.
LikeLike
Ah yes, ALWAYS what the mission requires and team assets. Obvious answer that’s not always obvious. Have to constantly remind myself of this vs carrying everything myself. Part of that ruthless evolution !
Huh, pack waist belt above battle belt. Ok you got me there. I’ve heard of such weirdness long time ago but had forgotten about it.
I have an average length torso, nothing unusual there so I guess it could work. Always viewed my battle belt and pack belt competing for the same piece of real estate right above my hip bone. That’s going to take some experimenting and messing around.
Thank you so much for the clarification and ideas ! Very helpful.
LikeLike
Where do you carry/store your helmet in your gear?
LikeLike
On my head.
Since it’s a bump helmet, it is barely noticeable on my head during the day. So I don’t see a need to take it off and put it on the pack most of the time. It is also, as you see, camouflaged and quite easy to add natural vegetation to.
Now, if I’m trying NOT to look like a combatant, I’ll shove it into my assault pack (there’s extra room) and wear a ball cap. If that were the case, I also wouldn’t be wearing my chest rig and openly carrying an AK.
LikeLike
Curious, how does that Teton pack look under NV?
I recently looked at all my gear through NV for the first time and was shocked at several things. My Spetznaz pack lit up like a beacon and one of my three mag pouches did the same even though they were all genuine Russian mil and made by the same mfg.
LikeLike
*drops phone, scrambles to get NVG*
Well, shit.
I had tested my assault pack, but not my Teton main pack. Turns out it glows. I could fix it with spray paint like I did with the assault pack, but then I’d lose the “innocent hiker” guise. I’ll plan to use this pack with an NIR-compliant pack cover when I actually want to hide.
LikeLike
Never mind just noticed you answered that!
LikeLike
What pouch do you use for the smoke grenade on your chest rig?
LikeLike
It’s a USGI surplus MOLLE smoke grenade pouch. Flashbang pouches also fit the EG-18X smokes.
LikeLike
Was looking at some of the reviews for the ninja pack, and a few mention that the stitching starts to tear at around 20lbs. I know it’s cheap, you get what you pay for, but just curious, what is the weight of your assault pack, wet?
LikeLike
About 15-20lbs, normally. It’s a “good enough” option for a budget, but there are definitely better and more rugged options out there if you want to carry more weight and can afford the extra coin.
LikeLike
I have and eberlystock pack have it stripped down to night vision bump helmet sleep kit rifle e-tool 3/4 gallon of water food for 3 days some odds and ends 4 mags(m16) radio spare batteries and solar panel. still I’m hitting 68# for full kit and I still need to pair it down. I’m 6″,4″ 230 and 50 years old ok fitness but pushing to improve.
LikeLike