Today, September 17, is Baron Von Steuben’s birthday. Von Steuben played a key role in the American Revolution, and has been revered ever since for his contributions to our victory against the British. In honor of his service, I would like to write a brief summary of the life and accomplishments of this man who is the namesake of my training business.
Early Life and Military Career
Von Steuben was born in Prussia (modern day Germany) in 1730. He enlisted in the Prussian army when he was 16 and saw service during the Seven Years War fighting against the Russian and Austrian armies. During his 17 years of service he rose to the rank of Captain and served as aide-de-camp to Frederick the Great.
A quick side note here. Frederick the Great was the King of Prussia, and one of the most brilliant strategic and tactical minds of the century. Even Napoleon respected him, and had a miniature statuette of Frederick in his office. Bold, cunning, and able to pull off incredible victories even when outnumbered, Frederick demanded professionalism and aggression in his subordinates. I bring this up because Von Steuben was one of 13 hand-picked Prussian officers to attend a “Special Class for the Art of War” (Spezialklasse der Kriegskunst) taught by Frederick the Great in 1762. No wonder he was such an asset to the Americans.
After the Seven Years War ended, Von Steuben found himself looking for work. He was eventually introduced to Benjamin Franklin through his contacts in France. Franklin wrote a letter to congress recommending Von Steuben, and he traveled to Pennsylvania where Congress agreed to pay him after the war according to his contributions. He then reported to George Washington at Valley Forge in February 1778.
Training the Continental Army
While serving as Washington’s Inspector General, Von Steuben first set about fixing the administrative needs of the army. He ensured that strict bookkeeping was kept regarding supplies, weapons, and personnel. This put a stop to the war profiteering that had been rife in the Continental army, and his rigid inspections ensured that it stayed that way.
Next, Von Steuben set about training Washington’s army. He knew that he couldn’t personally train Washington’s entire army, so he used a train-the-trainer approach. He selected 100-120 men from various regiments and trained them as a model company. The drills performed by this model company were observed by unit commanders. The men were then sent to different regiments to train them. This is similar to what I do with the Team Leader Class, and is why a full third of that class is spent teaching you to run your own training events.
One of the most important skills he taught was the proper use of the bayonet as a weapon. While the American volunteers had a fair amount of experience using muskets in colonial life, the bayonet was a uniquely military item that most volunteers were not familiar with. As such, bayonets had been used as field tools more than as weapons until Von Steuben arrived and set them straight. Additionally, Von Steuben knew that nothing quite instills raw aggression in troops like bayonet training. Having trained under Frederick the Great personally, Von Steuben knew that aggressive troops were bold troops, and that bold troops win battles.
Results of the Training Program
The training program set forth by Von Steuben very soon saw results in battle. In May 1778, the Battle of Barren Hill saw the British encircle Lafayette’s American troops on three sides against a river. Due to their training, the American soldiers were able to execute a disciplined breakout with a very effective delaying action by a small number of skirmishers. Lafayette escaped the encirclement with only 3 casualties.
A month later at the Battle of Monmouth, George Washington went blow to blow with the British forces under General Clinton and actually held the battlefield for the first time in a while. It was a pyrrhic victory for the Americans, but their performance in the battle was a vast improvement compared to past engagements. The British certainly noted this, and Clinton’s secretary wrote that “the Rebels stood much better than ever they did”. This battle sent a strong message to the British; the Continentals now had a professional army.
A year later, Von Steuben’s bayonet training played a key role in the Battle of Stony Point. On July 16, 1779, Continental soldiers from the elite Corps of Light Infantry conducted a daring attack where they seized a British outpost. They attacked by stealthily approaching at night and overwhelming the surprised defenders with a swift and violent charge from close range. None of the Americans were permitted to load their muskets for the attack, for fear that a negligent discharge would spoil the element of surprise. This meant that the entire attack was conducted with bayonets. The result was a devastating defeat for the British and only light casualties for the Americans.
General Von Steuben personally participated in Washington’s Southern campaign, even commanding troops in a few battles. After the war, Von Steuben was discharged with honors, and became a US citizen. He lived in New York and New Jersey for the rest of his days, and became an member of the German Reformed Church where he eventually became an elder.
Preserving Von Steuben’s Legacy
There is one final thing I must address. There has been an attempt by the American Left to hijack Von Steuben’s legacy by claiming that he was openly gay, and an early champion of LGBTQ rights. This is absolutely false. First of all, nobody was “openly gay” in Europe or the Americas during this period. The culture was vastly different back then. Homosexuality was considered scandalous and shameful, and wasn’t something that one would flaunt like they do today.
Second, there is no proof that Von Steuben was gay at all. This claim stems from an anonymous letter that accused Von Steuben of exploiting young boys, which was unfounded but still hurt his chance at employment in any European military. Left-wing activists also claim that his fondness for his aides, rowdy parties, and the fact that he never married are proof that he was homosexual, but none of that is proof of anything. At worst, there is a remote chance that he may have been secretly gay, but no actual evidence or historical record supports it.
Third, the man lived his whole life as a Christian in protestant churches in Prussia and eventually became an elder at his church in America. The Bible says that homosexuality is a sin and back then Churches still taught the whole Bible. I’ll concede that it is possible that Von Steuben could have been secretly gay, but he COULD NOT have been openly gay and a member of a church in good standing, let alone become an elder.
History.com published a ridiculous article about Von Steuben titled “The Revolutionary War Hero Who Was Openly Gay”. It’s a shameful piece of conjecture masquerading as historical record. I meticulously looked at every source cited by this article, and not a single one actually stated that Von Steuben had homosexual relations with anyone. That didn’t stop this article from being parroted by every liberal news outlet in the country, however.
In closing, let’s remember this man for who he was and what he did to help secure our freedom during the American Revolution. The Left doesn’t want us to have heroes and will do everything they can to undermine, slander, or hijack them. Baron Von Steuben is no different, and I will not stand by and let this man’s achievements be overshadowed by lies about his personal life.
“CONTACT FRONT!!” The instructor initiates the battle drill with a shout. “CONTACT FRONT!” The squad immediately echoes the call and deploys into a skirmish line facing the enemy, bringing maximum firepower to bear in the direction of contact. The students immediately begin firing off rounds in rapid succession while the squad leader assesses the situation to determine his next move.
Let’s take a look at the individual rifleman in this scenario. What is he shooting at? How fast is he shooting? What determines his rate of fire?
Often when I observe students participate in this sort of drill, the first thing that happens is they fire a lot of rounds very quickly, delivering hammered pairs into a distant hillside at an astonishing rate. And for their first few times, I allow them to do this so that they learn a valuable lesson: You can easily burn through six magazines in a 3-minute drill. I then bring up the lesson of practical rates of fire.
I could quote many a dry technical manual on the recommended number of rounds per minute a rifle should fire, but instead I teach a much more simple answer from MCWP 3-11.2 “The Marine Rifle Squad”;
“Weapons employment and squad firepower are not determined by how fast Marines can fire their weapons but how fast they can fire accurately.“
So how does this translate into practice? Simple; the rifleman’s rate of fire is as quickly as he can aim down his sights, squeeze off an accurate shot, acquire another sight picture, and squeeze off another accurate shot. That’s all you need to remember. This technique naturally adjusts the rate of fire to different ranges. It will take you longer to line up a shot at greater ranges, which means that your rate of fire at greater ranges is decreased. Conversely, your rate of fire increases as the distance to your target decreases.
That said, another question arises. What if you are looking down your sights and you don’t see an enemy to shoot at? Enemy troops tend to do this pesky little thing called using cover and concealment, so they won’t always be visible. So what do you aim at?
The rifleman must scan for indicators of his enemy’s firing position. These indicators include muzzle flash, movement, and dust kicked up by muzzle blast to name a few. The rifleman can then fire at any indicators he sees, placing well-aimed fire into likely or known enemy positions.
The rifleman must communicate with other members of his team. If he cannot see where the enemy is, it is likely that his teammates can, so he must listen to his teammates and team leader for fire commands and enemy sightings. I like to teach a simplified version of the military acronym “ADDRAC” for calling out spotted enemies, called the “Three Ds”;
Direction: Where should I look? (i.e. “FRONT LEFT!”, “2 O’CLOCK!”)
Description: What am I looking for? (i.e. “ENEMY SQUAD IN THE TREELINE”, “VEHICLE WITH DISMOUNTS!”)
Distance: How far am I looking and what range (in meters) do I set my sights to? (i.e. “THREE HUNDRED!”, “TWO-FIVE-ZERO!”)
An example spot report is; “TEN O’CLOCK! INFANTRY SQUAD ON THE HILL! TWO-FIVE-ZERO!” I’ve just communicated what direction to face, what I see, and how far away my teammates need to look for it. Simple, short, and effective. Always call out what you see, never assume that your teammates see what you’re seeing.
Let’s go back to our rifleman. If he cannot see the enemy and is not able to pinpoint his firing position, what does he shoot at?
Let’s say that your team is taking fire from this general direction.
You cannot see any enemies, nor can you spot any muzzle flashes or dust. Spraying blindly at the hill would be a waste of your ammunition, so you need to make the most of your rounds. What you can do is observe the sector for likely enemy firing positions, and aim at them. Think of where he would seek cover or concealment. You will then place well-aimed fire at these likely positions, getting the best possible use out of your ammunition.
Aim at the base of the trees, around the wall, or in the shrubs on the distant hill.
Now, let’s say that you have a good team, and your buddy calls out “TWO O’CLOCK! THREE SHOOTERS AT THE CREST OF THE HILL! ONE-FIVE-ZERO!” Now you can narrow your list of suspected enemy positions to what your buddy just called out, knowing that there are three hostiles on the closer hill to the right.
Now we can concentrate our fire on just these positions, thanks to good communication.
Using these techniques, we are able to concentrate our fire on where the enemy is most likely to be. We may not hit him directly, but we can at least bring our rounds close enough to him that our suppression is effective. And now that our search area is narrowed, we are more likely to actually spot him when he moves or pokes his head out to shoot at us.
Conclusion
As you can see, there is never an excuse for firing wildly in a general direction. It is the responsibility of the individual rifleman to use communication, intuition, and good observation to make the most out of his precious ammunition. Always listen for spotting reports from your buddies so you know where the enemy is to engage him. And always communicate any hostiles you see so your teammates can do the same.
If you want to know more about how to communicate, shoot, and move with other shooters, I teach these techniques and more in the Basic Rifleman Class later this month. Don’t miss out on this chance to get good training, fellowship, and venison with like-minded patriots in Crown City Ohio on September 24-25. See you out there!
In previous articles that I have written about my gear, I said that combat equipment is constantly evolving. If you ever are using your equipment and discover that it is not doing something that you need it to do, either get a better piece of gear or modify it so that it does.
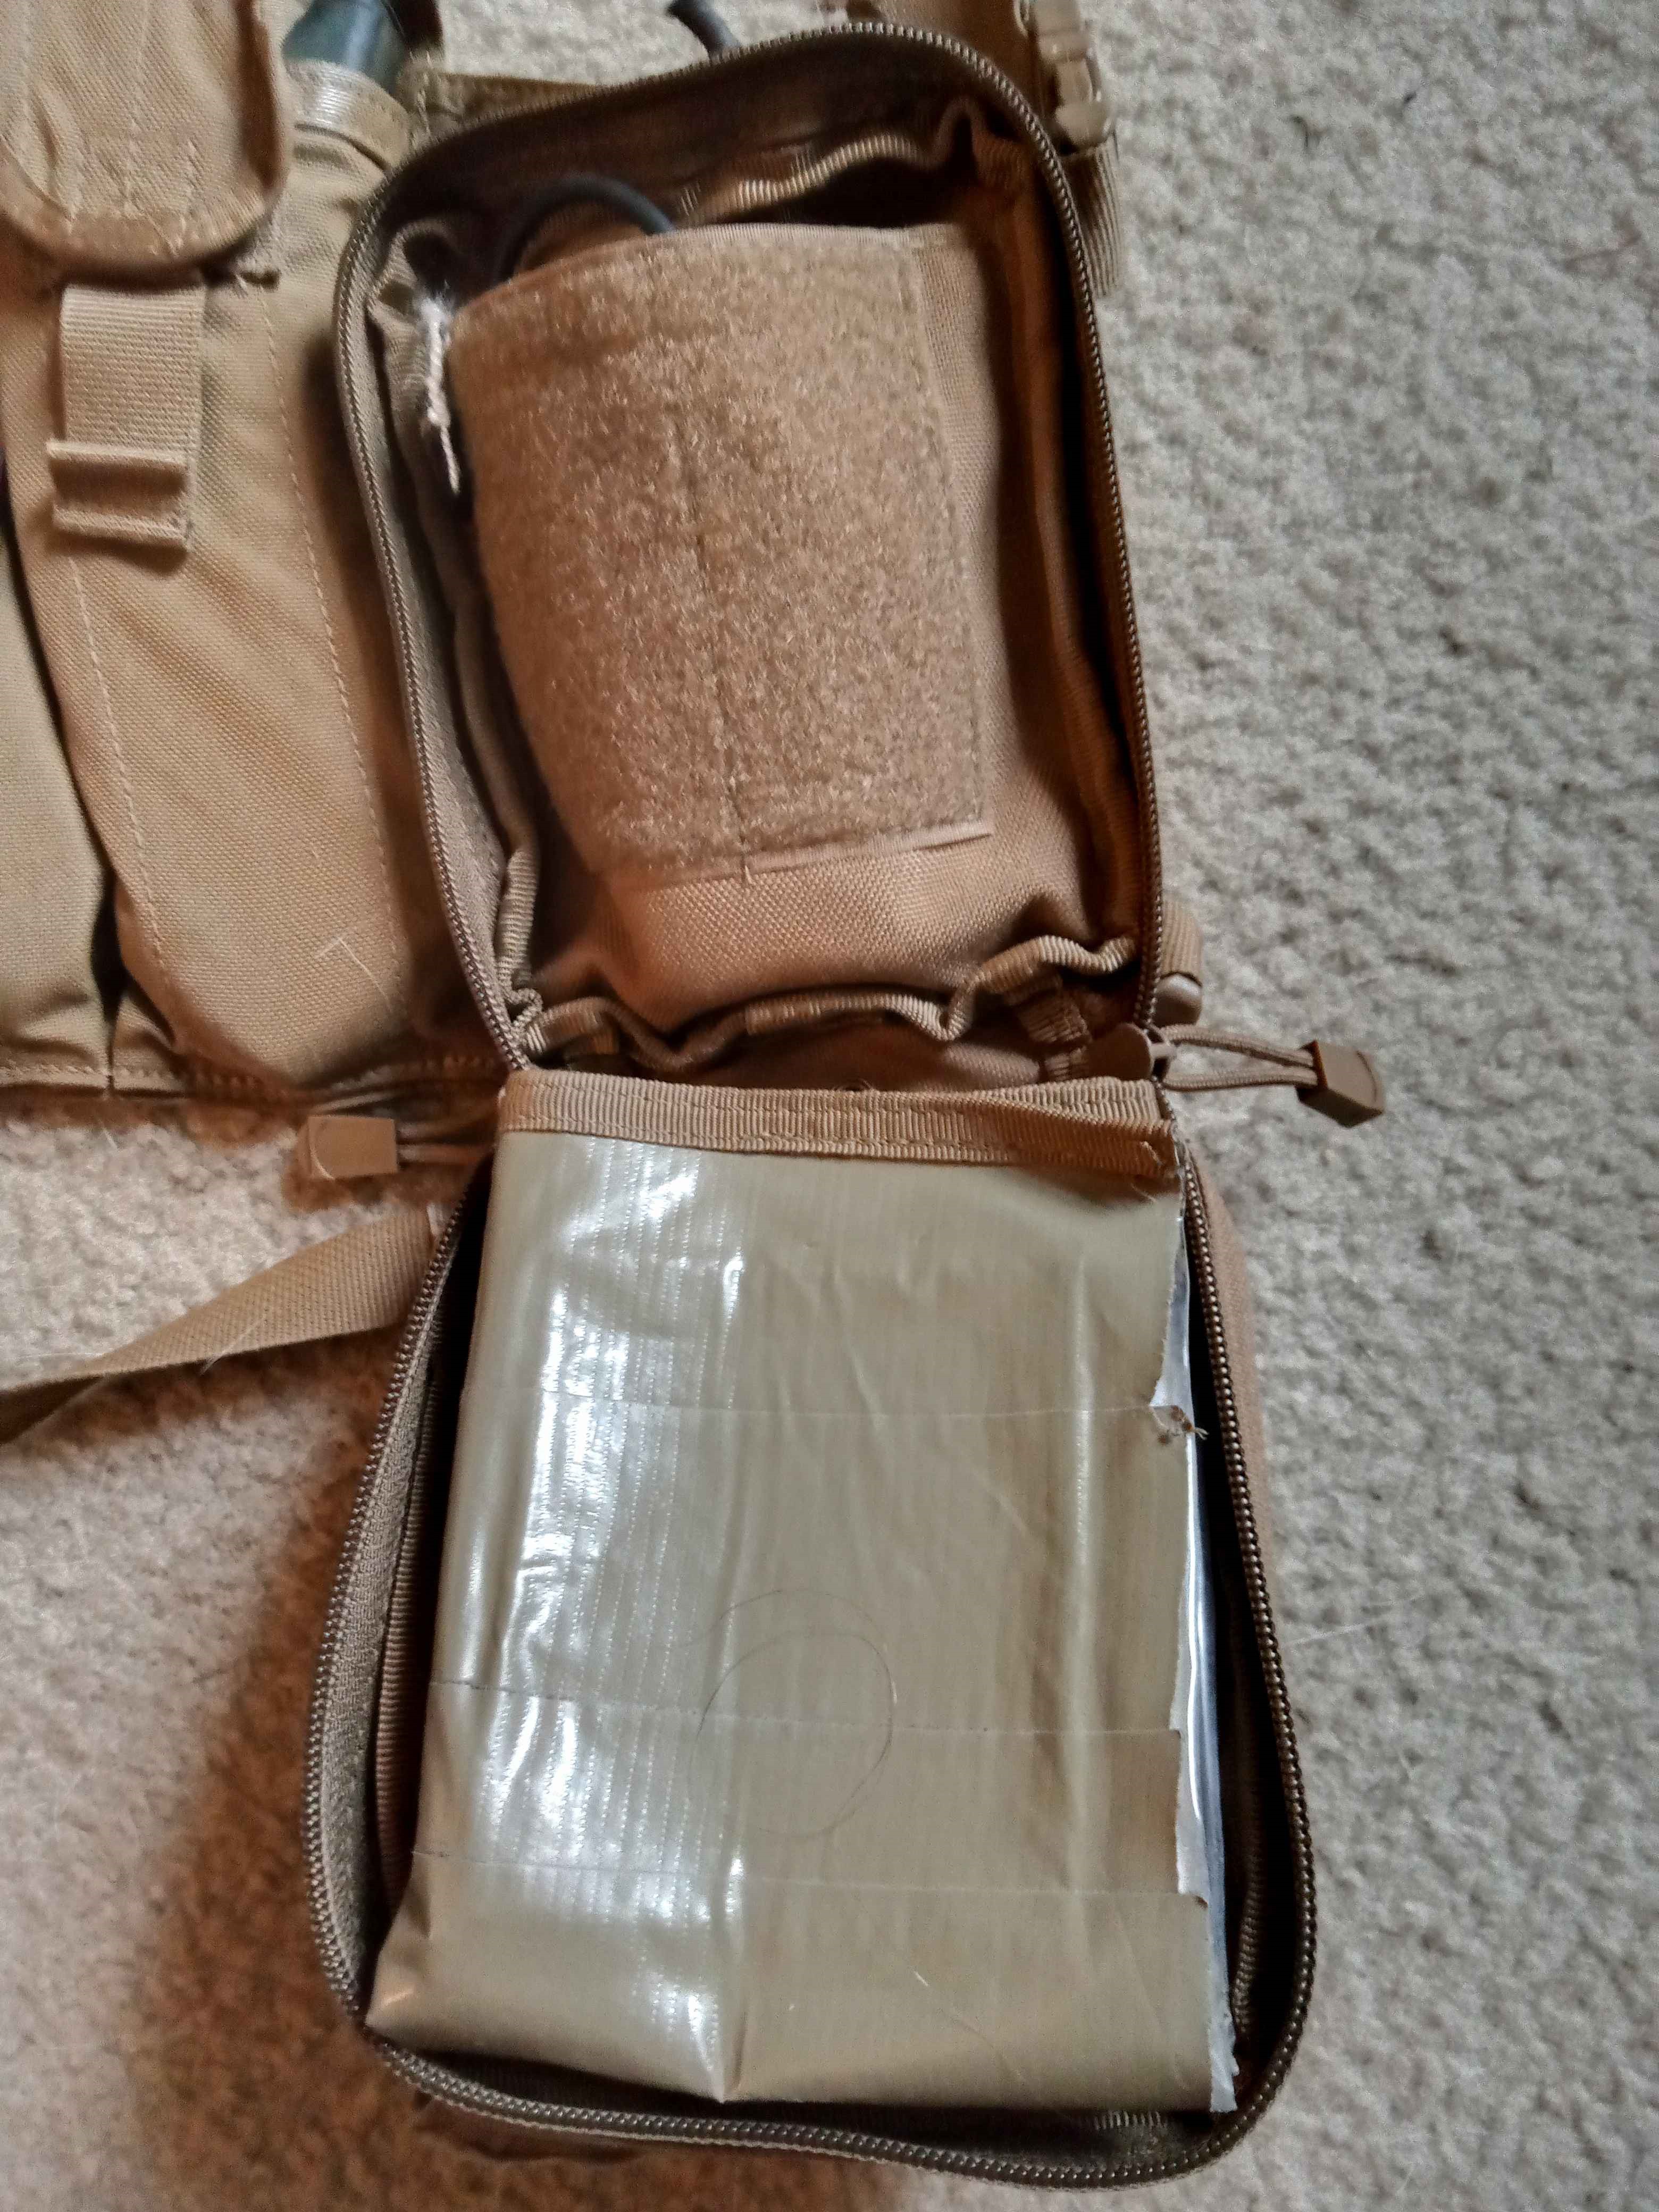
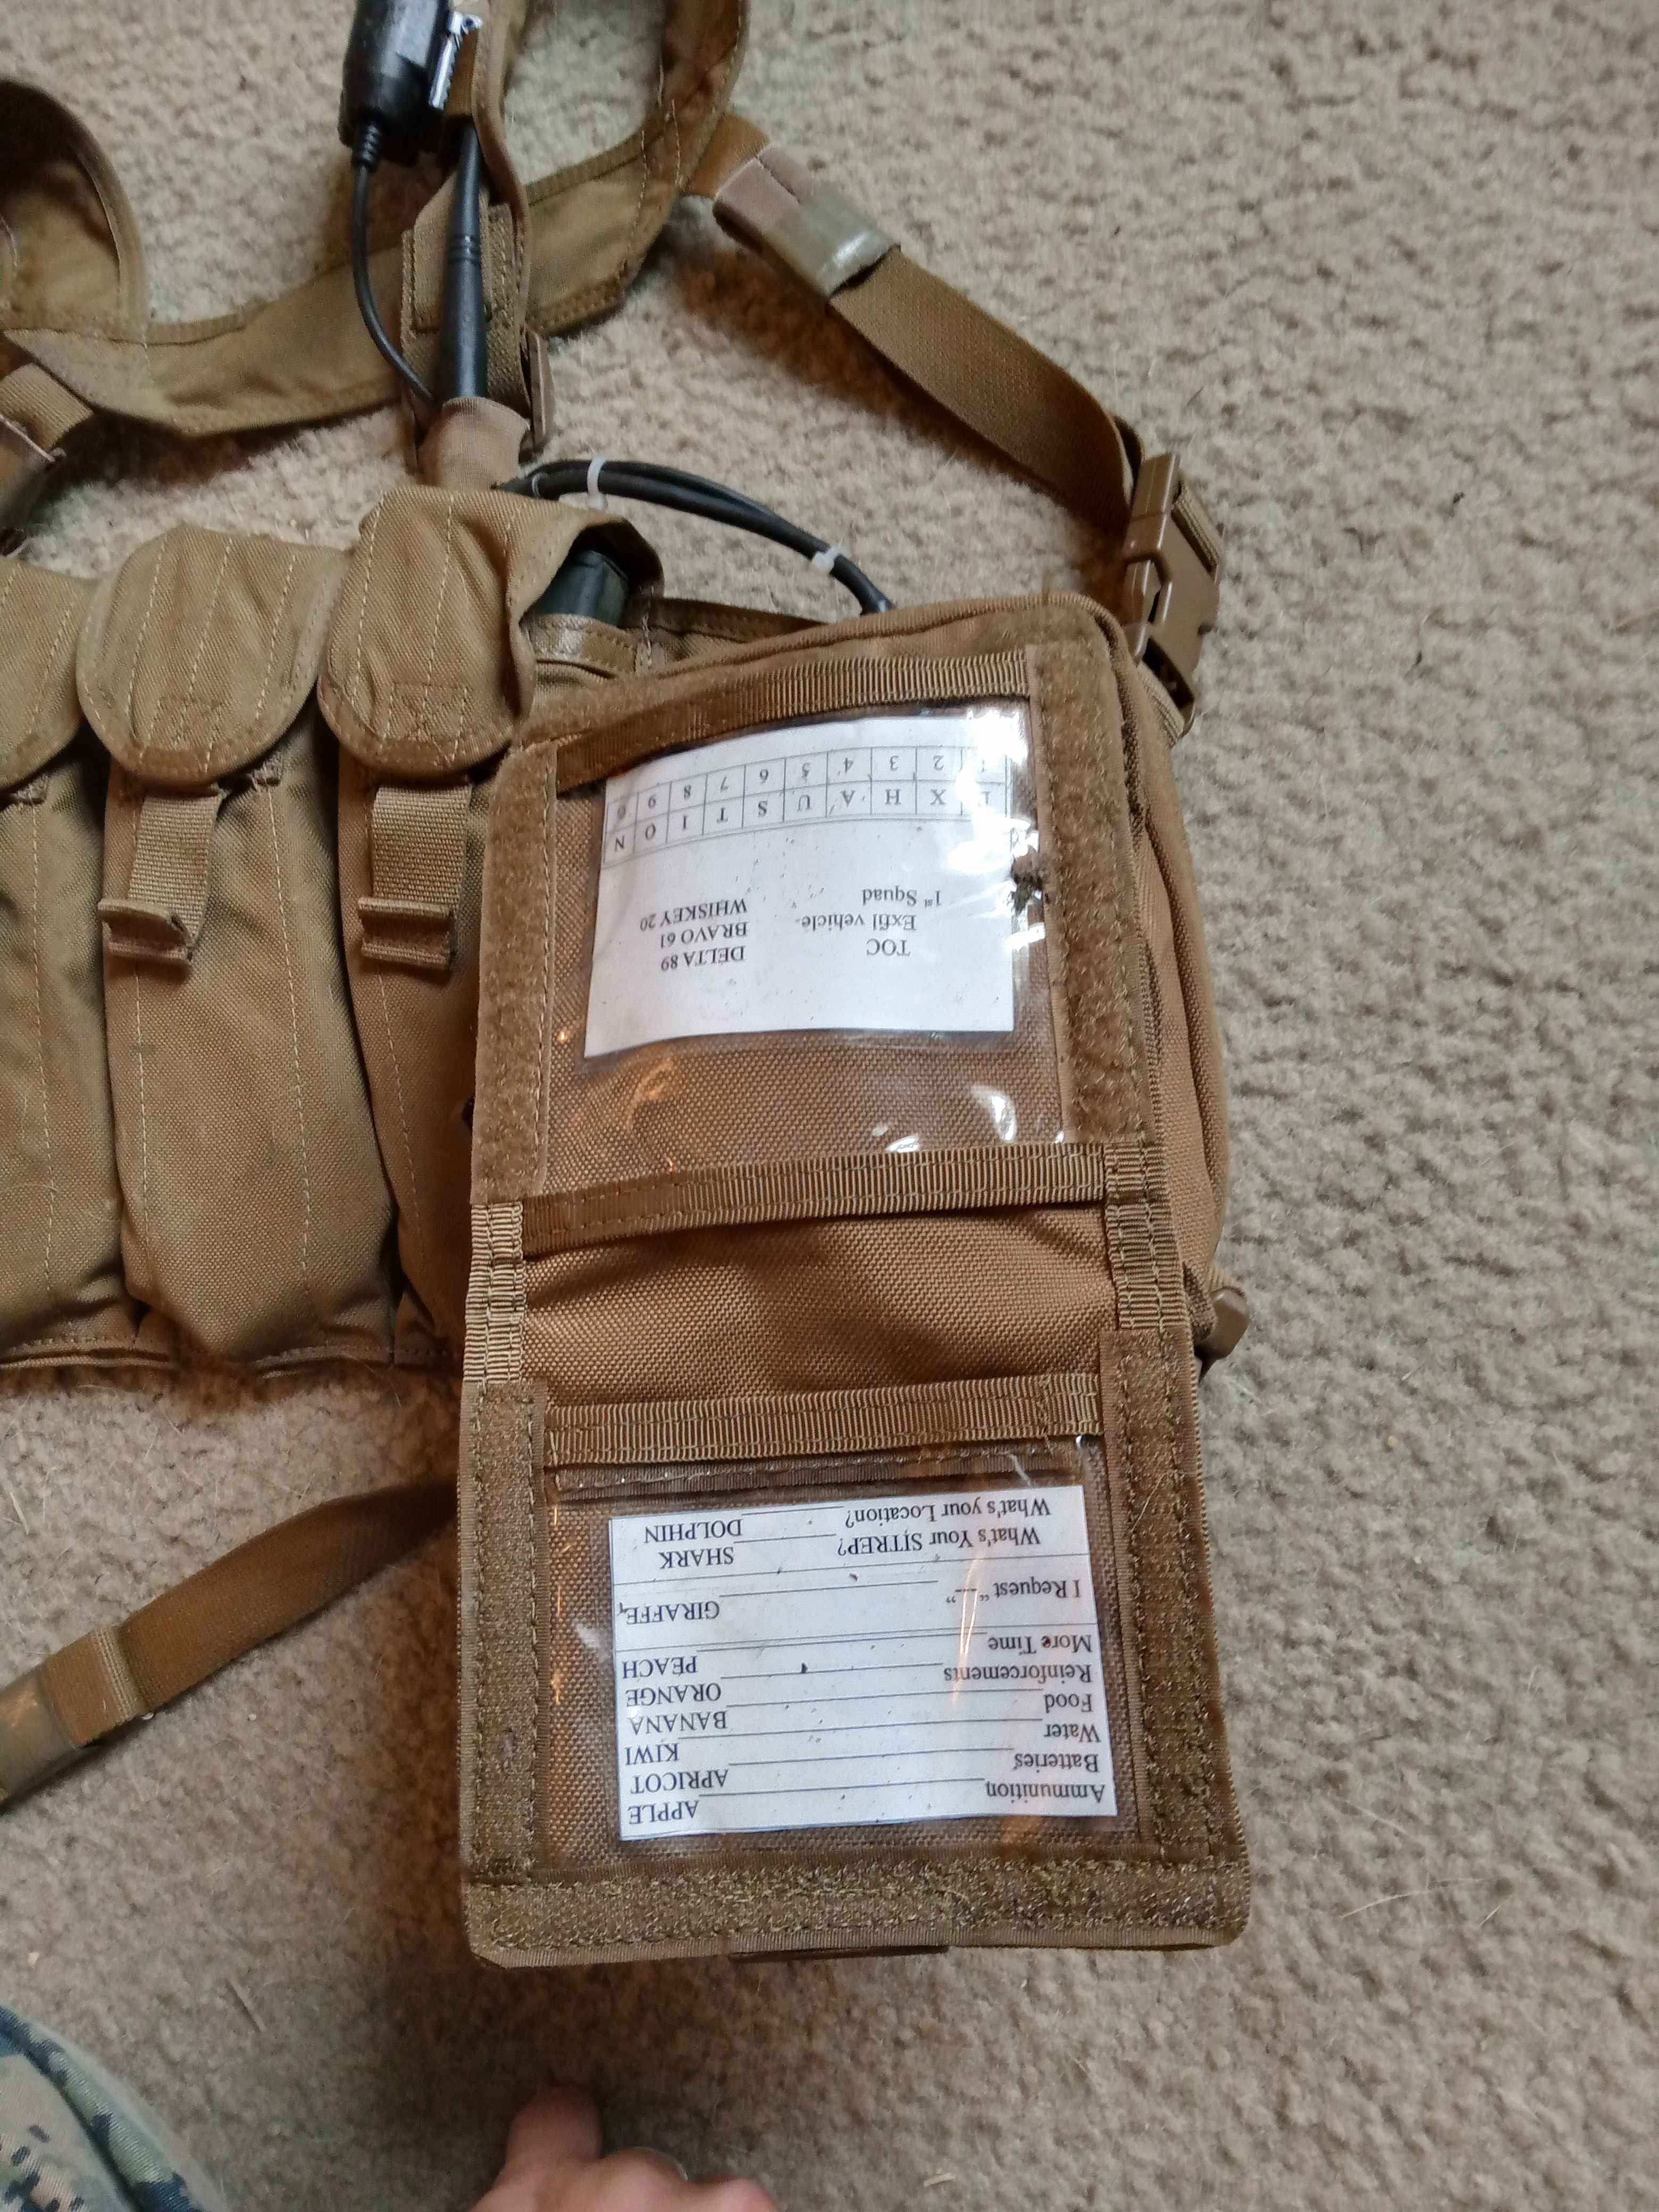
A few months ago I decided that I needed to improve the way that I carried administrative supplies. My previous method of having my map and map tools in my cargo pocket just wasn’t that effective, and relied on my having cargo pockets. I wanted to get an admin pouch that would at a minimum hold my note-taking gear, map pens, protractor, compass, and at least a small strip map. After some searching, I discovered the Condor Map Pouch, which exceeded my requirements to the extent that I am dubbing it “The Team Leader Pouch”
A quick disclaimer here is appropriate. I have no relationship or sponsorship with Condor. I bought this pouch from a local gear store with my own money, and I don’t even have an affiliate link. I have nothing to gain from whether you buy this pouch or not, I am merely sharing what I have found that works well for me.
The Condor Map Pouch is a compact pouch that combines the functions of map case, admin pouch, and (with a small modification) radio pouch. It takes up 3 MOLLE webbing slots, sitting perfectly on the left side of my UW Gear Minuteman chest rig. Let’s start with the main pouch.
The main pouch is zippered shut and contains the main feature of the pouch; the map case. The map case is made of some kind of clear plastic with velcro at one end, and two velcro panels attaching it to the inside of the pouch. It folds out nicely, and can be removed entirely if desired.
I have two complaints about this map case. First, it is clear on both sides, and the white backside of a map is very visible at distance. I solved this by covering the back of the map case with OD green duct tape. Second, I discovered that if any moisture gets inside the case, ink from the map can stick to the inside of the plastic. I compensate for this by popping oxygen absorbers (from MREs, jerky bags, etc.) into the case to prevent condensation. Thus far, it seems to work well. This could also be solved by laminating maps BEFORE putting them into the case.
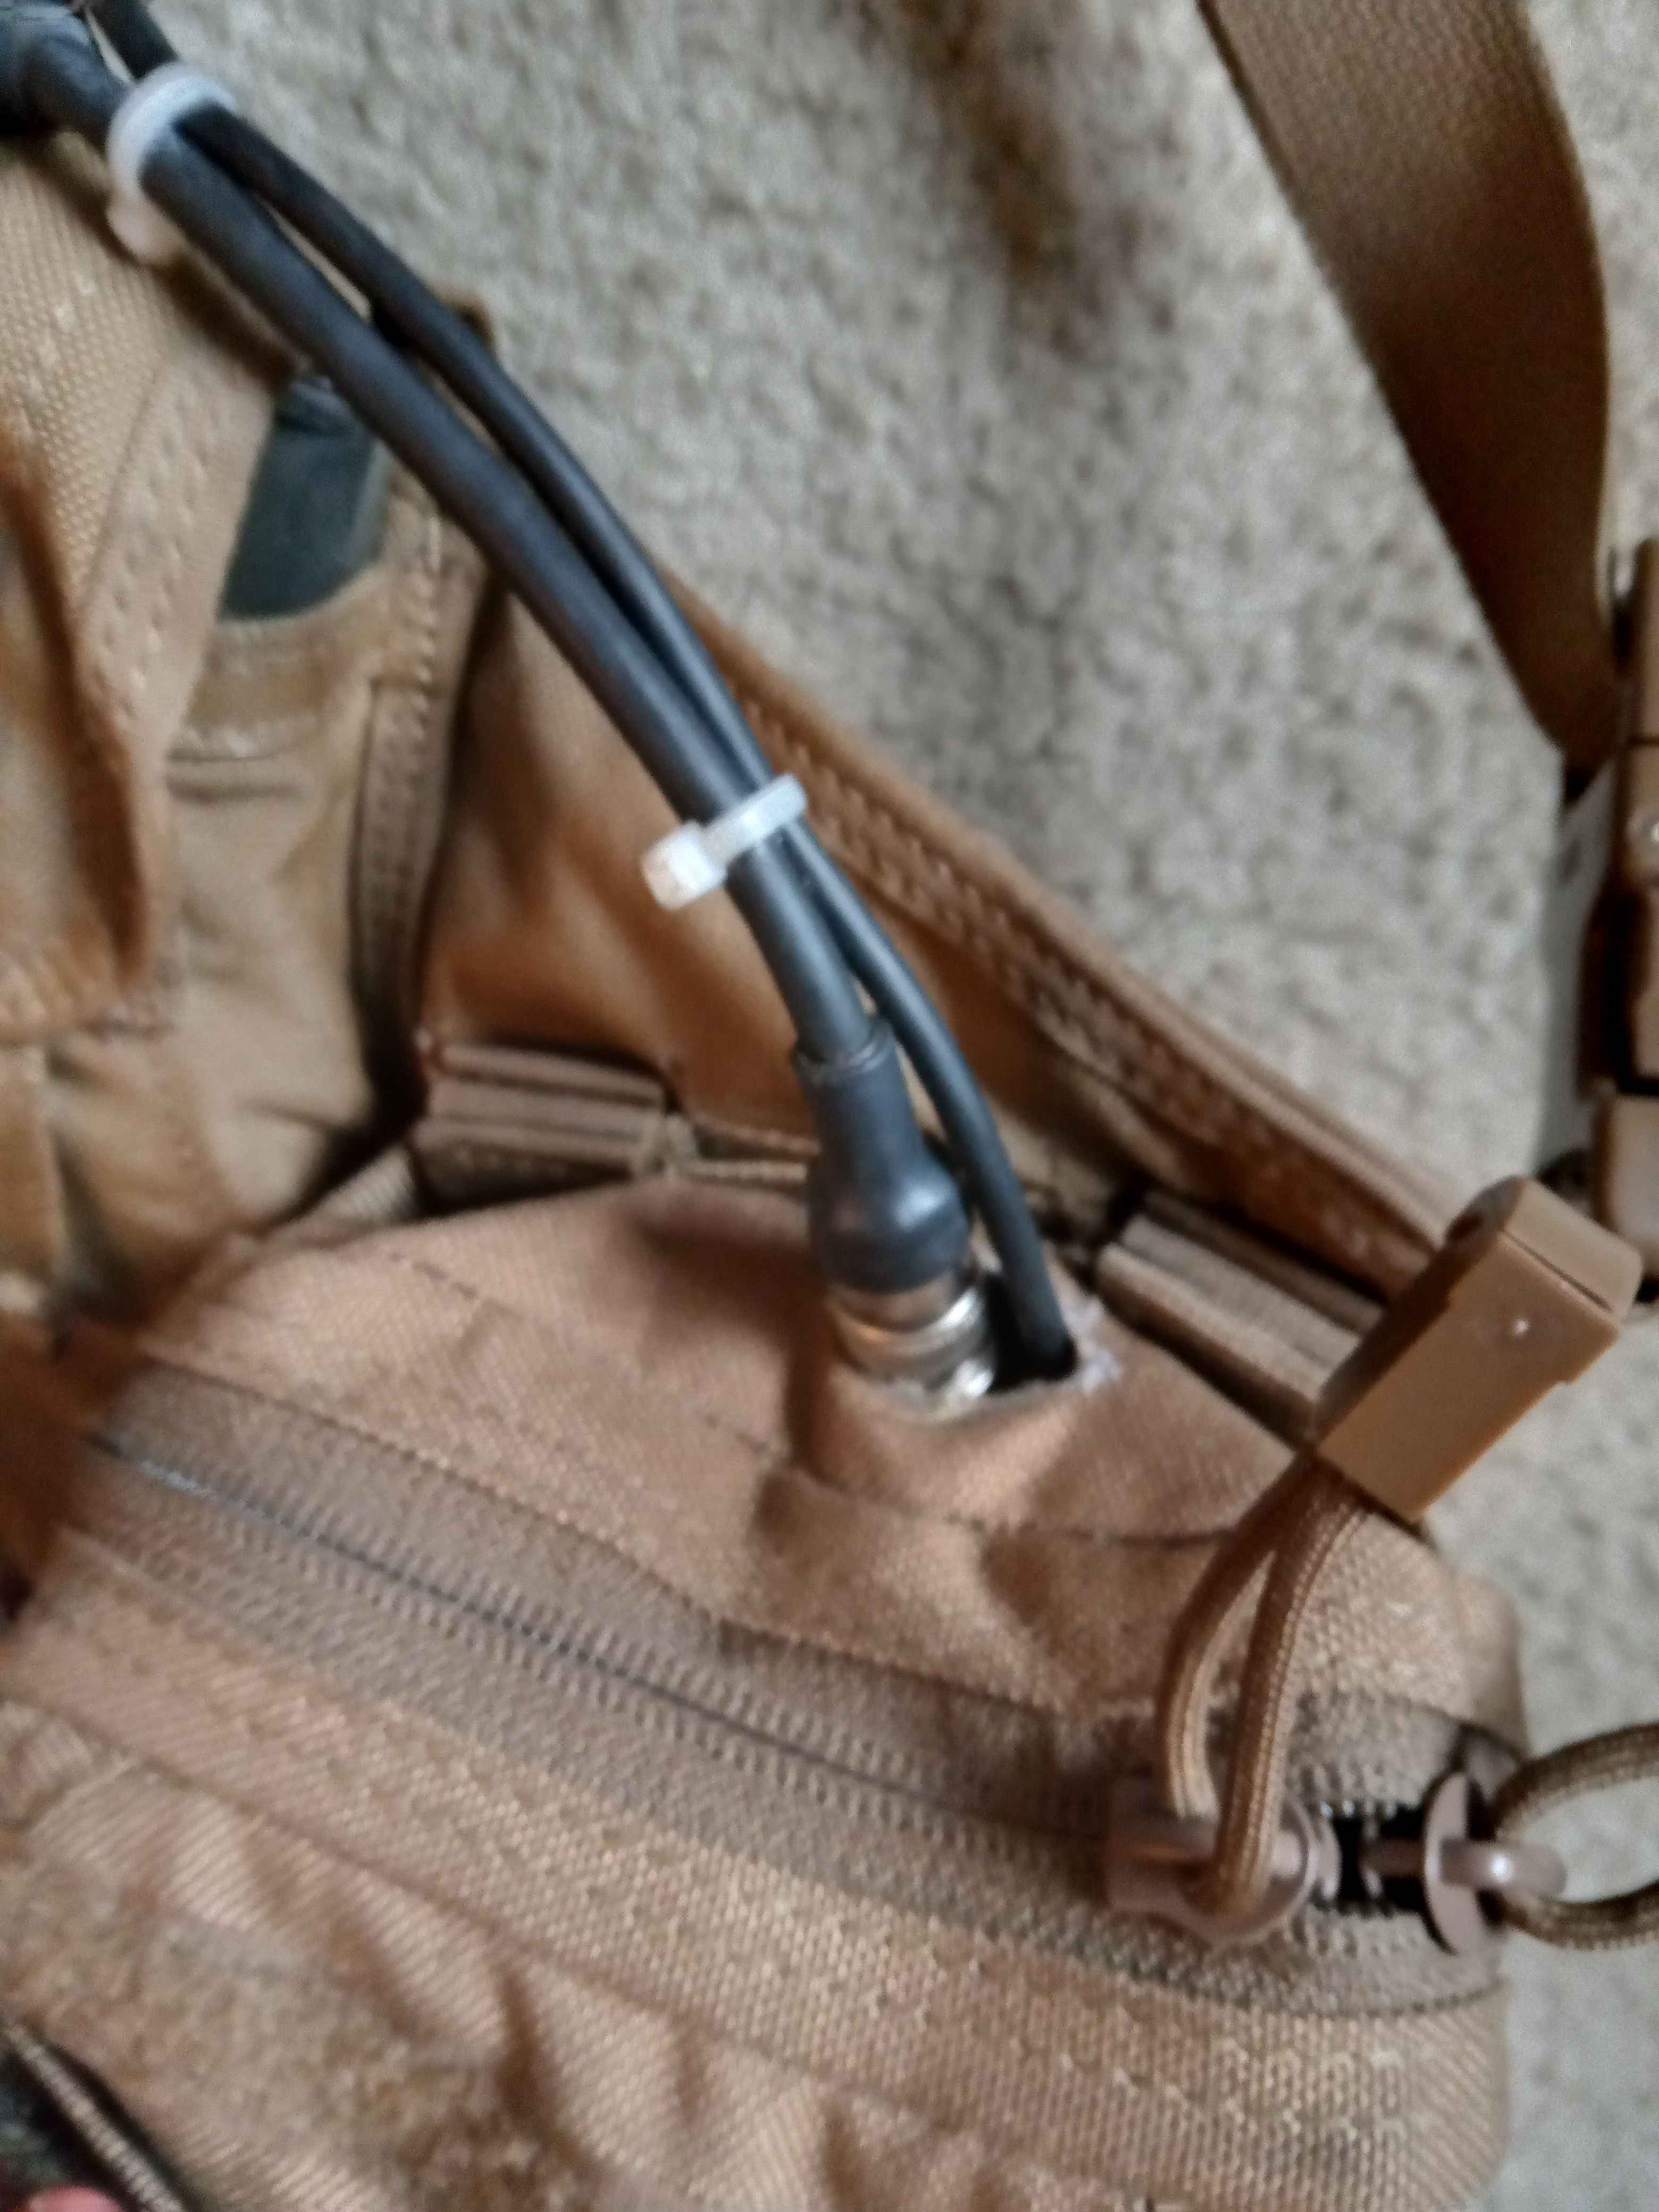
The main pouch also has a small internal pouch in the back of it which is just the right size for a small radio (like the Baofeng UV-9R that I use). This is where a slight modification to the pouch was necessary. My wife cut and stitched a 1-inch long buttonhole in the top of the pouch for my radio antenna and PTT cable. This solution works beautifully with how I have my intra-patrol comms integrated into the chest rig.
This modification is not necessary, and simply threading the cables through the zipper would work as well. However, this simple buttonhole is just a little bit more ideal for my setup. Don’t be afraid to make little mods to your kit like this if it works for you.
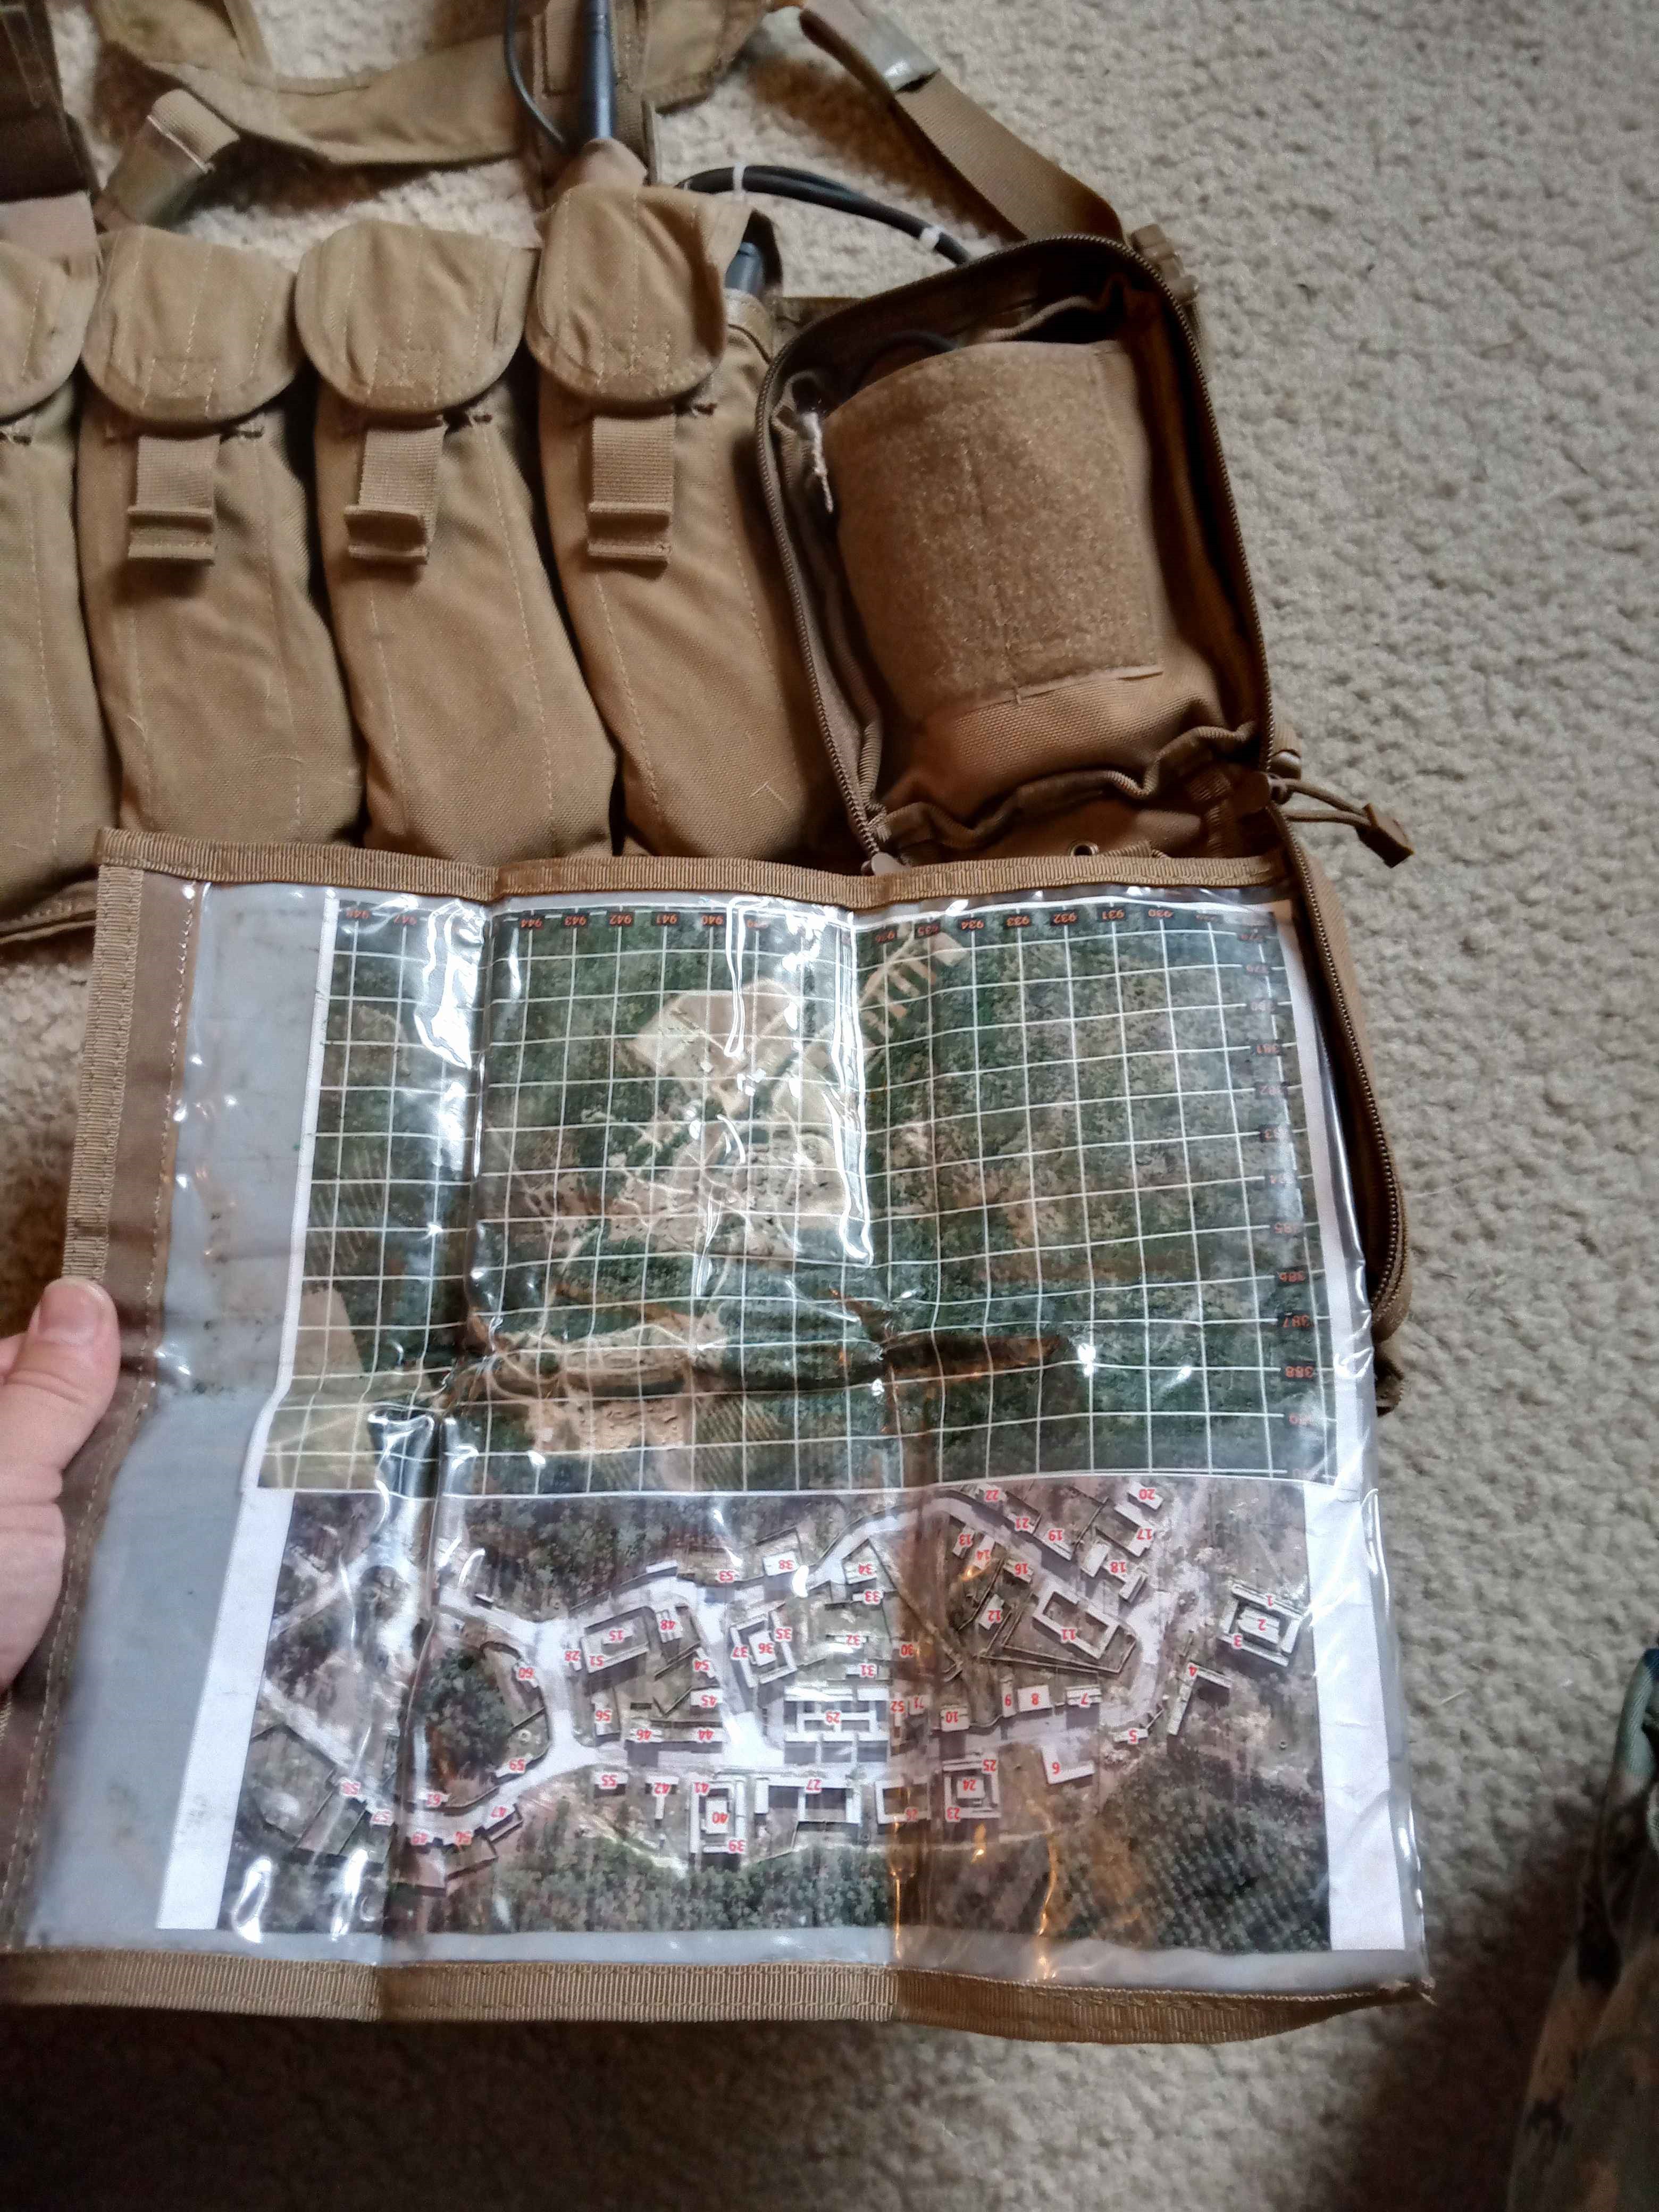
The front of the pouch has a liberal amount of velcro for you to put your cool guy patches on (like the VSTAC patch shown here that you get at my classes). Pulling this flap up reveals the admin part of the pouch. There are three pen slits that I use for map pens, and behind that is a roomy pouch that holds my compass, protractor, notebook, and signal whistle. There is still room to spare, and all this sits quite comfortably in the pouch.
Closing the pouch and pulling down the panel reveals two clear panels that are about index card sized. This is a great place to put communications materials like SOI/CEOI cards, trigrams, message formats, etc. I am now using this as a more comfortable alternative to the quarterback playbook that I used to wear on my forearm.
Summary
As compact as this pouch is, it fills a lot of my needs. The slight modification to fit my radio saves valuable space on my chest rig. From just what I have in this pouch I can navigate a patrol, keep a mission log, communicate to team/squad leaders, and coordinate maneuvers. For this reason I will call this my “Team Leader Pouch” going forward. I have used this pouch on my chest rig for several months now, including a few force-on-force training events, and it’s working very well for me so far.
If you would like to learn how to work alongside other riflemen in a team setting, come to a class. I have a Basic Rifleman Course in Ohio on September 24-25 where I go beyond the flat range to teach fundamental field skills for working within a team of shooters. And October 1-2 is the last Team Leader Class of the year. Send me an email to register.
In the Team Leader Class, one of the things I teach students is how to make a team training plan. Today I will endeavor to show you how to create a personal training plan so that you as an individual can seek self-improvement.
Identifying Your Mission
You should start your training journey with a goal in mind. It’s hard to hit a target if you don’t know what your target is. To do this, grab a notebook and try to visualize what you are training for, then write it down in one or two sentences. This is your personal mission statement. For example;
“I want to train myself in the skills necessary to operate as unsupported light infantry in order to survive a civil conflict.”
or;
“I want to be ready to help my family in our day-to-day lives”
These are two very different mission statements, leading in two specific directions. While there may be some overlap in the skills required for each mission, there is a lot of specific skills unique to each mission. This leads to our next step.
Create a Personal Mission-Essential Task List (METL)
Now that you have your desired end state in mind, it’s time to brainstorm what kind of skills contribute to your mission so that you know what to train. For demonstration purposes, we will go with the second sample mission statement.
“I want to be ready to help my family in our day-to-day lives”
Skills that contribute to this mission could include:
First aid care
Concealed carry weapon proficiency
Situational awareness
Vehicle handling
Contingency planning
Look at that, we now have a list of skills that we should strive to train to. I could list many more, but you get the point.
Set Measurable, Attainable Standards
We are now pointed in the right direction, but we need to determine what level of skill we desire. The way to do this is to set standards/goals for each mission-essential task. Using the example above:
First aid care
Apply tourniquet to an extremity under 90 seconds
recite from memory the questions to ask to determine a patient’s mental state
lay out items in the first aid kit and describe how and when you would use each item.
Concealed carry weapon proficiency
from concealment with a time limit of 5 seconds, engage an IPSC target at 15m with a hammer pair
And so on and so forth. What we have now is specific tasks to train ourselves to. This makes decisions in the final step much easier.
Seek Training that Supports your METL
There are a lot of trainers offering a lot of cool classes. To make the most of your finite resources, you should attend training that helps you accomplish your mission and enables you to complete one of your mission-essential tasks. I don’t know what your personal mission statement is, so I can’t write your training plan for you. However, I will link our training partners so you can check out their classes and see what fits your requirements.
This article is not for most of you readers, as you probably already have at least a basic understanding of what gear you do and don’t need. I am not writing this article for you, I am writing it so you can show it to your friends who are just breaking into the realm of preparing for the coming fight, and need a little guidance. At the very least, read it so you can make recommendations to them so that they will be assets, not burdens, when you eventually strap up and take them on a patrol. Originally posted in April 2021, I have updated this article to include things that I have learned since then. I have never and will never claim to have reached the pinnacle of knowledge on anything. We are all constantly learning and improving ourselves, and no one is perfect.
WARNING: Opinion
If you’re just starting out into building up a fighting kit, all of the info out there can be pretty overwhelming. The natural tendency is to focus on the cool-looking points of your gear, but this can be counter-productive, especially when you have a fixed income. For example, it’s natural to immediately buy an AR with a bunch of accessories, and maybe splurge on a high-end plate carrier and plates because that’s what you see all the “cool guys” wearing, and you need body armor right? The problem is that you just spent a ton of money on your rig, and you haven’t invested into some other basic things you need to sustain yourself during operations, like a good pack, ammo, or even canteens. In this article I will list the purchasing priorities for building a rifleman’s kit piece-by-piece, so that you can efficiently build up your gear and yourself to be as ready as possible for when it’s time to defend yourself and your liberties. I am trimming away all of the tacti-cool fat and unnecessary gear so you can make the most out of your limited budget and keep your priorities straight. I must note here that this is not a post about prepping. Things such as alternate energy, homesteading, and water purification are indeed important, but are beyond the scope of this article and my expertise. Perhaps someone more knowledgeable than I could write up a similar article along those lines later on. I am writing purely from the perspective of someone who is gearing up for a potential civil conflict/WROL scenario looking to make themselves an asset to their family, their team, and their country. Again, everything you’re about to read is my personal opinion based off my experience, feel free to disagree with anything I say.
Rifleman’s Essentials
This is the bare minimum of what you need to be proficient in a firefight, and thus where you should start. The first step is simple, as a rifleman you need a rifle. Notice I said a rifle, not a rifle with a scope, laser, bipod, and flashlight, those are much further down the list. I’m talking about a bare-bones rifle with a good sling AND THAT’S IT. For now. Also note that rifle was singular. It’s better to have one rifle and a full kit and ammo than ten empty weapons collecting dust. There’s too much that goes into weapon selection to cover here in depth, so I’ll be brief. Your rifle should, if possible, meet the following criteria:
It should be easy to feed. 6.5 Creedmore or .300 BLK are neat cartridges, but you can’t afford to be paying over a dollar/round. These days the best choice is probably 7.62×39, which can still be had for 34-40 cents per round. This is, however, a call you should make yourself. If magazine-fed it should use affordable, commonly available mags.
It should be reliable. There’s a lot of gimmicky weapons out there, try to stick with combat-proven platforms that don’t have a tendency to go click when you need them to go bang.
It should, if possible, be matched to your environment and mission profile. To determine this you will need to consider how you will be operating. At what distance will you most likely engage targets? Will you need to make shots through brush, or is your terrain more open? A quick survey of your surroundings will determine factors such as caliber, barrel length, etc.
If you have a limited selection, any rifle is better than no rifle. Even if you have a bolt-action Mosin-Nagant or a hunting rifle, you can be effective with it if you train accordingly.
You need a good sling for your rifle. Slings are useful for saving your arms during long patrols, stabilizing the rifle in a prepared firing position, freeing your hands for other tasks, and keeping accountability of your weapon so it’s ready to go at any time. Get an easily adjustable 2-point sling, single-points are only good for CQB and in mounted vehicle operations. My personal go-to is the Blue Force Tactical Vickers Sling, but there are other good ones out there.
Next you need the ability to feed said rifle. You should purchase 1,000 rounds of whatever caliber you are running, put it in sealed ammo cans, and DO NOT TOUCH IT. This is your emergency reserve, you only pull it out if you need it to protect life, liberty, and property in SHTF. Buy in bulk online for the cheapest prices. Any ammo you buy beyond this you can shoot in training.
Also in the realm of feeding your rifle, you need additional feeding devices (magazines, stripper clips, enblocs, etc.). For a start, you need to be able to carry at least 120 rounds on your person plus whatever’s in the gun, so at a minimum 5-6 magazines or that equivalent amount in stripper clips. If you can get more, get more. You can never have too many magazines, but at this point 5-7 will suffice.
Now you need a way to carry all those magazines on your body, so you should get some kind of load-bearing gear. There’s a ton of articles, videos, and posts about different kinds of kit so I won’t go too in-depth here. Suffice to say that you don’t yet need body armor, just a way to carry your combat equipment and ammo on your body.
Medical equipment is next. You need a trauma kit to quickly mitigate life-threatening injuries so you can survive the trip to the hospital/casualty collection point. You need items like quick clot, bandages, chest seals, etc. in your IFAK somewhere on your gear. You also need tourniquets, 2-4 of them. Get the same type so you only need to practice one way, and then get an extra one to practice with. Make sure your IFAK is somewhere you can easily access it, i.e. NOT on your back.
You need a way to carry water on your load-bearing kit. You won’t last long in combat operations without water, so you need to have some on your gear, at least 2 liters OR half a gallon. Camelbacks work great, but make sure you have extra bladders in case it pops. Canteens work as well. 2-quart canteens can collapse as you drink them like camelbacks do, so they don’t make slosh when half-full. However, if all you have is 1-quart canteens then you will need to get used to drinking a whole canteen all at once to prevent a half-full canteen from sloshing and making unwanted noise. It is possible, Marine Recruits do it every night in boot camp before going to bed.
Sustainment Gear
Now that you have all the Rifleman’s Essentials, you need to have the ability to sustain yourself in combat operations for a few days or even weeks. Sustainment gear satisfies basic human needs for survival such as water, food, and shelter, to keep you alive during extended periods of time in the field. For our purposes, we will assume a 1-week field stay without resupply.
First and foremost, you need a pack to carry everything. There’s a ton of models out there, so let me save you some trouble. Get a medium ALICE pack, preferably with a frame. It’s simple, been in service with the military for decades (even though no longer issued, trust me it’s still in use), and is big enough to hold everything you need without a lot of extra space. It’s also much cheaper than newer packs of comparable size and durability, making it ideal for the budget warrior. That’s my recommendation, do with it what you will.
The first basic human need for survival is water. You cannot carry enough water in your pack for a week’s worth of combat operations, so you need a way to purify/filter water in the field. I highly recommend Sawyer Mini water filters. They’re small, weigh almost nothing, re-usable for more water than you will ever drink in your life, and only cost about $20 each. If your environment is such that filtration is insufficient, you also need a purification method. I use a Steripen Ultra, a UV purifier that is small and very easy and quick to use. You should also have about half a gallon more water in your pack in addition to what’s on your gear, so two additional canteens will do nicely.
The next basic human need is food. Technically, you can survive for 40 days without eating before facing any permanent harm to your body, but you’re not planning on merely “surviving” are you? We’re talking about combat operations, and whether it’s patrolling, manning an observation post, or getting into gunfights, there’s a lot of physical exertion involved and you need calories to keep going. If you can get them, military MREs are a great option that is lightweight, compact, and calorie-dense. Plan on eating 2 per day, field strip them, and put them in your pack. If you can’t get MREs, there are similar options on the civilian side of the house such as Mountain House. Canned chilis and soups are also decent options if you have nothing else, but they get heavy. Gas camp stoves, while nice and compact, are luxury items. Up to you if you want to spend your money on one, but if we’re trimming all the fat, save your money.
The final basic human need is shelter, or protection from the elements. This will vary greatly depending on your environment. If you live where it gets chilly at night, you will need a compact sleeping bag. If you’re further north you will need two sleeping bags, a lightweight one for summer and a heavier one that can stand freezing temperatures. If you live further south, you can probably get away with just a light blanket or even no warming layers at all in summer. If you live in mosquito country, you may choose to invest in a bug net for sleeping in just your clothes.
Unless you live in an arid climate, you will have to contend with rain at some point. During the daytime this may not be an issue, but being wet and cold at night trying to sleep is miserable, and could be lethal if you get hypothermia. Invest in a military surplus GI poncho or tarp, and learn how to make a Royal Marine Rig or lean-to out of it. Sleeping under a tarp may not be appealing to many, but it is well worth it not to carry around a tent everywhere. You will probably also want a sleeping pad, both for comfort and to keep your sleeping bag dry and out of the mud. Sleeping pads are also a lifesaver when you’re resting on your elbows for hours in an observation post.
Speaking of rain and mud, you will need some kind of rain gear to wear with your kit. Rain jackets, like Gore-Tex, are great options for colder environments, not so much in hot climates because they make you sweat a LOT. Ponchos work great and are excellent multi-purpose items, but don’t integrate well with all types of load-bearing gear.
You need a solid pair of boots to protect your feet. This is another topic that is far too vast to do justice in one paragraph, and there are many videos and articles on this topic if you just do a quick search. Suffice to say that your boots should be rugged to withstand harsh treatment and heavy loads, but also comfortable so you aren’t a liability 5 miles into a 9-mile movement. Sneakers and work shoes are insufficient, you need good hiking/combat boots.
A great tool to have for field living is a good fighting knife/bayonet. Besides poking the blood out of people, a large (5”-8”) fighting knife can be used for a huge number of tasks in the bush, such as building a shelter, preparing a fire (tactical situation permitting), opening cans, cleaning fish, etc. Trust me, you won’t regret having a good knife somewhere on your kit.
Force Multipliers
Once you have the Rifleman’s Essentials and the ability to sustain yourself for up to a week during operations, then you can begin investing into force-multipliers. Force-multipliers are so called because they are tools which greatly enhance, or multiply, your lethality on the battlefield.
Another rifleman. Yes, that’s right, you shouldn’t be preparing and training alone, you are much more effective as a member of a team. Even if you just have one buddy working with you, it’s a huge leap in combat ability. Don’t just assume that if a civil war breaks out the militias will come to recruit you, you are the militia. Get a buddy, then get two more, and boom you got a fire team. And if you want to learn how to train up the other members of your fire team effectively, I have a class for that.
Night vision. The ability to move and fight at night is a massive bonus, especially for us as civilians. Our friends at Ready Made Resources have a great selection of NVGs at pretty decent prices, so go check them out. Now, be cautious here. You will need to save up a few thousand dollars to get a good quality night vision unit, and this will take time. You will be tempted to spend your money on other things as you save up, RESIST THE URGE. If you constantly say to yourself “yeah, I need night vision, but I can buy body armor and a cool scope right now,” you will never get your NVG. This needs to be a priority, so be patient. This is such a high priority that I’d even recommend selling any extra weapons/gear you have to get night vision sooner. I did, and have no regrets.
IR laser. Once you get your NVG (yay!) you will next need a way to aim your weapon using it. The most common way to do this is with an IR laser mounted on your rifle. There are a ton of expensive lasers out there, most of which cost over $1200. I highly recommend ordering a Perst-4 out of Russia. At $450 it’s a cheap, rugged military laser with great ergonomics, with the added bonus that it’s a full power class 3 laser. Although now they may be hard to obtain due to *ahem* current events.
Radios. Absolutely necessary if you plan to coordinate a large squad, or work alongside another team. With radios you can call for medevac, send tactical reports, and coordinate with an extraction team. Baofeng UV-5Rs are pretty good for the price, get a couple of them so you have somebody to talk to. Eventually you may choose to get a more advanced radio, but keep the Baofengs for your friends and teammates to borrow. While you’re at it, get trained so you can make the most out of your investment.
Once you have these investments out of the way, you can begin to add little bits and pieces to your gear as you train and find out what works for you and what doesn’t. Get to a training course where you can experience running your kit and find out what changes you need to make. Grab your sustainment pack and go camping with it for a couple days, see how it works for you. The more you train and practice using your gear, the more context you get for how to make practical investments in equipment that is useful and not just “cool looking.”
Additional Investments
I would like to add a few final notes on some other pieces of kit that you will at least consider buying during your journey, to put them into context as to their actual utility.
Body armor: Good kit, will stop incoming rounds to vital areas of your body. However, this must be weighed against the fact that it is heavy and uncomfortable, so you should do a realistic evaluation of your level of physical fitness as well as your mission profile. If you plan to wear body armor, plan to do a lot of workouts with it on. Don’t just look at yourself in the mirror and take it off, wear it for a couple hours walking around the house. Go for a run with it on. If you can’t run/jog 3 miles with your armor on without stopping, you’re not ready to use it as your main kit.
Ballistic helmet: Same deal as with body armor, protection at the cost of added weight. This time the weight is on your head. If you’re not used to wearing a kevlar helmet on your head for a few hours, I can tell you right now that it sucks. Your neck gets tired, parts of your skull get more pressure than others and start to hurt, and it makes you sweat. The new helmets aren’t immune to this either. I’ve worn LWHs, ECHs, OPS-Core high cuts, and MICH helmets, they all suck. Still a good thing to have, but if you’re gonna plan to use it for the real thing, make sure you use it in training a lot.
Optics: Red dots, LPVOs, fixed magnification scopes, etc. Whatever you get you should get for a purpose to enhance your existing skill. Magnification helps with target ID and longer ranges, illuminated reticles assist with aiming in low-light situations. Don’t buy cheap scopes, you get what you pay for with optics. I’ve seen amazon/wal-mart red dots randomly shut off due to recoil and even snap off the rifle during shooting.
Fore-grips: There is no objective “best option” here, it is literally user preference for comfort and has little to no effect on your shooting.
Weapon lights: Unless you primarily work in an urban environment, tac-lights have no place on your rifle. The risk of accidentally hitting the on switch and getting you or your teammates killed is too great in a rural patrolling situation. If you do get a tac-light for that small chance that you actually enter and clear a dark structure, get a light with a QD mount that allows you to keep it in your pack until you need it, and take it off when you’re done.
Other rifle accessories: Before you put anything on your weapon, ask yourself, “does this make me more effective?” If the answer is yes, buy it. If the answer is no or probably not, save your money.
Handguns: You don’t need a handgun unless you conceal and carry. The reason is that there is nothing your handgun can do that your rifle can’t do better. The myth that “a transition is faster than a reload” is only true if you suck at reloads. You can better use the weight and space that your holster takes up by holding extra rifle mags, your night vision, or a fighting knife.
Assault Packs: These are actually great for carrying stuff that you’d use on a 1-day patrol when you don’t need everything from your sustainment gear. Ideally, you’d get one that either fits inside or clips onto your sustainment pack. Use your assault pack to hold 1 day’s worth of chow, extra ammo/batteries, and anything else that your specific mission requires. Avoid the ones that strap directly to your plate carrier/vest, as you need to remove your fighting equipment to get anything out of it.
Magazines and ammo: This is never a bad idea. You can always use more mags and ammo, and so can your buddies if they’re running the same caliber as you (they should be).
Camouflage fatigues: Get a pattern that matches your environment and helps you blend in. If working within a team, try to have everyone wear the same pattern to avoid friendly fire. Keep in mind, however, wearing a “uniform” makes it easier for an enemy to PID you as hostile, but if you’re wearing a bunch of tactical gear with a rifle they can probably PID you anyway.
I hope this helps someone. As I stated at the beginning, everything here is simply my humble opinion, you are welcome to disagree with me in the comments. For the curious, I have articles about my personal kit and how I set it up.
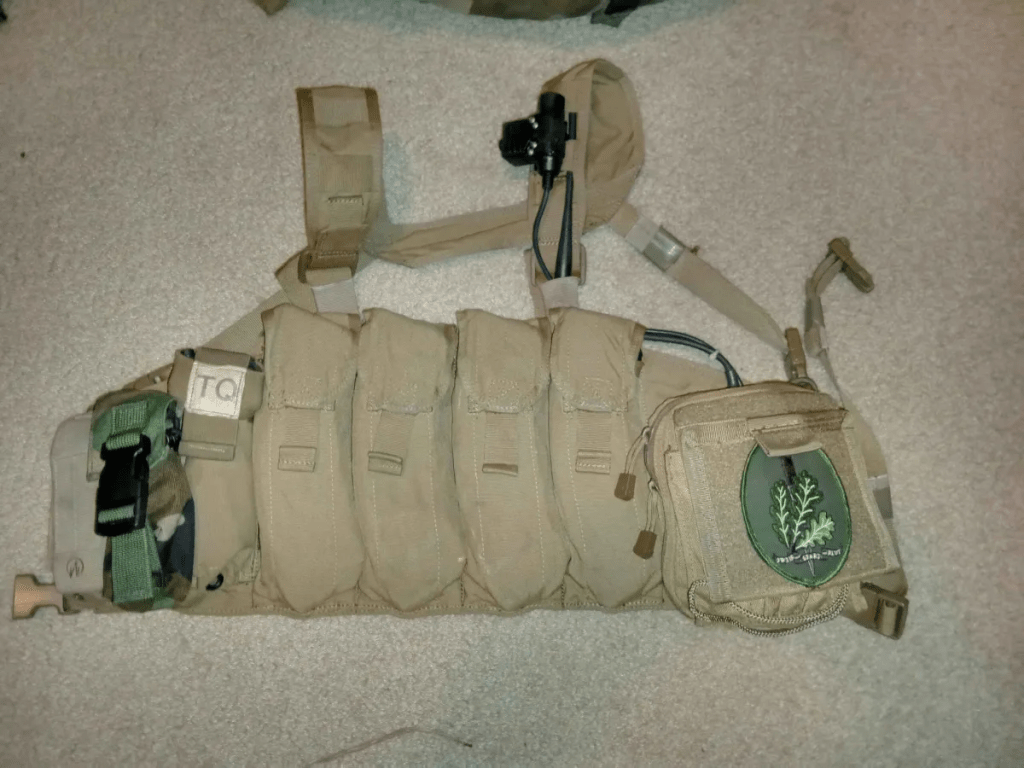
A few months ago I wrote a series on my Jäger Kit, describing how I set up my belt kit, chest rig, and pack for light infantry-style operations requiring an extended field stay of a week or so. About a month later I bought a customized Minuteman 4 chest rig from UW Gear, and I have spent the meantime testing it during my personal training regimen. At this point I am satisfied that this chest rig is an outstanding piece of kit, and I felt compelled to write this brief review on its performance during my testing of it.
Fitment/Comfort
The Minuteman 4 sits comfortably nice and high on my chest, out of the way of my belt rig. The straps have elastic retainers for the excess material, but I used duct tape to secure it anyway just to make sure it didn’t come undone while rubbing against my pack. The shoulder straps are nice and wide, comfortably spreading the weight without putting too much pressure on a small area like my old chicom did.
I used this chest rig while running stalking lanes and immediate action drills with my crew, so I had plenty of experience wearing it in the prone while crawling. It didn’t feel cumbersome at all, and I barely noticed the extra bulk of the magazine pouches on my chest. Single stack magazine pouches are all I run on my chest ever, so this fit the bill quite nicely. This leads into the next section of the review.
Magazine Pouches
The Minuteman 4 comes with 4x magazine pouches, mine are for 30-round AKM magazines. These pouches are perhaps the most signature part of any UW Gear product, with their “tuck tab closure” system. Simply tuck the stiff tab on the flap under the loop on the bottom of the pouch to close it, and pull up and out to open it. Unlike velcro, the tuck tabs do not make noise when opened. The tabs feel very secure, and if anything are a little bit difficult to re-insert and close the pouch. This is fine for me, however, as I can take time after a firefight to reorganize my ammo and properly secure the pouch. Perhaps the tabs will become less stiff over time.
These are not tacticool “speed reload” pouches by any means. These are practical “grab rifle and go inna woods” pouches that keep your mags in and dirt/mud out when you’re crawling around behind cover.
Modularity
While the magazine pouches themselves are built into the rig, it comes with MOLLE webbing on either side to allow the addition of whatever pouches you see fit. Mine is a custom rig that has 3 rows of MOLLE on each side instead of the 2 that it normally has.
The Minuteman 4 (top) is quite an improvement over my Chicom Type 56. Now I just need to paint it!
If you read my earlier article on my chest rig setup, you will see that I have kept everything more or less in the same place as before. The only changes I made have been to add a multitool pouch to my right side (picture left) and I have consolidated my radio, compass, and other tools into a modified Condor map pouch that I am calling my “team leader pouch.” I will post a separate article on that pouch later.
The last thing I like about this chest rig is that the straps have loops on them for running cables, hoses, or other accessories onto them. I have a PTT and my radio antenna looped onto my left (picture right) side.
Closing thoughts
Over the last two months I have put this thing through a lot of hard use, including a week-long field stay where I wore it daily. It has yet to show any signs of wear or tear, and I am very pleased with the durability and comfort of the Minuteman 4 thus far. Hawkeye’s dedication to craftmanship shows through in his work, and I am happy to recommend his gear to any serious partisan in training.
Speaking of training, I’m teaching the Support Weapons Class in September and another Team Leader Class in early October. Having good equipment is fine, but it does you no good if it sits on a shelf all year. Get out here and train!
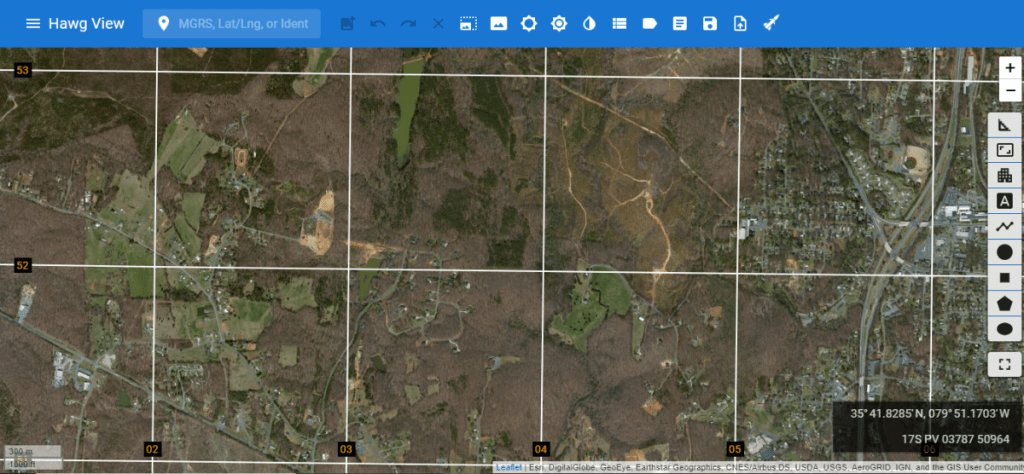
A contact of mine in the military aviation community recently introduced me to hawg-ops.com. It’s a free tool to quickly make tactical maps designed for CAS pilots to plan missions, training events, and tabletop exercises. Opening the website brings you to a map of the US that allows you to zoom in to any location, initially with imagery imported from google maps.
At first glance, it doesn’t look too impressive. Until, that is, you click on the top left corner and see all the options you have for layers on the map. You can switch to topographic map, different types of imagery, and add or remove symbols and markers.
The best part, however, is the ability to add grid lines in either MGRS, Lat/Long, or GARS. This is critical for land navigation in your area. Most maps designed for land navigation only show topographic data with the grid lines. Imagine having a custom map of your area with satellite imagery and MGRS grid lines overlaid, with another map of the EXACT SAME scale and area showing topographic data and the EXACT SAME grid lines.
The only tricky part is figuring out how to print these maps to a useful scale that common protractors and map tools use such as 1:24,000, 1:25,000, or 1:50,000. I am currently experimenting with this to find a solution, but even in its current form it’s still a great tool when paired with a topo map using the same grid system.
The right side of the window has several additional tools for drawing on the maps to plot routes, bearings, and elevation. The “analysis tool” (top right) is especially useful for pulling magnetic bearings and elevation changes from point to point, making it a great tool for communications planning as well. There’s even a large selection of unit symbols that you can click and drag onto the map for Intelligence Preparation of the Battlefield (IPB).
This has been but a brief overview of the capabilities of this website, as I’m still playing with it myself. Check it out yourself and play around with it. If you find something else you can do with this website, email me at vonsteubentraining@protonmail.com so I can include it in Part 2 of how to use this tool.
See my articles on how to make a tactical map board and conduct battle tracking to see how to fully use this tool.
It’s Memorial Day. This morning I went to the local war monument and read every name that was engraved there. There were a couple hundred names, so it took me a while. And while I could have paid my respects with a few somber minutes of silence, reading the names of the fallen has a special meaning to me.
When we die, we leave this world for the next one and the light that is our life goes out. But when you die, you aren’t truly dead yet. The word “immortal” comes from the Latin word “immortalis.” Immortalis has two meanings, the first being “deathless, undying.” The second meaning, however, is “destined to endure forever, never to be forgotten”
When our body dies, we live on in the memory of those who knew us. Every time someone tells a story about us, the light of our life flares up again, though but for a minute. Eventually, however, those who knew us will die as well, taking their memories to the grave with them. In the end, when all memories of us have faded, all that remains of us is our names.
A name is a sacred thing. Your name is yours and yours alone. Your name is tied to the memories of you in the minds of others, and is a key part of your very being. So when all memory of you has faded and the stories of your life cease to be retold, the only way you can live again is when someone reads your name.
This is why we honor our war dead with monuments. Those who fall in battle have given us everything they were and could have been. They have sacrificed their lives for us, and as a small token of our gratitude, we seek to repay a small piece of the life that they gave. Thus we carve their names in stone so that every time someone passes that stone and reads their names, the light of their lives twinkles for a moment. It is all the immortalis that we as mortal men can bestow.
So the next time you visit a military cemetery or pass by a war monument, take a moment to stop and read a few of the names in stone. In so doing you will ignite a spark of life in the names you read, and for a moment, they will live once again.
In addition to my classes on small unit tactics and combat leadership, I also offer custom training for groups. If you or your group would like tailor-made training specific to your situation, email me at vonsteubentraining@protonmail.com.
Two weeks ago I wrote an article about a simple method to set up a map board for battle tracking. Today I am going to cover how to use that board to track units, events, and combat reports in real time.
Battle Tracking Defined
Battle tracking is the task of keeping track of events as they occur in real time as well as the movement of troops and equipment. Battle tracking is valuable for:
Tracking the location of friendly units
Marking locations and times of notable events and combat reports
Intelligence analysis of events in the area to detect patterns and anomalies
Tracking last known position and composition of hostile, potentially hostile, and neutral elements
Situational awareness in any WROL situation is vital to your survival. You can sit inside well-emplaced defensive positions all you want, but you will allow yourself to be surprised if you are not constantly seeking information about what is happening in your area. Reconnaissance must be a continuous effort, as well as establishing an intelligence network of people supplying you with information.
This, however, is a deep dive for another time. Today I will simply show you a way to keep track of the information you’ve collected.
Tracking Friendly Units
Whenever you send out a security patrol or establish an observation post, it is important that you maintain radio communications with your subordinate elements. Those units should call your Tactical Operations Center (TOC) at specified comm windows to send Position Reports (POSREPs) or Situation Reports (SITREPs). Both reports include the unit’s location. Once the unit has sent their location via grid coordinates or a landmark (such as road intersections), update their position on a small whiteboard set up to track POSREPs.
Draw the grid lines in sharpie, and the POSREPS in dry erase marker. That way you don’t erase your board when updating it.
Next, mark the unit’s position on the map with the appropriate blue pin.
Note the NATO symbology to mark what kind of unit this is. In this case, a squad-sized recon element.
Tracking Hostile, Neutral, and Unknown elements (SALUTE Reports)
There will come times when your units in outside your perimeter come across other people that are not yours. Whether those people are hostile, neutral, or just unknown, your units should report the contact to the TOC. They should use the SALUTE report format as follows:
Size of unit (how many are there?)
Activity of the unit (what are they doing?)
Location of the unit (grid or landmark location)
Uniform (what are they wearing?)
Time observed (time and date that they were observed, NOT the time the report was sent)
Equipment (What do they have? Weapons? Tools? Radios? Backpacks?)
In this case, our recon patrol seems to have discovered another neighborhood protection group.
Record the SALUTE report on a sticky note, index card, or other small sheet of paper. Place it on the edge of the map board.
Next, select the appropriate pin for the unit spotted and place it on the board. Remember, if you’re using NATO symbology like I am, the colors are as follows:
Blue for friendly forces (Units that we control and operate under our chain of command OR work directly alongside us, i.e. a nearby neighborhood protection team that we coordinate with)
Red for enemy forces (an opposing force, or OPFOR)
Green for independent/neutral forces (not necessarily hostile/friendly. Law Enforcement falls into this category unless you are working directly with them.)
Yellow for unknown forces
Finally, tie a small piece of string around the pin and connect it to the sticky note with the corresponding combat report. This way anyone can look at pins on the board and quickly know what they are looking at and when it was noted.
You will need to set an expiration period for reports, after which time they are removed from the board. This expiration period is up to you and the situation. For current day monitoring of crime reports in your area, you could leave reports up for weeks. For a quickly-changing WROL situation and a competent reconnaissance effort, you may need to pull pins off the board after 24 hours if you are getting a lot of reports.
Once you remove a report from the board, file the report with all your other combat reports in chronological order (index cards and index card holders are great for this). This way you can review the reports later to check for patterns and anomalies.
Conclusion
Now you have the basic knowledge to begin battle tracking your AO. You can use this method for any type of tracking at any scale, you can even start now with a simple street map of your town and marking locations of crime reports published by your local police department. While it is tempting to rely on electronic maps and tracking software, it is critical to have a low-tech way of tracking your situational awareness with a traditional map board in case the power goes out. In an increasingly digital world, there are certain advantages to remaining analog.
I intend to write more about running a TOC in future articles, so stay tuned. Semper paratus, semper discens, semper fidelis.
In addition to my classes on small unit tactics and combat leadership, I also offer custom training for groups and individuals. If you or your group would like special training on running an operations center, email me at vonsteubentraining@protonmail.com to set up a private training event.
Whether you’re standing up a neighborhood protection team, security at your homestead, or even just monitoring protest/riot activity in your area, you should make a map board and set it up so you can keep track of events as they unfold. There are many ways to do this, the following is what I have used in a regiment-level Combat Operations Center. It’s simple, analog, and easy to do with minimal materials. All that is required (besides your map) is the following simple office supplies:
multi-colored pushpins (I use Blue, Red, Green, Yellow, and White)
white out (the kind in a bottle)
a fine-tip marker, such as the map pens I use here
Cork board
paracord
duct tape
scrap cardboard
To start, select the colors of pushpins you will use and color code them to identify different types of forces/events for your board. I use NATO standard symbology and color coding, as follows:
Blue for friendly forces (Units that we control and operate under our chain of command OR work directly alongside us, i.e. a nearby neighborhood protection team that we coordinate with)
Red for enemy forces (an opposing force, or OPFOR)
Green for independent/neutral forces (not necessarily hostile/friendly. Law Enforcement falls into this category unless you are working directly with them.)
Yellow for unknown forces
White for holding stuff on the board
What I want to do next is mark the pins with different unit symbols and types so it’s easier for me to look at the board and see what kind of unit a pin indicates. To do this, stick the pins you want to mark into your scrap cardboard and use the white out to “paint” the tops of the pins white.
What this does is give you a clear, blank surface to draw/write on. Next use the fine-tip markers to draw/write whatever identifying marks you want on the pins.
I use NATO map symbology for the most part, with some special symbols for non-standard units.
If you mess up or want to change a symbol, simply cover the pin with another layer of white out and try again.
Now we move to the board itself. Attach your map to the cork board with pins or clamps. If your map is larger than the board, wrap the unwanted part of the map behind the board so it is out of the way. Hang the board on the wall, or use an easel like me.
You may use satellite imagery as shown here, blown up and printed off, or an actual map. If you’re in a rural area, your map should have grid lines on it to make it easy to report positions of units. In an urban area, a street map will do. You can add your own coordinate system to a street map to further obscure radio traffic.
The next step is to make a pin board to store the pins you just marked where you can easily use them. I made this using 5 layers of scrap cardboard held together with duct tape.
Note the duct tape tab at the top. That is there so I can hang this on the map board.
Once the pin board is made stick your pins into it in an organized manner. I separated mine by butting different unit types on different rows. Do whatever you want, as long as it’s organized so you can quickly find what you want.
Yellow pins are for unknown forces and are therefore left blank.
Now your board is ready for battle tracking. In part 2, I will share one way to receive combat reports and clearly mark them on the board.